
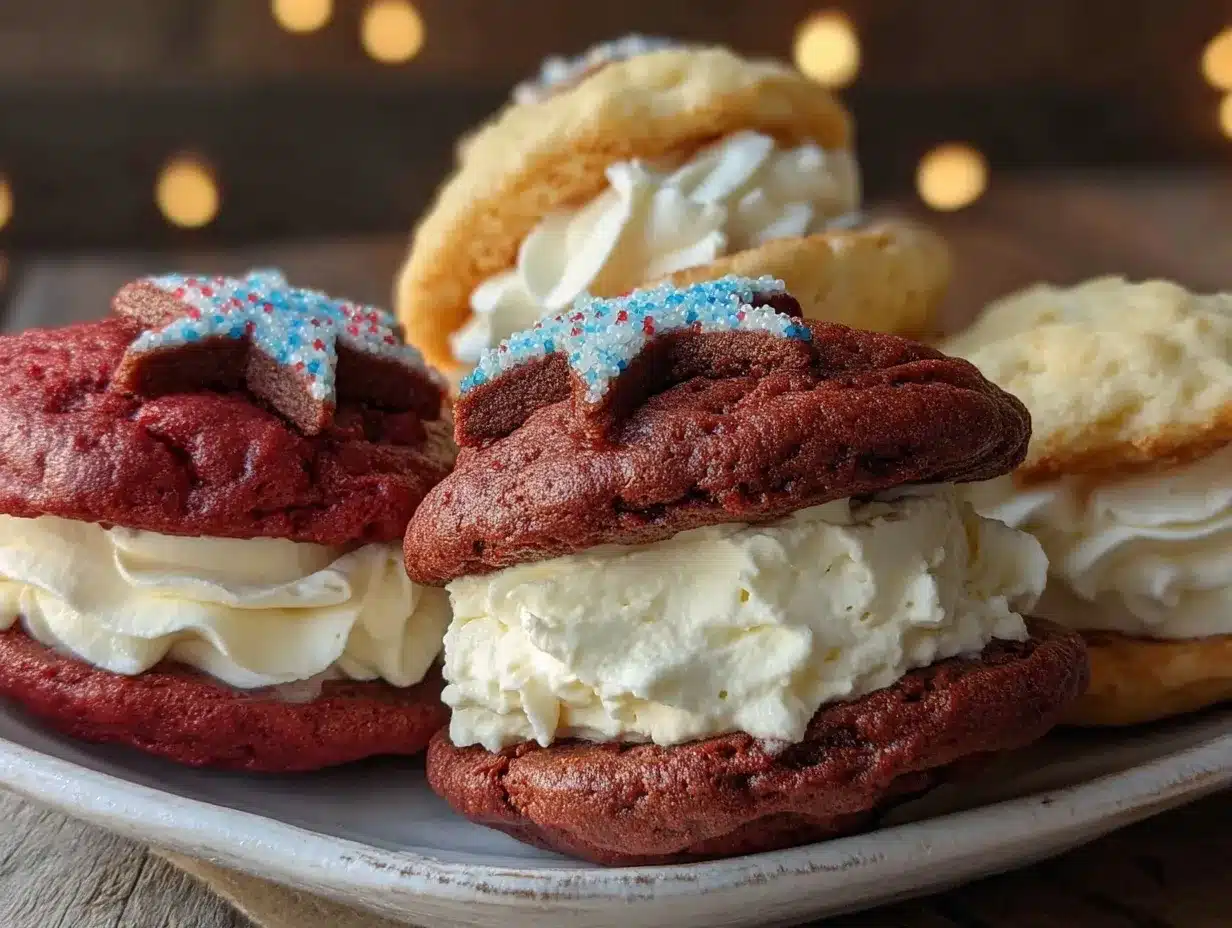
“You’ve got to try these star-shaped whoopie pies for the Fourth,” my neighbor called out, waving a plate through the fence. I was skeptical at first—red, white, and blue whoopie pies? Star-shaped? Marshmallow cream filling? It sounded like a dessert screaming for attention, maybe a little too kitschy for my usual taste. But that summer afternoon, with the scent of freshly mown grass and the distant hum of fireworks practice, I found myself reaching for one anyway.
The moment I bit into that soft, pillowy cake sandwich bursting with sweet marshmallow cream, all doubts melted away. Honestly, it was like a little burst of celebration in every bite—airy yet satisfying, playful but not over-the-top. Since then, I’ve made the Perfect Red White and Blue Star Whoopie Pies with Marshmallow Cream more times than I can count, especially around patriotic holidays or any time I want a fun, crowd-pleasing treat that’s a bit different from the usual cupcakes or cookies.
These whoopie pies have become my go-to for when I want to impress without pulling out the fancy piping bags or complicated decorations. Plus, watching folks’ faces light up when they realize these are homemade? Priceless. It’s funny how something so simple—just a few colors and a fluffy filling—can turn a backyard gathering into a memory. I guess that’s the quiet magic of this recipe, and why it’s stuck around in my kitchen rotation.
Why You’ll Love This Recipe
After testing and tweaking this recipe over several holiday weekends, it’s become clear why these star whoopie pies are a hit. From the way the marshmallow cream filling holds its shape without being too stiff, to the soft but sturdy cake that keeps everything together, this recipe is a keeper. Here’s why it might just be your new favorite for patriotic celebrations or any festive occasion:
- Quick & Easy: The batter whips up in about 15 minutes, and baking takes just 10-12 minutes per batch—perfect for last-minute plans or busy weeknights.
- Simple Ingredients: No need to hunt for obscure spices or specialty items. Most of these are pantry staples you probably already have, like all-purpose flour, cocoa powder, and marshmallow fluff.
- Perfect for Patriotic Parties: These star-shaped whoopie pies fit right in at Fourth of July barbecues, Memorial Day picnics, or even a fun summer birthday bash.
- Crowd-Pleaser: Kids and adults alike can’t get enough of the soft cake and sweet marshmallow cream combo. They’re not too sweet, just the right balance.
- Unbelievably Delicious: The slight cocoa flavor in the red and blue cookies plays beautifully against the vanilla sweetness of the marshmallow cream. Trust me, you’ll close your eyes after the first bite.
What sets this recipe apart is the attention to texture and color balance. The star shape isn’t just decorative—it helps these treats stand out on a platter, and the marshmallow cream isn’t your standard frosting. It’s fluffy and light, but just sticky enough to hold those sandwich halves together without messiness. I’ve tried other fillings—cream cheese, buttercream—but this marshmallow cream keeps things feeling fresh and festive.
Honestly, there’s something about these whoopie pies that brings a smile even before the first bite. They’re a sweet little celebration on their own, and I think you’ll find the same once you make them for your next get-together.
What Ingredients You Will Need
This recipe relies on straightforward, wholesome ingredients that come together to create a playful yet satisfying flavor profile. The red and blue star cakes are subtly chocolatey and the marshmallow cream filling is dreamy and smooth. Here’s what you’ll want on hand:
- For the Cake:
- All-purpose flour (2 cups / 240 g) – the base for the soft cake texture
- Cocoa powder (1/4 cup / 25 g), unsweetened – adds gentle chocolate flavor
- Baking powder (1 tsp) and baking soda (1/2 tsp) – leavening agents for fluffiness
- Salt (1/4 tsp) – balances sweetness
- Granulated sugar (1 cup / 200 g) – sweetens the cake
- Unsalted butter (1/2 cup / 113 g), softened – adds richness and moisture (I usually reach for Land O’Lakes for consistent softness)
- Large eggs (2), room temperature – bind everything together
- Whole milk (3/4 cup / 180 ml), room temperature – keeps the batter smooth
- Vanilla extract (1 tsp) – enhances flavor
- Red and blue gel food coloring – choose gel for vibrant color without thinning the batter
- For the Marshmallow Cream Filling:
- Marshmallow fluff (1 cup / 230 g) – the star of the filling
- Unsalted butter (1/4 cup / 57 g), softened – adds creaminess
- Powdered sugar (1 cup / 120 g), sifted – sweetens and thickens the filling
- Vanilla extract (1 tsp) – flavor enhancer
- Pinch of salt – balances sweetness
If you want to swap milk for a non-dairy alternative like almond or oat milk, that works just fine and keeps the texture tender. For a gluten-free option, use a 1-to-1 gluten-free flour blend, but be aware the texture might be a bit different. Also, when it comes to food coloring, gel types like AmeriColor give you those rich red and blue tones without making the batter runny.
Equipment Needed
To make these star-shaped whoopie pies, you don’t need a ton of fancy gear, but a few tools will make the process smoother and your results prettier.
- Mixing Bowls: One large bowl for the dry ingredients and another for wet ingredients keeps things tidy.
- Electric Mixer: A hand or stand mixer helps cream the butter and sugar properly and whip your marshmallow filling to fluffy perfection.
- Star-Shaped Cookie Cutter: About 3 inches wide is ideal. If you don’t have a star cutter, you can carefully shape rounds or use a silicone star mold.
- Baking Sheets: Two or three, preferably rimmed, to hold your whoopie pie halves.
- Parchment Paper or Silicone Baking Mats: Prevents sticking and helps with even baking.
- Cooling Rack: Essential for letting your whoopie pie halves cool evenly without sogginess.
- Offset Spatula or Butter Knife: For spreading the marshmallow cream filling evenly.
Personally, I’ve found using a silicone baking mat is a game-changer—it cuts down on cleanup and the cakes slide right off. If you’re on a budget, parchment paper works just as well and can be reused a couple of times. For the star cutter, I grabbed mine from a local kitchen store, but online options are plentiful. Keep it sharp and clean for clean edges.
Preparation Method
- Prep Your Oven and Baking Sheets (10 minutes): Preheat your oven to 350°F (175°C). Line two baking sheets with parchment paper or silicone mats.
- Mix Dry Ingredients (5 minutes): In a large bowl, sift together 2 cups (240 g) all-purpose flour, 1/4 cup (25 g) cocoa powder, 1 tsp baking powder, 1/2 tsp baking soda, and 1/4 tsp salt. Set aside.
- Cream Butter and Sugar (5 minutes): Using an electric mixer, beat 1/2 cup (113 g) softened unsalted butter with 1 cup (200 g) granulated sugar until light and fluffy, about 3-4 minutes. This step is key for a tender crumb.
- Add Eggs and Vanilla (2 minutes): Beat in 2 large eggs, one at a time, then stir in 1 tsp vanilla extract.
- Alternate Adding Dry Ingredients and Milk (4 minutes): Gradually add the dry ingredients in three parts, alternating with 3/4 cup (180 ml) whole milk, beginning and ending with dry ingredients. Mix on low speed just until combined. Overmixing can make the cake tough.
- Divide and Color the Batter (3 minutes): Split the batter evenly into three bowls. Add red gel food coloring to one bowl and blue gel coloring to another, mixing until you get rich, vivid colors. Leave the third bowl plain for the white stars (or keep it very light with a tiny drop of vanilla for contrast).
- Chill the Batter (Optional, 15 minutes): If your batter feels too runny for cutting shapes, chilling it briefly in the fridge helps it firm up for easier handling.
- Roll and Cut Stars (15 minutes): Lightly flour your work surface and roll out each colored batter between two sheets of parchment paper to about 1/4 inch (6 mm) thickness. Use your star cutter to cut out as many stars as possible, placing them on the prepared baking sheets with about 1 inch (2.5 cm) space between.
- Bake (10-12 minutes): Bake in the preheated oven until the edges are set and a toothpick inserted comes out clean. Times may vary slightly based on your oven.
- Cool Completely (20 minutes): Transfer the stars to a cooling rack to cool fully before filling. This prevents the marshmallow cream from melting.
- Make the Marshmallow Cream Filling (10 minutes): In a mixing bowl, beat 1/4 cup (57 g) softened unsalted butter until smooth. Add 1 cup (230 g) marshmallow fluff, 1 cup (120 g) sifted powdered sugar, 1 tsp vanilla extract, and a pinch of salt. Beat until fluffy and spreadable.
- Assemble the Whoopie Pies (10 minutes): Match similarly sized star halves. Spread about 1 tablespoon (15 g) of marshmallow cream on the flat side of one star, then sandwich with another. Press gently to spread the filling to the edges.
- Chill Before Serving (Optional, 30 minutes): Pop the assembled whoopie pies in the fridge for a bit so the filling firms up slightly for easier handling and prettier presentation.
Keep an eye on the baking times; overbaking can dry out these tender cakes, and underbaking leaves them too soft to hold their shape. When rolling out the batter, flour your rolling pin lightly to prevent sticking but avoid adding too much flour or the cakes can become dense.
Cooking Tips & Techniques
Whoopie pies are deceptively simple, but a few tricks can make a big difference. First, don’t rush the creaming of butter and sugar. This step traps air, which gives you that soft, light texture. I learned this the hard way after a batch turned out a bit dense and flat.
When coloring your batter, gel food coloring works best because it won’t thin out the batter like liquid colors do. If you only have liquid, add it sparingly. Also, chilling the batter for 15 minutes before rolling helps it hold the star shapes better, especially in warm kitchens.
Cutting perfect stars can be tricky. I recommend using a sharp cookie cutter and pressing straight down without twisting to keep edges clean. If your cutter sticks, dip it in flour between uses.
For the marshmallow cream, beating the butter first until smooth makes the mixing easier and the final filling fluffier. Don’t skip sifting the powdered sugar—it keeps the texture silky without lumps.
Timing is key. Since the cakes bake quickly, prep your filling while they cool to streamline the process. Also, assembling the whoopie pies when the cake is completely cooled prevents the filling from melting or sliding off.
Variations & Adaptations
Feeling adventurous? Here are some tasty twists and dietary swaps to make these star whoopie pies your own.
- Flavor Variations: Swap cocoa powder for pumpkin spice or cinnamon for a fall-inspired version. You can also add a teaspoon of almond extract to the filling for a nutty depth.
- Dietary Adaptations: Use gluten-free flour blends for a gluten-free treat. For dairy-free, swap butter for vegan margarine and milk for almond or oat milk. The marshmallow fluff can be replaced with dairy-free marshmallow cream available in specialty stores.
- Cooking Method: Instead of rolling and cutting, you can pipe rounds of batter onto baking sheets and then sandwich with marshmallow cream for a quicker, rustic approach.
- Festive Fillings: Mix in a few tablespoons of raspberry jam into the marshmallow cream for a fruity pop that pairs beautifully with the cocoa-flavored cakes.
I once made a batch with a swirl of homemade savory bacon jam tucked inside the filling for a surprising sweet-savory combo that blew guests away. Not traditional, but definitely unforgettable!
Serving & Storage Suggestions
These whoopie pies are best served at room temperature so the marshmallow cream is soft and gooey. Arrange them on a festive platter to show off their star shapes and vibrant colors. They pair nicely with cold lemonade or iced tea at backyard barbecues.
Store leftover whoopie pies in an airtight container at room temperature for up to 2 days. For longer storage, refrigerate for up to 5 days or freeze for up to 2 months. When freezing, wrap each pie individually in plastic wrap to keep the marshmallow cream fresh.
To reheat, let frozen whoopie pies thaw in the fridge overnight, then bring to room temperature before serving. You can warm them gently in a low oven (around 300°F/150°C) for 5 minutes if you want that just-baked softness back.
Interestingly, the flavors tend to meld and deepen after a day, so if you can wait, these are even better the next day. Just make sure to give them a gentle fluff with a fork if the filling firms up too much in the fridge.
Nutritional Information & Benefits
Each star whoopie pie contains approximately 220 calories, with 8 grams of fat, 32 grams of carbohydrates, and 2 grams of protein. The moderate portion size makes it a manageable indulgence for celebrations.
Using unsweetened cocoa powder adds antioxidants, and the marshmallow cream filling is lower in fat than typical buttercream frostings. If you swap in non-dairy milk and butter alternatives, you can tailor the recipe for vegan or dairy-free diets.
Keep in mind these treats do contain gluten, dairy, and eggs, so they’re not suitable for all allergies. However, with ingredient swaps, you can make versions that fit various dietary needs without losing much of the magic.
Conclusion
The Perfect Red White and Blue Star Whoopie Pies with Marshmallow Cream have earned a permanent spot among my favorite festive desserts. They’re playful, approachable, and reliably delicious. Whether you’re hosting a big party or just want a quick, fun way to celebrate summer, these whoopie pies deliver smiles every time.
Feel free to play around with the colors, fillings, or shapes—this recipe is flexible enough to handle your creativity. I love how these pies bring a little extra joy to the table without fuss or stress.
If you give them a try, let me know how you customize them or what occasion you made them for. Sharing recipes and stories is what keeps the kitchen lively, right? Here’s to many happy, starry bites ahead!
FAQs
- Q: Can I make the whoopie pies ahead of time?
A: Yes! You can bake the cakes and prepare the filling up to a day in advance. Assemble just before serving for best freshness. - Q: What if I don’t have a star-shaped cutter?
A: You can use a round cookie cutter or even pipe small rounds of batter for a rustic version. The shape is fun but not essential. - Q: How do I prevent the marshmallow cream from oozing out?
A: Make sure the cakes are fully cooled before filling, and chill the assembled pies for 30 minutes to firm up the filling. - Q: Can I use natural food coloring?
A: Natural colors tend to be less vibrant and may affect batter consistency. Gel food coloring is best for bright, bold colors. - Q: How do I store leftover whoopie pies?
A: Store them in an airtight container at room temperature for 2 days or refrigerate up to 5 days. Freeze for longer storage with individual wrapping.
For a fun twist on handheld party snacks, you might also enjoy the quick cheesy mug pizza recipe or the sweet-savory balance of savory bacon jam to complement your dessert spread.
Pin This Recipe!

Perfect Red White and Blue Star Whoopie Pies with Marshmallow Cream

These star-shaped whoopie pies feature soft, subtly chocolatey cakes in red, white, and blue colors, sandwiched with a fluffy marshmallow cream filling. Perfect for patriotic celebrations and easy to make with simple ingredients.
- Prep Time: 15 minutes
- Cook Time: 12 minutes
- Total Time: 37 minutes
- Yield: 12 servings 1x
- Category: Dessert
- Cuisine: American
Ingredients
- 2 cups (240 g) all-purpose flour
- 1/4 cup (25 g) unsweetened cocoa powder
- 1 tsp baking powder
- 1/2 tsp baking soda
- 1/4 tsp salt
- 1 cup (200 g) granulated sugar
- 1/2 cup (113 g) unsalted butter, softened
- 2 large eggs, room temperature
- 3/4 cup (180 ml) whole milk, room temperature
- 1 tsp vanilla extract
- Red gel food coloring
- Blue gel food coloring
- 1 cup (230 g) marshmallow fluff
- 1/4 cup (57 g) unsalted butter, softened (for filling)
- 1 cup (120 g) powdered sugar, sifted
- 1 tsp vanilla extract (for filling)
- Pinch of salt (for filling)
Instructions
- Preheat oven to 350°F (175°C). Line two baking sheets with parchment paper or silicone mats.
- In a large bowl, sift together flour, cocoa powder, baking powder, baking soda, and salt. Set aside.
- Using an electric mixer, beat 1/2 cup softened unsalted butter with granulated sugar until light and fluffy, about 3-4 minutes.
- Beat in eggs one at a time, then stir in 1 tsp vanilla extract.
- Gradually add dry ingredients in three parts, alternating with milk, beginning and ending with dry ingredients. Mix on low speed just until combined.
- Divide batter evenly into three bowls. Add red gel food coloring to one, blue gel to another, and leave the third plain or very lightly colored.
- Optional: Chill batter for 15 minutes if too runny for cutting shapes.
- Lightly flour work surface and roll out each colored batter between parchment sheets to about 1/4 inch thickness.
- Use a 3-inch star-shaped cookie cutter to cut out stars and place on prepared baking sheets about 1 inch apart.
- Bake for 10-12 minutes until edges are set and a toothpick comes out clean.
- Cool stars completely on a cooling rack before filling.
- To make filling, beat 1/4 cup softened butter until smooth. Add marshmallow fluff, powdered sugar, vanilla extract, and salt. Beat until fluffy and spreadable.
- Match similarly sized star halves. Spread about 1 tablespoon of marshmallow cream on one star and sandwich with another. Press gently to spread filling to edges.
- Optional: Chill assembled whoopie pies for 30 minutes to firm up filling before serving.
Notes
Use gel food coloring for vibrant colors without thinning the batter. Chill batter if too runny for easier cutting. Beat butter and sugar thoroughly for a light cake texture. Assemble pies only after cakes are fully cooled to prevent filling from melting. Store leftovers in airtight container at room temperature for 2 days or refrigerate up to 5 days. Freeze wrapped individually for up to 2 months.
Nutrition
- Serving Size: 1 star whoopie pie
- Calories: 220
- Fat: 8
- Carbohydrates: 32
- Protein: 2
Keywords: whoopie pies, patriotic dessert, red white and blue, marshmallow cream, star-shaped cookies, Fourth of July dessert, easy dessert, holiday treats


