“I swear, this cake almost didn’t happen.” That’s what I told my friend as I stared at a bowl of buttercream that looked more like a blob of pink paint than the delicate ombre petals I’d imagined. Honestly, the whole idea of crafting a Perfect Gradient Petal Buttercream Graduation Cake in Ombre Pink to Gold started on a whim during a late-night scroll through cake inspiration boards. I wasn’t even sure if the gold shimmer would cooperate or if the gradient would blend smoothly enough to look anything close to elegant.
But you know what? After a couple of tries (and a fair share of messy frosting-covered fingers), the magic kicked in. The moment I piped that first petal and saw the colors melt into each other — from soft pinks to a subtle blush, and finally that warm, glowing gold — it felt like the cake was telling a story all on its own. It wasn’t just a graduation cake anymore; it was a statement, a celebration of growth and transformation.
What stuck with me most was how this cake became my little comfort project during a chaotic week. The act of layering those petals, watching the colors shift, was oddly calming. And now, when I see someone’s face light up at the sight of this cake, I realize why it’s worth every piped petal and golden brushstroke. There’s something quietly joyful about how this design captures both the excitement of a milestone and the softness of a cherished memory.
Why You’ll Love This Recipe
After repeatedly testing this gradient petal buttercream technique, I can say this recipe is a keeper for anyone wanting a show-stopping graduation cake with a personal touch. It’s been refined enough to be approachable but still delivers that wow factor you want for special occasions. Here’s why it stands apart:
- Quick & Easy: The buttercream whips up in under 15 minutes, and the petal technique is surprisingly forgiving, perfect for last-minute celebratory baking.
- Simple Ingredients: No need for exotic supplies — just pantry staples and a few food colorings to get that dreamy ombre effect.
- Perfect for Graduation or Any Celebration: The pink-to-gold gradient adds a touch of glamour that suits both formal and casual gatherings.
- Crowd-Pleaser: Beyond looks, the buttercream has a perfectly balanced sweetness and buttery texture that gets compliments every time.
- Unbelievably Delicious: The golden shimmer isn’t just for show — it’s edible luster dust that adds a subtle, elegant finish without overpowering the flavor.
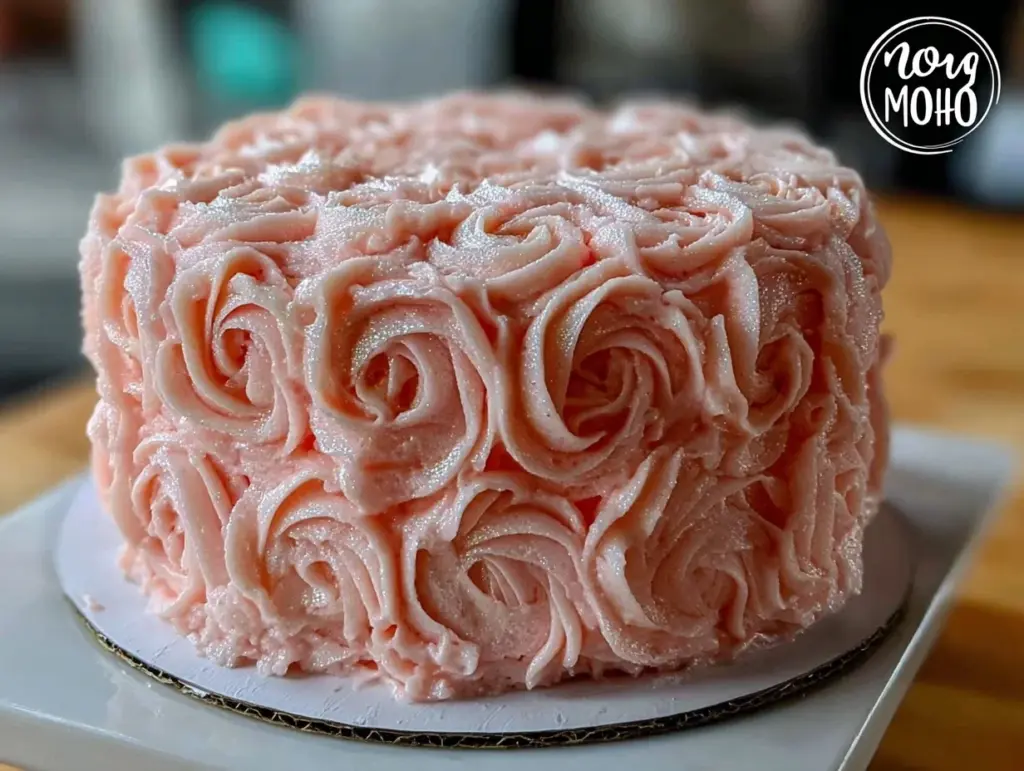
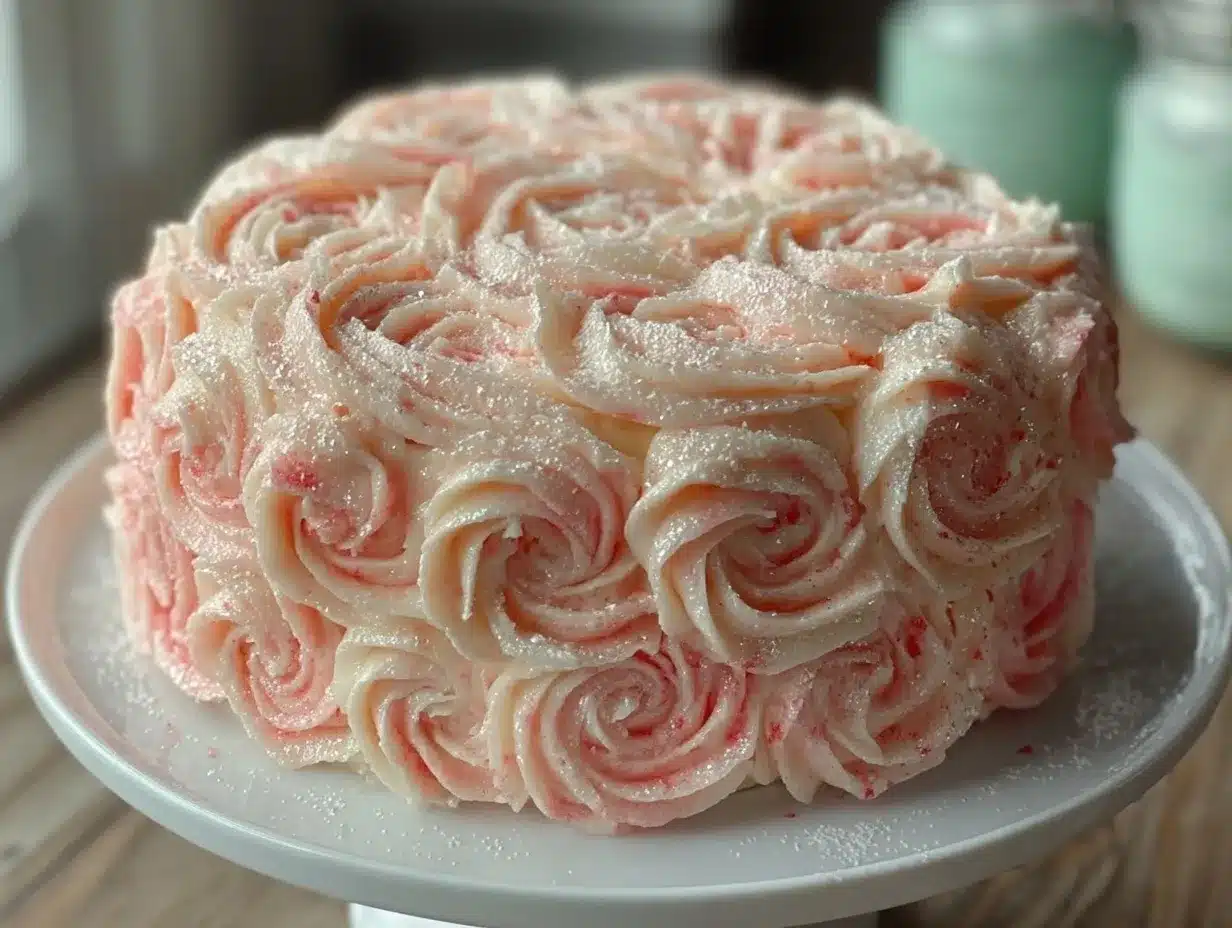
This isn’t just another buttercream cake. The trick is in the layering of tinted buttercream shades, carefully applied with a petal piping tip to create a soft, dimensional gradient. I’ve found that using a blend of gel colors rather than liquid food coloring helps keep the frosting stable and vibrant. Plus, brushing on edible gold dust at the end gives it a delicate shimmer that feels both festive and refined — the kind of detail that makes people remember your cake.
Honestly, this cake became my go-to when I wanted to impress friends without diving into complicated fondant work. It’s approachable, forgiving, and perfect if you’re comfortable with basic piping but want to try something a little more special than a plain frosted cake. If you’re curious about buttercream techniques, this recipe will give you confidence and beautiful results.
What Ingredients You Will Need
This recipe uses simple, wholesome ingredients to deliver a vivid gradient effect and a luscious buttercream texture without fuss. Most items are pantry staples, and the color is all about layering small amounts of gel food colorings rather than tons of dye.
- Unsalted Butter, softened (about 2 cups or 450g) – the base for a creamy, smooth buttercream. I prefer Plugrá or Kerrygold for their rich flavor.
- Powdered Sugar (4–5 cups or 480–600g), sifted – for sweetness and structure.
- Vanilla Extract (2 teaspoons) – adds depth without overpowering.
- Heavy Cream or whole milk (2–4 tablespoons or 30–60ml) – helps adjust the consistency for piping.
- Gel Food Colors:
- Soft pink (start with 1/8 teaspoon)
- Deeper rose pink (about 1/4 teaspoon)
- Gold shimmer dust (edible, for brushing on finished petals)
- Optional: A pinch of salt to balance sweetness.
Substitution tip: Use dairy-free butter and coconut cream if you want a vegan version, but keep in mind that the texture might differ slightly. For a gluten-free option, this recipe is naturally safe since it contains no flour.
When selecting your gel colors, go for brands like AmeriColor or Wilton — they blend well without thinning the frosting. If you want a stronger gold effect, layering edible gold leaf or adding a touch of copper luster dust can enhance the shimmer.
Equipment Needed
- Stand Mixer or Hand Mixer: Vital for whipping the buttercream to a silky, fluffy texture. I use a KitchenAid stand mixer but a powerful hand mixer works fine.
- Offset Spatula: For smoothing the crumb coat and final layers.
- Large Piping Bags: To hold different tinted buttercream shades. Disposable ones are fine; I recommend reusable silicone bags for less waste.
- Petal Piping Tips: Size #103 or #104 is perfect for those delicate petal shapes. If you don’t have these, a small leaf tip can work but results will vary.
- Bench Scraper or Cake Smoother: Helpful for smoothing sides before piping petals but optional.
- Small Paintbrush: For applying edible gold dust on the final petals. A soft, food-safe brush makes a huge difference.
If you’re on a budget, silicone spatulas and disposable piping bags are inexpensive and get the job done well. Using a turntable for your cake is also a big help for steady, even petal placement, but you can carefully do it by hand if needed.
Pro tip: Keep your tools dry and free of grease for best buttercream hold and crisp petal edges. I learned the hard way that even a slightly greasy tip ruins those clean lines.
Preparation Method
- Make the Buttercream: In your stand mixer bowl, beat 2 cups (450g) softened unsalted butter on medium speed for about 3 minutes until creamy and pale.
Add 4 cups (480g) sifted powdered sugar gradually, mixing on low until incorporated, then increase speed to medium-high and whip for 4–5 minutes.
Mix in 2 teaspoons vanilla extract and 2 tablespoons (30ml) heavy cream. Adjust with more cream if needed for piping consistency. The buttercream should be fluffy but hold its shape. - Divide and Tint Buttercream: Split the buttercream into 4 bowls. Leave one plain (for the lightest shade). In the others, mix gel food coloring to create a gradient: very pale pink, soft rose, and deep pink. Use tiny amounts—start with 1/8 teaspoon and gradually add more for deeper hues.
Remember, the color will soften when piped, so don’t overdo it. - Prepare Cake Base: Your cake layers should be fully cooled and leveled. Apply a thin crumb coat of plain buttercream all over the cake using an offset spatula. Chill in the fridge for 20–30 minutes to firm up.
- Fill Piping Bags: Fit your petal piping tips (#103 or #104) into large piping bags and fill each with one shade of buttercream. Twist the top to prevent air bubbles.
- Pipe the Petals: Starting at the base of the cake, pipe petals by squeezing the bag gently while moving it side to side to form a teardrop shape — narrow end facing inward, wide end outward.
Use the lightest pink at the bottom, then gradually switch to deeper shades as you move upward, finishing with the gold-tinted buttercream near the top.
Overlap each petal slightly for a full, layered look.
Keep a damp cloth nearby to clean your tip between color changes if necessary. - Add Gold Shimmer: After piping, let the cake chill for about 15 minutes to set the petals.
Using a soft food-safe brush, lightly dust edible gold luster dust over the top petals and edges for that perfect golden glow.
Tip: Apply gently to avoid smudging the petal shapes. - Final Touches: Inspect the cake for any gaps or uneven petals and fill in as needed.
Store the cake in a cool place until serving.
Time-wise, the full process including chilling takes about 1.5 to 2 hours, but most of that is hands-off chilling. I find piping petals is meditative once you get into the rhythm.
Cooking Tips & Techniques
One thing I learned fast is that temperature control is key. Buttercream that’s too warm becomes runny and won’t hold petal shapes well. If your kitchen is on the warmer side, pop the buttercream in the fridge for 5 minutes to firm up before piping.
Another tip is to keep your piping pressure steady. Inconsistent pressure can cause petals to look uneven or misshapen. Practice on parchment paper first if you’re new to petal piping.
When blending your ombre colors, less is more. It’s tempting to add a lot of color to get bold shades, but heavy-handed gel coloring can break the buttercream texture. Tiny dots blended in slowly give you better control.
Also, don’t rush the layering. Overlapping the petals slightly creates that full, 3D flower effect that makes this cake so stunning. If you find your petals sticking together, chilling the cake for a few minutes between layers helps.
Finally, I can’t recommend enough brushing on edible gold dust at the end. It adds just the right amount of sparkle without being over the top. I once skipped this step, and honestly, the cake felt a bit flat somehow.
Variations & Adaptations
This cake design is surprisingly versatile. Here are some ways you can make it your own or adjust for different occasions:
- Seasonal Colors: Swap the pinks for blues and silvers for a winter graduation or soft lavender to peach for spring. The petal technique works beautifully with any gradient.
- Dietary Tweaks: Use vegan butter and plant-based cream for a dairy-free version. I’ve had success with Earth Balance and canned coconut milk as cream substitutes.
- Flavor Infusions: Add citrus zest (like lemon or orange) to your buttercream for a fresh twist. A splash of rose water can also complement the pink-gold theme.
- Different Cake Shapes: This petal piping technique works on round, square, or even heart-shaped cakes. Just adjust your petal placement to fit the shape.
- Gold Leaf Accent: For a luxe upgrade, add edible gold leaf flakes sparingly on top of the petals for extra shine and texture.
Personally, I once tried a dusty mauve to copper ombre for a friend’s birthday and loved how the warmer tones gave the cake a cozy, autumnal feel. It’s fun to experiment with colors that speak to the season or event.
Serving & Storage Suggestions
Serve this cake chilled or at room temperature. I find the buttercream tastes best after sitting out 20–30 minutes so it’s soft and silky on the tongue. It pairs wonderfully with a light, refreshing beverage like sparkling floral lemonade or a delicate rosé.
If you have leftovers, wrap the cake tightly with plastic wrap and keep it in the refrigerator for up to 3 days. The buttercream maintains its texture well but can firm up, so allow it to warm slightly before serving again.
For longer storage, you can freeze the cake for up to 2 weeks. Freeze uncovered for an hour first to set the buttercream, then wrap in several layers of plastic wrap and a freezer bag. Thaw overnight in the fridge and bring to room temperature before serving.
Over time, the gold dust may fade a bit in the fridge, so touching up with a light brush of gold right before serving helps keep that fresh, shimmered look.
Nutritional Information & Benefits
While this cake is definitely a treat, here’s a rough breakdown per slice (assuming 12 slices):
| Nutrient | Amount |
|---|---|
| Calories | 350–400 kcal |
| Fat | 22–25g |
| Sugar | 35–40g |
| Protein | 3–4g |
The unsalted butter supplies rich fats and vitamin A, while the powdered sugar is the main source of carbs. This recipe is naturally gluten-free, which is great for those with gluten sensitivities.
From a wellness perspective, I like to enjoy this cake mindfully as a celebratory indulgence. The balance of sweetness and real butter flavor makes it feel like a rewarding treat rather than just sugar overload.
Conclusion
Making the Perfect Gradient Petal Buttercream Graduation Cake in Ombre Pink to Gold has become one of those little rituals I turn to when I want to create something beautiful and meaningful without fuss. It’s a recipe that invites you to slow down, focus on the layering of color and texture, and end up with a cake that feels like a gift in itself.
Feel free to tweak the shades, try different flavor infusions, or add your own personal sparkle. This buttercream cake is as much about the process as the result — a sweet celebration of milestones and memories.
If you try this recipe, I’d love to hear how your petal gradients turned out or any creative spins you added. Sharing those moments makes the whole experience even sweeter.
Here’s to many more layered celebrations and golden moments in your kitchen!
FAQs
- Can I use regular liquid food coloring instead of gel? Liquid colors can thin the buttercream and affect texture, so gel food coloring is best for vibrant, stable shades.
- How do I fix buttercream that’s too soft for piping petals? Chill it briefly in the fridge (5–10 minutes) and then whip again for a minute to firm it up.
- What if I don’t have a petal piping tip? A small leaf tip can work, or you can pipe teardrop shapes freehand with a round tip, but the petals won’t have the same delicate curve.
- Can I make this cake a day ahead? Yes! Just cover it well and keep refrigerated. Bring to room temperature before serving for the best texture.
- Is edible gold dust safe to eat? Yes, edible gold dust is food-grade and safe when used as directed. Avoid using non-edible luster dusts.
For those curious about other quick and delicious recipes to serve alongside your cake, the easy cheesy mug pizza is a fun savory snack, or for a sweet breakfast treat the fluffy blueberry lemon scones make a lovely pairing. Both come together quickly and satisfy those cravings with minimal fuss.
Pin This Recipe!
Perfect Gradient Petal Buttercream Graduation Cake Easy Ombre Pink to Gold Tutorial

A stunning graduation cake featuring a delicate ombre gradient of pink to gold buttercream petals, perfect for celebrating milestones with elegance and a personal touch.
- Prep Time: 15 minutes
- Cook Time: 1 hour 30 minutes
- Total Time: 1 hour 45 minutes
- Yield: 12 servings 1x
- Category: Dessert
- Cuisine: American
Ingredients
- 2 cups (450g) unsalted butter, softened
- 4–5 cups (480–600g) powdered sugar, sifted
- 2 teaspoons vanilla extract
- 2–4 tablespoons (30–60ml) heavy cream or whole milk
- Gel food colors: soft pink (start with 1/8 teaspoon), deeper rose pink (about 1/4 teaspoon)
- Edible gold shimmer dust for brushing on finished petals
- Optional: pinch of salt to balance sweetness
Instructions
- Make the Buttercream: Beat 2 cups (450g) softened unsalted butter on medium speed for about 3 minutes until creamy and pale. Gradually add 4 cups (480g) sifted powdered sugar, mixing on low until incorporated, then whip on medium-high for 4–5 minutes. Mix in 2 teaspoons vanilla extract and 2 tablespoons (30ml) heavy cream. Adjust with more cream if needed for piping consistency. The buttercream should be fluffy but hold its shape.
- Divide and Tint Buttercream: Split the buttercream into 4 bowls. Leave one plain for the lightest shade. In the others, mix gel food coloring to create a gradient: very pale pink, soft rose, and deep pink. Use tiny amounts—start with 1/8 teaspoon and gradually add more for deeper hues.
- Prepare Cake Base: Ensure cake layers are fully cooled and leveled. Apply a thin crumb coat of plain buttercream all over the cake using an offset spatula. Chill in the fridge for 20–30 minutes to firm up.
- Fill Piping Bags: Fit petal piping tips (#103 or #104) into large piping bags and fill each with one shade of buttercream. Twist the top to prevent air bubbles.
- Pipe the Petals: Starting at the base of the cake, pipe petals by squeezing the bag gently while moving it side to side to form a teardrop shape with the narrow end facing inward and wide end outward. Use the lightest pink at the bottom, then gradually switch to deeper shades as you move upward, finishing with the gold-tinted buttercream near the top. Overlap each petal slightly for a full, layered look. Keep a damp cloth nearby to clean your tip between color changes if necessary.
- Add Gold Shimmer: After piping, chill the cake for about 15 minutes to set the petals. Using a soft food-safe brush, lightly dust edible gold luster dust over the top petals and edges for a golden glow. Apply gently to avoid smudging the petal shapes.
- Final Touches: Inspect the cake for any gaps or uneven petals and fill in as needed. Store the cake in a cool place until serving.
Notes
Keep tools dry and grease-free for best buttercream hold and crisp petal edges. Chill buttercream briefly if too soft for piping. Practice steady piping pressure for even petals. Use gel food coloring for stable, vibrant shades. Overlap petals slightly for a full 3D effect. Brush edible gold dust gently to avoid smudging. Cake can be made a day ahead and stored refrigerated; bring to room temperature before serving. For vegan version, use dairy-free butter and coconut cream but texture may vary.
Nutrition
- Serving Size: 1 slice (1/12 of cak
- Calories: 375
- Sugar: 37.5
- Sodium: 50
- Fat: 23.5
- Saturated Fat: 15
- Carbohydrates: 38
- Protein: 3.5
Keywords: graduation cake, buttercream cake, ombre cake, petal piping, pink and gold cake, edible gold dust, celebration cake, easy buttercream recipe


