
“Hey, can you make those cute little berry pies again? The ones with the stars on top?” My neighbor’s kid had just hopped off his bike and plopped down on our porch steps, eyes wide with expectation. Honestly, I wasn’t even planning on baking that day—just a quick snack run—but you know how it goes. One thing led to another, and suddenly I was rolling out dough, humming a tune, and thinking about how those Easy Patriotic Berry Hand Pies with Star-Shaped Cutouts have become this low-key tradition around here.
Truth be told, these pies started out as a bit of a happy accident. I had some leftover mixed berries, a bit of pie dough from a rushed grocery run, and a vague idea to make something festive for a last-minute summer get-together. I wasn’t sure if the hand pies would hold up or if the star cutouts would even stay put, but as soon as that first warm pie came out of the oven, everything changed. The flaky crust, the sweet-tart berry filling, and those little star-shaped windows? They just clicked.
Since then, I’ve probably baked these Easy Patriotic Berry Hand Pies with Star-Shaped Cutouts more times than I can count—each batch a little sweeter, a little prettier. They’re perfect for when you want a bite-sized dessert that looks like it took way more effort than it actually did (trust me, your guests will be impressed). And the best part? You don’t need to be a pie pro to pull these off. Just a few pantry staples, a bit of patience, and you’ll have a snack that feels like a celebration in every bite. Funny how something so simple can turn into the star of the summer snack table, right?
So, if you’re curious about making these charming little hand pies that bring a burst of red, white, and blue to your kitchen, stick around. I’ll share everything I’ve learned from trial, error, and plenty of happy taste tests.
Why You’ll Love This Recipe
After making these Easy Patriotic Berry Hand Pies with Star-Shaped Cutouts for a handful of summers, I can honestly say they’re a hit every single time. Here’s why this recipe stands out from the crowd:
- Quick & Easy: These hand pies come together in under 45 minutes, making them perfect when you need a festive snack fast.
- Simple Ingredients: No fancy or hard-to-find items here. You likely already have pie dough, frozen or fresh berries, and a few pantry staples.
- Perfect for Summer Gatherings: Whether it’s the 4th of July, a backyard barbecue, or an afternoon picnic, these pies add a patriotic pop that everyone loves.
- Crowd-Pleaser: Kids love the handheld size and star shapes, and adults appreciate the balance of flaky crust and juicy filling.
- Unbelievably Delicious: The combination of buttery crust and sweet-tart berry filling with a hint of cinnamon is comfort food at its finest.
What really sets this recipe apart is the little detail of the star-shaped cutouts. It’s a simple technique that adds charm and allows the vibrant berry filling to peek through, giving a fresh feel to a classic hand pie. Plus, the hand pies are perfectly portioned for snacking without the mess of slicing a big pie (and trust me, that’s a game changer when you’re juggling a grill and a crowd).
These hand pies aren’t just tasty—they’re the kind of treat that makes you pause and appreciate a moment of summer sweetness. They’ve even stolen the spotlight from other favorite quick bites, like the quick cheesy mug pizza I sometimes whip up on busy nights. If you want something that looks festive but feels effortless, this recipe fits that bill perfectly.
What Ingredients You Will Need
This recipe keeps things straightforward with a few star players that bring everything together beautifully. These ingredients are mostly pantry staples, plus a handful of fresh or frozen berries depending on the season.
- Pie Dough: 1 package (about 14 oz / 400 g) refrigerated pie crusts, store-bought or homemade (I often use Pillsbury for convenience and consistent results)
- Mixed Berries: 2 cups (300 grams) fresh or frozen mixed berries (blueberries, strawberries chopped, raspberries) – fresh works best when in season, frozen is great off-season
- Sugar: 1/3 cup (65 grams) granulated sugar to sweeten the filling just right
- Lemon Juice: 1 tablespoon fresh lemon juice to brighten the berry flavors
- Cornstarch: 2 tablespoons (16 grams) cornstarch to thicken the filling and keep it from being runny
- Cinnamon: 1/2 teaspoon ground cinnamon for a subtle warm note
- Salt: A pinch, to balance the sweetness
- Egg Wash: 1 large egg, beaten with 1 tablespoon water for brushing the crust (adds that perfect golden glow)
- Turbinado Sugar (optional): A sprinkle on top before baking for a little crunch and sparkle
You can swap out the mixed berries for all blueberries or strawberries if you prefer, or even a cherry pie filling for a twist. If you want a gluten-free version, you can try a store-bought gluten-free pie crust or make your own (just watch the handling as they can be more delicate). For a vegan alternative, swap the egg wash with a plant-based milk and a tiny bit of maple syrup for color.
One quick tip: if you use frozen berries, thaw and drain them well to avoid soggy pies. Also, I like to pick small-curd cottage cheese over large for my other recipes, but that’s not needed here—just some berry goodness!
Equipment Needed
- Baking Sheet: A rimmed baking sheet lined with parchment paper to catch any drips and make cleanup easier.
- Rolling Pin: For lightly rolling out the pie dough if it needs smoothing or to adjust thickness.
- Star-Shaped Cookie Cutter: Around 1.5 to 2 inches (4-5 cm) wide for the fun cutout tops.
- Round or Square Cutter: About 3 to 4 inches (7.5 to 10 cm) in diameter for cutting the hand pie bases and tops (a small bowl or cup works in a pinch).
- Mixing Bowl: To combine the berry filling ingredients.
- Pastry Brush: For applying the egg wash—if you don’t have one, a clean kitchen brush or even a spoon back works fine.
- Cooling Rack: To let the pies cool evenly and keep the crust crisp.
If you don’t have a star-shaped cookie cutter, you can carefully cut stars freehand with a small knife or use other festive shapes. I’ve tried silicone baking mats and parchment paper for the baking sheet—both work well, but parchment tends to give the crust a slightly crisper bottom. Plus, the tools needed here are pretty common in most kitchens, so you won’t need to hunt down specialty gear. Pro tip: keep the pie dough cold until you’re ready to work with it to prevent sticking and tearing.
Preparation Method

- Prepare the Filling: In a medium mixing bowl, combine 2 cups (300 g) of mixed berries, 1/3 cup (65 g) granulated sugar, 1 tablespoon fresh lemon juice, 2 tablespoons (16 g) cornstarch, 1/2 teaspoon ground cinnamon, and a pinch of salt. Gently toss everything until the berries are evenly coated. Set aside while you prep the dough. This step takes about 5 minutes.
- Preheat the Oven: Heat your oven to 375°F (190°C). Line a baking sheet with parchment paper to prevent sticking and catch any berry juices that might bubble over.
- Roll Out the Dough: Lightly flour your work surface. Unroll the refrigerated pie crust and smooth it with a rolling pin just a bit if needed, aiming for roughly 1/8 inch (3 mm) thickness. Try to keep the dough cold but pliable—if it’s too warm, pop it in the fridge for 10 minutes. This helps prevent the dough from tearing when cutting.
- Cut the Bases: Using a 3-4 inch (7.5-10 cm) round or square cutter, cut out 8-10 shapes from the dough. Transfer these cutouts to the baking sheet, spacing them about 2 inches apart.
- Fill the Pies: Spoon about 1-2 tablespoons of the berry filling onto each dough base, leaving around 1/2 inch (1.2 cm) border to seal. Don’t overfill or the pies might burst open while baking.
- Cut the Tops with Stars: Roll out the remaining dough and use the same 3-4 inch cutter to cut out the tops. Then, using the star-shaped cookie cutter, cut a star in the center of each top piece. Carefully place these tops over the filled bases.
- Seal the Edges: Press the edges of the pies together with your fingers or the tines of a fork to seal. This keeps the filling inside and gives a nice decorative edge.
- Apply Egg Wash: Brush the pie tops lightly with the beaten egg wash (1 egg + 1 tablespoon water). This step gives the pies a gorgeous golden color and a bit of shine.
- Optional Sugar Sprinkle: For a little sparkle and crunch, gently sprinkle turbinado sugar on top of each pie.
- Bake: Place the baking sheet in the oven and bake for 25-30 minutes or until the crust is golden brown and the filling is bubbly. Keep an eye around the 20-minute mark—the pies should smell fragrant and look beautifully golden.
- Cool: Remove from the oven and transfer the pies to a cooling rack for at least 10 minutes before serving. This helps the filling set slightly so it won’t spill when you take a bite.
And just like that, you’ve got a batch of festive hand pies ready to enjoy. If you’re curious about more quick and creative snacks, I sometimes reach for the savory bacon jam to add a punch of flavor to summer boards, but these berry pies always steal the show when the stars and stripes come out.
Cooking Tips & Techniques
Making these hand pies perfectly flaky and flavorful can feel tricky the first few times, but a couple of things really helped me nail it.
- Keep Dough Cold: Warm dough is sticky dough. If your kitchen is warm, chill the dough between steps to avoid tearing and shrinking during baking.
- Don’t Overfill: It’s tempting to heap on the berries, but too much filling means juice escaping and soggy crust. A modest 1-2 tablespoon scoop per pie is just right.
- Seal Edges Firmly: Use a fork or your fingers to press the edges tight. If sealing feels tricky, gently brush the edges with water before pressing to help them stick better.
- Vent the Tops: The star cutout isn’t just decorative—it lets steam escape during baking, preventing sogginess and making the filling bubble up nicely.
- Watch the Bake Time: Ovens vary, so start checking at 25 minutes. The perfect pie will be golden and smell like summer in the kitchen.
- Multitasking: While the pies bake, use the time to clean up or prep drinks—those 25 minutes fly by, and you’ll want to serve the pies warm.
One mistake I made early on was skipping the cornstarch—it made the filling too runny, and the pies got soggy fast. I also learned that if you brush the egg wash too thickly, it can pool and burn, so a light, even coat is best.
Variations & Adaptations
These Easy Patriotic Berry Hand Pies with Star-Shaped Cutouts are flexible and open to fun variations depending on your mood, dietary needs, or the season.
- Flavor Variations: Swap the mixed berry filling for peach and blueberry in summer, or apple cinnamon in fall for a cozy twist.
- Gluten-Free: Use a gluten-free pie crust from the store or homemade almond flour crust to make this recipe gluten-free friendly.
- Vegan Option: Replace the egg wash with almond milk mixed with a teaspoon of maple syrup for golden tops without eggs.
- Savory Twist: For a fun change, try a cheese and herb filling, inspired by the flaky crusts used in the savory candied bacon recipe I love.
Personally, I once made a batch with a touch of vanilla extract in the filling, which gave the pies a subtle warm sweetness that surprised me in a good way. Feel free to experiment with your own favorite fillings and shapes to make these pies your own.
Serving & Storage Suggestions
These hand pies are best served warm from the oven, with the flaky crust still crisp and the filling bubbling gently. They make a perfect snack for a picnic, 4th of July party, or just a casual summer afternoon treat.
Pair them with a scoop of vanilla ice cream or a dollop of whipped cream for a simple dessert upgrade. For a refreshing drink, a cold lemonade or iced tea complements the berry sweetness beautifully.
To store, let the pies cool completely, then keep them in an airtight container at room temperature for up to two days. For longer storage, they freeze well—just wrap individually and freeze for up to a month. Reheat in a 350°F (175°C) oven for about 10 minutes to refresh the crust.
Keep in mind, flavors develop nicely after resting a bit, so if you make them ahead, letting them sit for a few hours helps the filling meld with the crust. Just don’t wait too long or the crust might soften.
Nutritional Information & Benefits
Each hand pie contains roughly 200-250 calories depending on the size and filling amount, with moderate sugar content from the berries and added sugar. The mixed berries are packed with antioxidants, vitamins C and K, and dietary fiber, making this a tasty way to sneak some fruit into your day.
The use of cornstarch keeps the filling thick without adding extra fat or calories. Plus, the portion-controlled size helps with mindful snacking.
These pies are naturally vegetarian and can be adapted for gluten-free or vegan diets as mentioned earlier. Just keep in mind the crust ingredients when considering allergies.
From my experience, these hand pies strike a nice balance between indulgence and freshness, making them a guilt-light treat that feels festive and satisfying.
Conclusion
Easy Patriotic Berry Hand Pies with Star-Shaped Cutouts are the kind of recipe that proves simple ingredients and a little creativity can lead to something truly special. They’re approachable for any home cook and deliver that perfect mix of flaky crust and sweet berry filling that makes you pause for a moment of joy.
Feel free to tweak the fillings, shapes, or even the crust to make them your own signature snack. I love how these pies bring a bit of sparkle and sweetness to summer gatherings—and I hope they become a favorite in your kitchen, too.
If you try them out, I’d love to hear how your pies turned out or what fun variations you came up with. Sharing these recipes and stories is what makes cooking so rewarding. Here’s to many warm, berry-filled bites ahead!
FAQs About Easy Patriotic Berry Hand Pies
Can I use frozen berries for the filling?
Yes! Just thaw and drain them well to avoid excess moisture that can make the pies soggy.
How do I keep the crust from getting soggy?
Make sure to use cornstarch in the filling to thicken it and seal the edges tightly. Also, vent the tops with star cutouts to let steam escape.
Can I make these hand pies ahead of time?
You can prepare and assemble them a few hours before baking. Store in the fridge and bake just before serving for best results.
What can I use if I don’t have a star-shaped cutter?
You can cut stars freehand with a small knife or substitute with other fun shapes like hearts or circles.
Are these hand pies freezer-friendly?
Absolutely! Freeze unbaked pies on a tray, then transfer to a bag. Bake from frozen, adding a few extra minutes to the baking time.
Pin This Recipe!
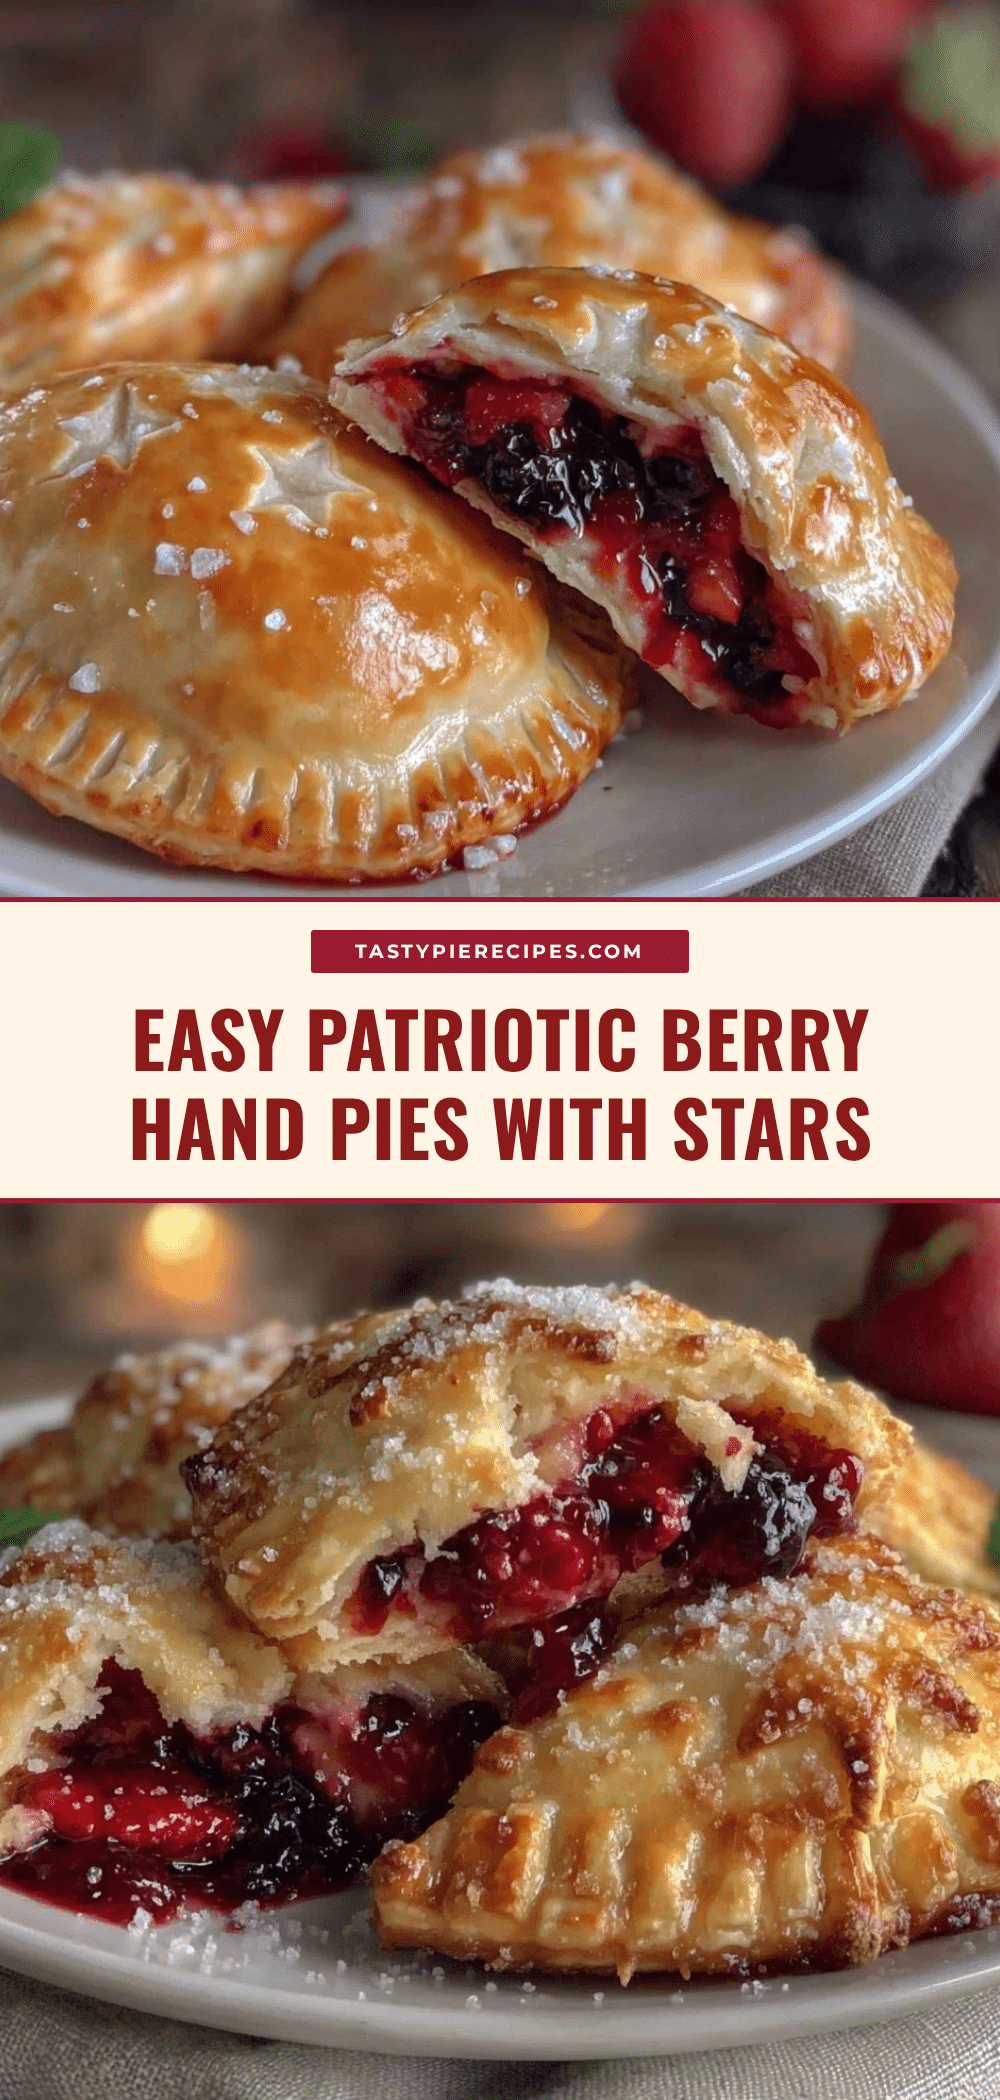
Easy Patriotic Berry Hand Pies

These bite-sized hand pies feature a flaky crust and sweet-tart mixed berry filling with star-shaped cutouts, perfect for festive summer snacks and 4th of July celebrations.
- Prep Time: 15 minutes
- Cook Time: 30 minutes
- Total Time: 45 minutes
- Yield: 8-10 hand pies 1x
- Category: Dessert
- Cuisine: American
Ingredients
- 1 package (about 14 oz / 400 g) refrigerated pie crusts, store-bought or homemade
- 2 cups (300 g) fresh or frozen mixed berries (blueberries, chopped strawberries, raspberries)
- 1/3 cup (65 g) granulated sugar
- 1 tablespoon fresh lemon juice
- 2 tablespoons (16 g) cornstarch
- 1/2 teaspoon ground cinnamon
- Pinch of salt
- 1 large egg, beaten with 1 tablespoon water (egg wash)
- Turbinado sugar (optional, for sprinkling on top)
Instructions
- In a medium mixing bowl, combine mixed berries, sugar, lemon juice, cornstarch, cinnamon, and salt. Gently toss until berries are evenly coated. Set aside.
- Preheat oven to 375°F (190°C). Line a baking sheet with parchment paper.
- Lightly flour work surface. Unroll pie crust and smooth with rolling pin to about 1/8 inch (3 mm) thickness. Keep dough cold; chill if necessary.
- Using a 3-4 inch (7.5-10 cm) round or square cutter, cut out 8-10 shapes from the dough. Place on baking sheet spaced about 2 inches apart.
- Spoon 1-2 tablespoons of berry filling onto each dough base, leaving a 1/2 inch (1.2 cm) border.
- Roll out remaining dough and cut out tops with the same cutter. Use a star-shaped cookie cutter (1.5-2 inches / 4-5 cm) to cut a star in the center of each top piece.
- Place tops over filled bases and press edges together firmly with fingers or fork to seal.
- Brush tops lightly with egg wash.
- Optionally sprinkle turbinado sugar on top for crunch and sparkle.
- Bake for 25-30 minutes until crust is golden brown and filling is bubbly. Check at 25 minutes.
- Remove from oven and transfer pies to a cooling rack for at least 10 minutes before serving.
Notes
Keep the pie dough cold to prevent tearing and shrinking. Don’t overfill the pies to avoid bursting and soggy crust. Seal edges firmly and vent the tops with star cutouts to let steam escape. If using frozen berries, thaw and drain well. For vegan option, replace egg wash with almond milk and maple syrup. Pies freeze well; bake from frozen adding a few extra minutes.
Nutrition
- Serving Size: 1 hand pie
- Calories: 200250
- Sugar: 15
- Sodium: 150
- Fat: 8
- Saturated Fat: 3
- Carbohydrates: 35
- Fiber: 3
- Protein: 2
Keywords: hand pies, berry pies, patriotic dessert, 4th of July snacks, mixed berry hand pies, star-shaped pies, summer dessert


