
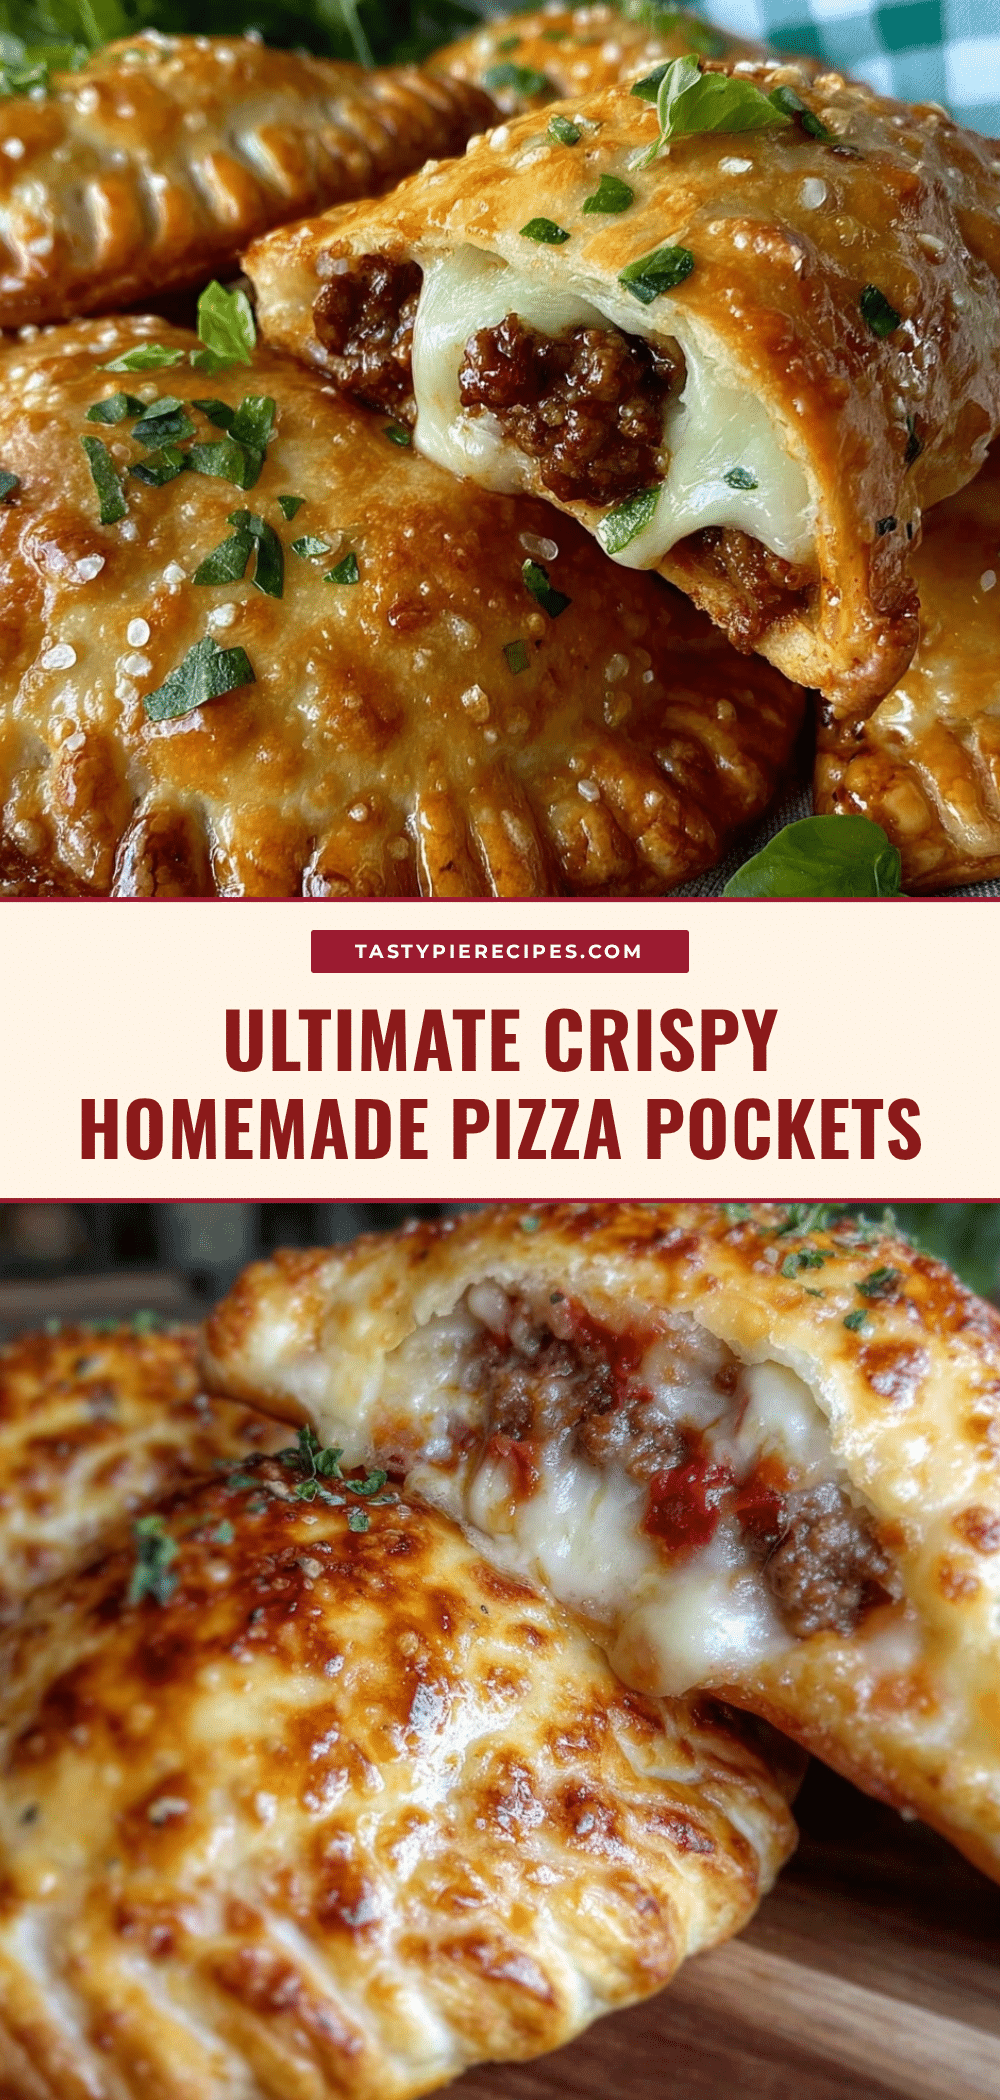
“You want pizza pockets? Homemade? That sounds like a lot of work,” my friend said, eyeing my kitchen mess skeptically as I pulled out a pan of golden, crispy pockets fresh from the oven. Honestly, I get it. Store-bought pizza pockets have that convenience thing down pat. But one chilly evening, juggling work deadlines and a hungry kiddo, I threw together this homemade version on a whim—and the results surprised even me. The crust was crisp, flaky, and had this buttery punch that those frozen pockets just can’t touch. Inside, melty cheese mingled with tangy tomato sauce and perfectly seasoned pepperoni, all sealed in a handheld delight.
After making these pizza pockets a few times in one week (no joke, I was obsessed), I realized this recipe was more than just a quick fix. It’s the kind of comfort food that doesn’t ask you to compromise flavor for speed. Plus, I could tweak it to fit whatever was in the fridge—sometimes swapping pepperoni for sautéed mushrooms or adding a handful of fresh basil. The best part? No weird preservatives or mystery ingredients lurking in the crust.
That night, as I sat back with a warm pocket in hand, I had this quiet moment of thinking—why didn’t I try this sooner? Making pizza pockets from scratch isn’t just doable, it’s genuinely better. And if you’re the kind of person who loves that crispy, cheesy, savory bite but hates the idea of a freezer full of options you barely trust, you’re going to appreciate what’s ahead.
Why You’ll Love This Recipe
After mastering this Crispy Homemade Pizza Pockets recipe, I’m convinced it’s a keeper. I’ve tested it multiple times to get the crust just right (crispy but tender inside), and the filling has this balanced tomato-cheese combo that hits all the right notes. Here’s why this recipe stands out:
- Quick & Easy: Ready in under 40 minutes—perfect if you’re juggling dinner and everything else.
- Simple Ingredients: You probably already have everything in your pantry and fridge, no special trips needed.
- Great for Any Occasion: Whether it’s a casual lunch, a potluck, or a fun weeknight dinner, these pockets fit right in.
- Crowd-Pleaser: Kids, adults, picky eaters—everyone asks for seconds.
- Unbelievably Delicious: The crisp crust with melty cheese inside is comfort food at its finest, but homemade.
This isn’t just another pizza pocket recipe; it’s got a little trick with the dough—using a blend of olive oil and a touch of butter to get that perfect crispiness without drying out the crust. Plus, the filling is seasoned just right, with a pinch of Italian herbs that makes a big difference. Honestly, it’s the kind of recipe that makes you close your eyes for a moment after the first bite.
If you’re curious about perfecting quick, crowd-pleasing meals, you might find inspiration from my take on easy keto grilled chicken Greek salad—another recipe that balances simplicity and flavor without fuss.
What Ingredients You Will Need
This recipe uses straightforward, pantry-friendly ingredients to create bold flavor and that satisfying crispy texture. You can easily swap or add extras depending on your mood or what’s on hand.
- For the Dough:
- All-purpose flour – 2 ½ cups (about 320 g), for a tender but sturdy crust
- Instant yeast – 2 ¼ teaspoons (one packet)
- Sugar – 1 tablespoon, to help yeast activate
- Salt – 1 teaspoon, for flavor balance
- Warm water – 1 cup (240 ml), about 110°F (43°C) to wake the yeast
- Olive oil – 2 tablespoons, provides moisture and crispiness
- Unsalted butter – 1 tablespoon, melted (adds a rich, flaky touch)
- For the Filling:
- Shredded mozzarella cheese – 1 ½ cups (about 170 g), the melty star of the show
- Pizza sauce – ½ cup (120 ml), homemade or your favorite store-bought brand
- Pepperoni slices – ½ cup (about 30 g), classic choice but easily swapped
- Italian seasoning – 1 teaspoon, adds that herby depth
- Minced garlic – 1 clove, optional but highly recommended
- Grated Parmesan cheese – 2 tablespoons, for a sharp finish
- For the Egg Wash:
- Egg – 1 large, beaten with a tablespoon of water, for that shiny golden crust
For a gluten-free twist, try swapping the all-purpose flour for a reliable gluten-free flour blend. And if you want to keep it vegetarian or vegan, you can replace pepperoni with sautéed mushrooms or vegan sausage, and use dairy-free cheese alternatives.
Equipment Needed
- Large mixing bowl – for combining and proofing the dough
- Measuring cups and spoons – precise measurements make all the difference
- Rolling pin – to roll out the dough evenly (a wine bottle works in a pinch!)
- Baking sheet or pizza stone – for crisp baking surface
- Parchment paper – prevents sticking and makes cleanup easier
- Pastry brush – to apply the egg wash evenly
- Sharp knife or pizza cutter – to cut the pockets before baking
If you don’t have a rolling pin, your hands work just fine—pressing and stretching the dough gently. For baking, a pizza stone helps get the bottom extra crisp but is definitely optional. I’ve made these on a simple baking sheet with great results. Try to keep your baking surface clean and preheated for that perfect crunch.
Preparation Method

- Activate the yeast: In your large bowl, combine warm water (about 110°F/43°C), sugar, and yeast. Stir gently and let sit for 5-7 minutes until foamy and bubbly. If it doesn’t foam, your yeast might be old, so consider starting fresh.
- Make the dough: Add flour, salt, olive oil, and melted butter to the yeast mixture. Mix with a wooden spoon or your hands until it starts to come together. Then knead on a floured surface for about 8-10 minutes until smooth and elastic. (If the dough is sticky, sprinkle a bit more flour, but don’t overdo it.)
- Let it rise: Place the dough ball in a lightly oiled bowl, cover with a clean towel, and let it rise in a warm spot for about 1 hour, or until it doubles in size.
- Prepare the filling: While the dough rises, mix shredded mozzarella, pizza sauce, pepperoni, Italian seasoning, garlic, and Parmesan cheese in a bowl. Adjust seasoning to your taste.
- Shape the pockets: Preheat your oven to 425°F (220°C). Punch down the dough and divide it into 8 equal pieces. Roll each piece into a 6-inch (15 cm) circle on parchment paper.
- Fill and seal: Spoon about 2 tablespoons of filling onto one half of each dough circle, leaving a small border. Fold the dough over and press the edges firmly with a fork to seal, preventing any filling leaks.
- Egg wash: Lightly brush each pocket with the beaten egg wash to get that golden shine after baking.
- Bake: Transfer pockets (parchment and all) to your baking sheet. Bake for 15-18 minutes until golden brown and crisp. If you want extra crispiness, switch to the broil setting for the last 1-2 minutes—just watch carefully so they don’t burn.
- Cool and enjoy: Let the pizza pockets cool for at least 5 minutes before biting in. The filling will be hot and melty, so patience pays here.
Pro tip: If your filling seems too wet, strain excess sauce or add a bit more cheese to keep the pockets from getting soggy. I’ve found sealing edges firmly and using egg wash makes a big difference in keeping things tidy.
Cooking Tips & Techniques
Making homemade pizza pockets crisp and delicious isn’t rocket science, but a few tricks make all the difference. First, the dough’s texture depends on kneading—don’t rush it. Kneading develops gluten, giving you that chewy-yet-crispy crust you crave. I used to skip this step and ended up with pockets that were dense or crumbly.
Second, when filling the pockets, avoid overstuffing. It’s tempting, I know, but too much filling can cause leakage or soggy dough. Spoon just enough so you get a good balance of crust to filling.
Third, the egg wash isn’t just for looks—it helps give that beautiful golden brown color and acts like glue sealing the edges. If you’re out of eggs, a little olive oil brushed on works in a pinch, though the finish won’t be quite as glossy.
Finally, baking at a high temperature (425°F/220°C) crisps the crust while melting the cheese perfectly. I’ve tried lower temps, but that often results in a doughy base. Also, keeping an eye towards the end of baking helps avoid burning, especially if you switch on the broiler for extra crunch.
While these pockets bake, it’s a great time to prep a fresh salad—something like the easy keto grilled chicken Greek salad offers a crisp, refreshing contrast to the warm pockets.
Variations & Adaptations
One of the best things about this recipe is how easy it is to make it your own. Here are some ideas I’ve tried or thought about:
- Vegetarian: Swap pepperoni for sautéed spinach, mushrooms, or roasted peppers. Add a sprinkle of feta for extra flavor.
- Spicy kick: Toss in some chopped jalapeños or a dash of red pepper flakes in the filling for a bit of heat.
- Gluten-Free: Use a gluten-free flour blend designed for pizza dough. The texture will be slightly different but still delicious.
- Cheese Variations: Mix mozzarella with provolone or fontina for a richer cheese blend. Or try vegan cheese to suit dietary needs.
- Alternative Cooking Method: Cook these pizza pockets in an air fryer at 400°F (200°C) for about 10-12 minutes, flipping halfway, for ultra-crispy results with less oil.
Personally, I once swapped the pepperoni for leftover grilled chicken from a cozy crockpot loaded steak and potato soup night, and it was surprisingly good—comfort food with a twist!
Serving & Storage Suggestions
These pizza pockets are best served warm, right out of the oven when the crust is crisp and the cheese is still gooey. I like to plate them with a side of fresh greens or a simple marinara dipping sauce for an extra tomato punch.
If you have leftovers, store them in an airtight container in the refrigerator for up to 3 days. To reheat, pop them in a 350°F (175°C) oven for 8-10 minutes or use a toaster oven. Microwave reheating works but tends to soften the crust, so I recommend the oven method to keep that satisfying crispness.
These pockets also freeze well. Wrap individually in plastic wrap and place in a freezer bag. When ready, thaw overnight in the fridge and reheat as above. Flavors tend to meld beautifully after resting, making every bite even more comforting.
Nutritional Information & Benefits
Estimated per pizza pocket (1 of 8): approximately 250 calories, 12g fat, 20g carbohydrates, and 12g protein. This makes for a balanced snack or light meal.
Using olive oil and fresh ingredients means you’re avoiding processed fats and preservatives common in store-bought versions. Plus, the protein from cheese and pepperoni (or your chosen filling) helps keep you full longer.
For those watching carbs, swapping regular flour with almond flour or another low-carb alternative pairs well with a filling rich in meats and cheeses, similar to dishes like the creamy keto chicken enchilada soup.
Note: Contains dairy and gluten, so adjust accordingly for allergies or intolerances.
Conclusion
Making Crispy Homemade Pizza Pockets beats the frozen aisle any day. They’re crispy, flavorful, and customizable, fitting right into busy weeknights or casual weekend meals. I love how this recipe lets me control every ingredient and satisfy cravings without guilt. Plus, it’s a fun project that doesn’t demand too much kitchen time.
Feel free to tweak the fillings or try different cheeses; the dough is forgiving and resilient. If you’ve ever thought about making your own handheld pizza treats, this is your chance to try a recipe that’s truly better than store-bought.
I’d love to hear how your pizza pockets turn out or your favorite fillings, so drop a comment below. Sharing food stories is half the fun, right? Here’s to crispy, cheesy bites that bring everyone to the table.
FAQs
Can I use store-bought pizza dough instead of making my own?
Absolutely! Store-bought dough can save time and still yield tasty pockets. Just roll it out evenly, and follow the filling and baking steps as usual.
How do I prevent the pockets from leaking during baking?
Make sure to seal the edges tightly with a fork and avoid overfilling. Brushing the edges with egg wash also helps “glue” them shut.
Can I make these pizza pockets ahead of time?
Yes! You can assemble them and keep them refrigerated for a few hours before baking or freeze them raw and bake straight from frozen (adding a few extra minutes to baking time).
What’s the best way to reheat leftover pizza pockets?
Reheating in an oven or toaster oven at 350°F (175°C) for 8-10 minutes keeps the crust crispy. Microwaving works in a pinch but can make the crust soggy.
Are there any good vegetarian filling options?
Definitely. Try sautéed mushrooms, spinach, roasted peppers, or even caramelized onions with cheese. You can mix and match to suit your taste.
Pin This Recipe!
Crispy Homemade Pizza Pockets Recipe Easy Better Than Store-Bought

These crispy homemade pizza pockets feature a flaky, buttery crust filled with melty cheese, tangy tomato sauce, and seasoned pepperoni. They are quick to make, customizable, and better than store-bought versions.
- Prep Time: 15 minutes
- Cook Time: 18 minutes
- Total Time: 1 hour 33 minutes
- Yield: 8 servings 1x
- Category: Main Course
- Cuisine: Italian-American
Ingredients
- 2 ½ cups all-purpose flour (about 320 g)
- 2 ¼ teaspoons instant yeast (one packet)
- 1 tablespoon sugar
- 1 teaspoon salt
- 1 cup warm water (about 110°F / 43°C)
- 2 tablespoons olive oil
- 1 tablespoon unsalted butter, melted
- 1 ½ cups shredded mozzarella cheese (about 170 g)
- ½ cup pizza sauce (120 ml)
- ½ cup pepperoni slices (about 30 g)
- 1 teaspoon Italian seasoning
- 1 clove minced garlic (optional)
- 2 tablespoons grated Parmesan cheese
- 1 large egg, beaten with 1 tablespoon water (for egg wash)
Instructions
- Activate the yeast: In a large bowl, combine warm water (about 110°F/43°C), sugar, and yeast. Stir gently and let sit for 5-7 minutes until foamy and bubbly.
- Make the dough: Add flour, salt, olive oil, and melted butter to the yeast mixture. Mix until it starts to come together, then knead on a floured surface for 8-10 minutes until smooth and elastic.
- Let it rise: Place the dough ball in a lightly oiled bowl, cover with a clean towel, and let it rise in a warm spot for about 1 hour or until doubled in size.
- Prepare the filling: Mix shredded mozzarella, pizza sauce, pepperoni, Italian seasoning, garlic, and Parmesan cheese in a bowl. Adjust seasoning to taste.
- Shape the pockets: Preheat oven to 425°F (220°C). Punch down the dough and divide into 8 equal pieces. Roll each piece into a 6-inch (15 cm) circle on parchment paper.
- Fill and seal: Spoon about 2 tablespoons of filling onto one half of each dough circle, leaving a small border. Fold dough over and press edges firmly with a fork to seal.
- Egg wash: Lightly brush each pocket with the beaten egg wash for a golden shine.
- Bake: Transfer pockets (with parchment) to a baking sheet. Bake for 15-18 minutes until golden brown and crisp. Optionally broil for 1-2 minutes for extra crispiness, watching carefully.
- Cool and enjoy: Let pizza pockets cool for at least 5 minutes before serving.
Notes
If filling is too wet, strain excess sauce or add more cheese to prevent soggy pockets. Seal edges firmly and use egg wash to keep pockets sealed. Baking at high temperature crisps crust and melts cheese perfectly. Avoid overfilling to prevent leaks. For extra crispiness, broil for last 1-2 minutes carefully. Store leftovers in airtight container in fridge up to 3 days; reheat in oven for best crispness. Freeze individually wrapped for longer storage.
Nutrition
- Serving Size: 1 pizza pocket
- Calories: 250
- Sugar: 2
- Sodium: 450
- Fat: 12
- Saturated Fat: 5
- Carbohydrates: 20
- Fiber: 1
- Protein: 12
Keywords: pizza pockets, homemade pizza pockets, crispy pizza pockets, easy pizza pockets, pepperoni pockets, handheld pizza, pizza snack, comfort food


