I figured pickles needed hours, sometimes days, to soak up flavor and get that satisfying crunch. It took about 24 hours for that assumption to fall apart completely. Honestly, I never thought a quick refrigerator pickle could taste this fresh and crispy—like biting into a garden’s worth of dill and cucumber magic. The first time I tossed together these Easy Crispy Dill Refrigerator Pickles, I expected a mushy mess or bland results, but instead, I got sharp, tangy, crunchy pickles that were ready in a day. The sound of that first snap was oddly satisfying, and the tang hit just right without any long wait.
The best part? These pickles don’t demand a fancy pressure canner or hours of babysitting on the stove. It’s a no-fuss recipe that fits right into a busy kitchen rhythm, like when you’re prepping a quick snack while the oven’s warming up for something else. It’s funny how something so simple can become a staple you reach for again and again, especially when your fridge is stocked with these little jars of crisp delight. I’ve come to trust this recipe for a last-minute pickle fix and for adding that bright crunch to sandwiches, salads, or even a casual charcuterie board.
What sticks with me is how these pickles remind me that sometimes, the best results come from doing less, letting the flavors develop quietly in the fridge overnight. They’re not just pickles; they’re a little crunchy promise that good things don’t always have to take forever. Plus, it’s kind of fun knowing you can whip up a batch and have fresh pickles ready faster than you can binge-watch an episode of your favorite show.
Why You’ll Love This Recipe
From my kitchen trials (and a few experiment mishaps), this Easy Crispy Dill Refrigerator Pickles recipe has proven itself time and again. Here’s why it’s earned a permanent spot in my fridge:
- Quick & Easy: Ready in just 24 hours, this recipe fits perfectly into busy schedules or last-minute snack cravings.
- Simple Ingredients: No mysterious spices or hard-to-find items—you probably have everything in your pantry and fridge right now.
- Perfect for Entertaining: These pickles add a crunchy, tangy punch to any sandwich, picnic, or casual gathering.
- Crowd-Pleaser: Kids and adults alike rave about the crisp snap and bold dill flavor—no cucumber-haters here.
- Unbelievably Delicious: The balance of garlic, fresh dill, and vinegar creates a flavor that’s bright, herbaceous, and just a little addictive.
This isn’t your standard pickle recipe, either. Instead of soaking for weeks or requiring boiling water baths, the fridge method keeps the cucumbers crisp and fresh. The key is in how the brine and dill mingle quickly but thoroughly, with the garlic adding a punch without overpowering. I always recommend using fresh dill—there’s no substitute for that fragrant, almost grassy note it brings.
Plus, if you love making quick, fresh sides like my roasted grape and brie tart, you’ll appreciate how this pickle recipe slots perfectly into a casual, flavorful meal. It’s comfort food without the fuss, and honestly, it’s the kind of recipe that makes you look forward to slicing cucumbers just to make a new batch.
What Ingredients You Will Need
This recipe uses straightforward, wholesome ingredients to deliver big flavor without fuss. Most are pantry staples, making it perfect for spontaneous pickle cravings.
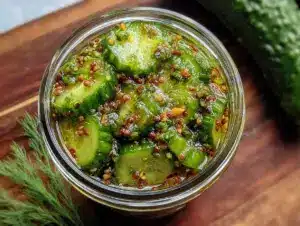
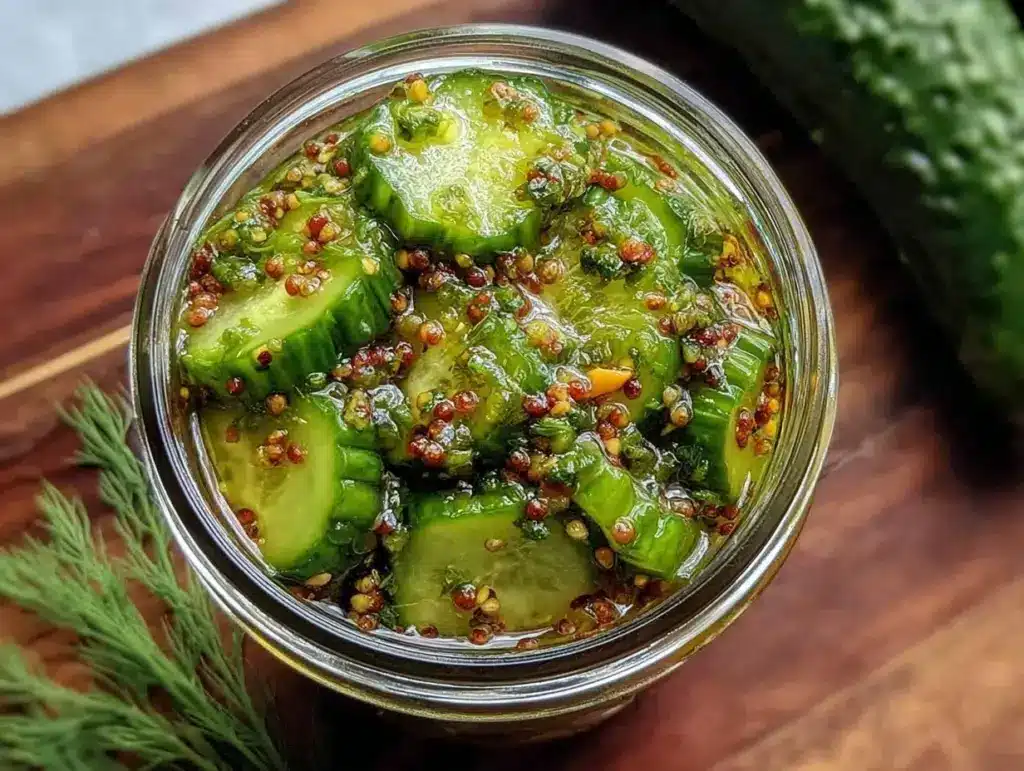
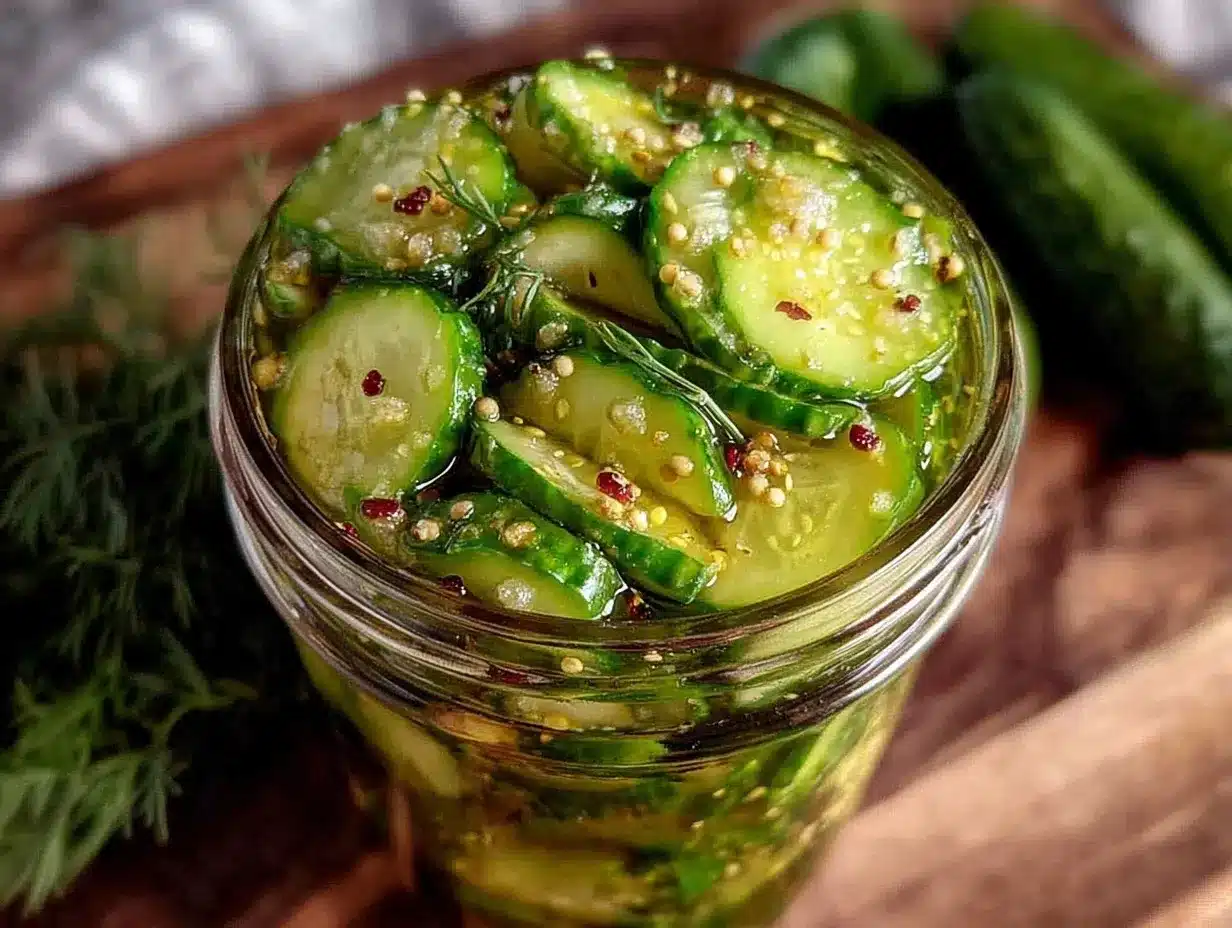
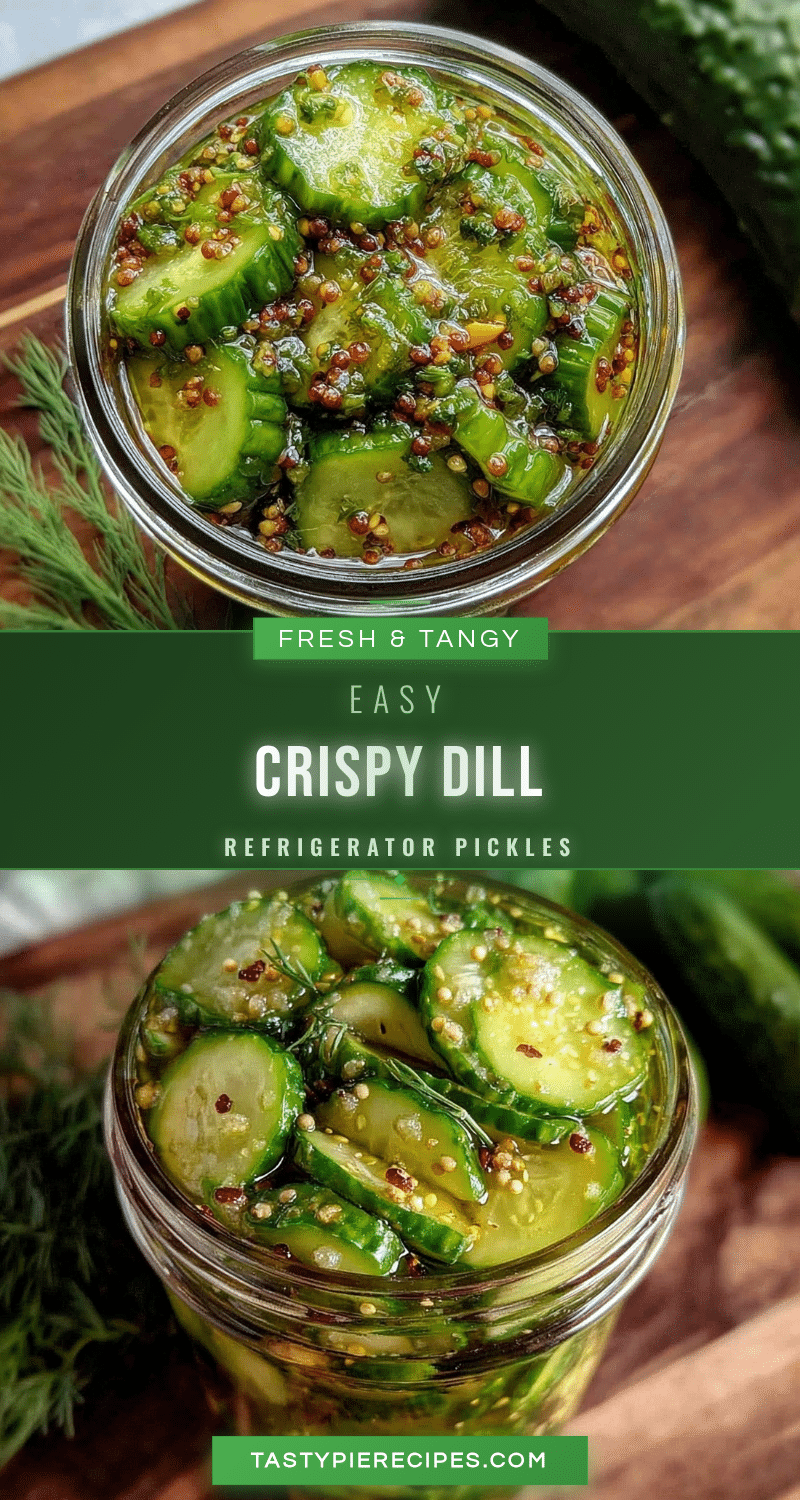
- Cucumbers: About 4 medium Kirby or Persian cucumbers, sliced into spears or rounds (Kirbys hold their crunch best).
- Fresh dill: 1 large bunch (about 1/2 cup loosely packed), plus extra sprigs for garnish (fresh dill is non-negotiable here).
- Garlic cloves: 3-4, smashed (adds that punchy aroma and flavor).
- White vinegar: 1 1/2 cups (use distilled white for the cleanest tang).
- Water: 1 1/2 cups (filtered or tap is fine).
- Kosher salt: 2 tablespoons (important for drawing out moisture and crisping cucumbers).
- Granulated sugar: 1 tablespoon (balances the acidity).
- Black peppercorns: 1 teaspoon (whole, for subtle spice).
- Red pepper flakes: 1/2 teaspoon (optional, for a slight kick).
You can find kosher salt brands like Diamond Crystal or Morton; I prefer Diamond Crystal for its lighter texture, which dissolves more evenly. If you want to cut back on sugar, feel free to reduce it slightly, but the touch of sweetness really rounds out the brine.
For a gluten-free version, all these ingredients work just fine—just double-check your vinegar to be sure it’s pure. If fresh dill isn’t in season, dried dill weed can substitute but use about a third of the amount and expect a milder flavor.
Equipment Needed
- Quart-sized glass jar or container: A clean, sealable jar works best for marinating the pickles—mason jars are ideal.
- Measuring cups and spoons: For precise vinegar, water, salt, and sugar amounts.
- Sharp knife: To slice the cucumbers evenly for consistent pickling.
- Cutting board: Preferably non-porous to avoid cucumber juice stains.
- Mixing bowl: To combine the brine before pouring over cucumbers.
If you don’t have mason jars, any airtight container will do, but glass is preferred to avoid unwanted flavors. Personally, I keep a set of wide-mouth jars around—they’re easier to fill and clean. Also, rinsing the jars with boiling water before use helps keep the pickles fresh longer.
For tools on a budget, a simple plastic container with a tight lid works fine, just make sure it’s food-safe and odor-free. I’ve tried using plastic containers before and noticed the pickles sometimes absorbed a faint plastic smell, so glass is my go-to.
Preparation Method
- Prepare cucumbers: Wash the cucumbers thoroughly. Cut off the blossom ends (this helps prevent mushiness). Slice into spears about 3-4 inches long, or rounds about 1/4 inch thick, according to your preference. (About 10 minutes)
- Make the brine: In a mixing bowl, combine 1 1/2 cups white vinegar, 1 1/2 cups water, 2 tablespoons kosher salt, and 1 tablespoon sugar. Stir until salt and sugar dissolve completely. (5 minutes)
- Pack the jar: Place the smashed garlic cloves, dill bunch, black peppercorns, and red pepper flakes (if using) into the bottom of your jar. Then tightly pack the cucumber slices on top, leaving about 1/2 inch of space at the top. (10 minutes)
- Pour the brine: Slowly pour the brine over the cucumbers, making sure they’re fully submerged. Tap the jar lightly to release any air bubbles. Seal the jar with a lid. (5 minutes)
- Refrigerate: Place the jar in the fridge for at least 24 hours before tasting. The pickles will keep for up to 2 weeks refrigerated, but they’re best within the first week for crispness. (Overnight to 24 hours)
Pro tip: If you want extra crispness, soak the cucumber spears in ice water for 30 minutes before packing them in the jar. I’ve found this little step makes a noticeable difference on warmer days when cucumbers tend to soften faster.
Watch out for overfilling the jar—leaving headspace is key to letting the brine circulate and the flavors develop evenly. If you notice any floating cucumbers, press them down gently with a clean utensil so they stay submerged.
Cooking Tips & Techniques
Here’s what I’ve learned after making these pickles dozens of times:
- Don’t skip the salt: It’s critical for crisp texture and flavor development. Too little salt means soggy pickles; too much, and they’re overwhelmingly salty.
- Use fresh dill: The fresh herb is the star here. I once tried dried dill only, and the flavor was flat and disappointing.
- Smash the garlic: Crushing the cloves releases more aroma and flavor than just slicing.
- Keep cucumbers submerged: Air exposure can lead to uneven pickling and soft spots. A small fermentation weight or a clean zip-top bag filled with brine works well to keep them down.
- Don’t rush the process: 24 hours might feel like a long wait, but that’s the sweet spot for crisp, tangy pickles. Less time means bland cucumbers; more time, softer ones.
- Consider temperature: Store your pickles in the coldest part of the fridge to keep that crunch intact longer.
I remember one batch where I forgot to add the peppercorns—still edible, but missing that subtle spice that rounds out the flavor. Small details make all the difference! Also, if you want to speed up the process slightly, slicing the cucumbers thinner can help, but you lose some of that satisfying snap.
Variations & Adaptations
This recipe is pretty forgiving and easy to tweak depending on what you like or have on hand.
- Spicy Pickles: Add extra red pepper flakes or even a few sliced jalapeños to the jar for a fiery kick. I tried this once for a summer barbecue, and they disappeared fastest.
- Garlic-Free Version: Omit garlic for a milder flavor, replacing it with a few mustard seeds or coriander seeds for an aromatic twist.
- Low-Sodium Option: Cut the salt by half and add a splash of lemon juice for brightness. The texture will be slightly less crisp, but still tasty.
- Herb Variations: Swap dill for fresh tarragon or basil for a different flavor profile. Tarragon pickles have a slightly licorice note that’s surprisingly delightful.
- Quick Pickle Slices: If you’re in a rush, slice cucumbers paper-thin and let them marinate for 12 hours instead of 24. They won’t last as long but make a great quick snack.
One variation I adore is mixing these pickles with sliced fresh tomatoes and herbs for a summery salad—kind of like the fresh vibe I get from my fresh fig and honey crostata that also pairs fresh, seasonal flavors in a simple way.
Serving & Storage Suggestions
Serve these pickles cold straight from the fridge. They’re fantastic on sandwiches, burgers, or alongside a cheese platter. The crisp texture makes them a perfect foil to rich, creamy dishes.
If you’re planning a picnic or a casual dinner, these pickles add a bright, tangy crunch that livens up everything from grilled meats to simple snacks.
Store the pickles in their original jar, tightly sealed, in the refrigerator. They’ll keep well for up to two weeks, but honestly, they rarely last that long at my house. When reheating leftovers (if you want to warm them for a cooked dish), do it gently on the stove to avoid losing crunch.
Over time, the flavors deepen and mellow, but the cucumbers will soften slightly after the first week. So, if you like your pickles extra crisp, plan to enjoy them within the first several days.
For a fun twist, try chopping the pickles and mixing them into potato salad or tuna salad for an unexpected burst of dill and crunch.
Nutritional Information & Benefits
These Easy Crispy Dill Refrigerator Pickles are low in calories (roughly 10-15 calories per serving), fat-free, and a great source of hydration thanks to their high water content. The vinegar supports digestion, and fresh dill provides antioxidants and vitamins A and C.
Because they’re naturally gluten-free, vegan, and low-carb, they fit well into many dietary plans. Just watch the salt if you’re on a low-sodium diet.
From a wellness perspective, these pickles are a guilt-free way to add flavor and crunch without added sugars or preservatives found in many store-bought versions.
Conclusion
This Easy Crispy Dill Refrigerator Pickles recipe is a keeper. It’s the kind of simple, no-fuss dish that sneaks into your routine and suddenly you’re wondering how you ever lived without it. The 24-hour wait feels like a small price to pay for that perfect crunch and bright, garlicky dill punch.
Make it your own by adjusting the spice levels or swapping herbs, and don’t hesitate to experiment with how you serve them. I personally love keeping a jar handy for everything from quick snacks to complementing richer dishes like my roasted grape and brie tart.
If you give this recipe a try, I’d love to hear how your pickles turn out or what twists you add. There’s something rewarding about sharing these little homemade delights, and who knows—you might just find yourself making pickles a regular kitchen project.
Here’s to crunchy bites and simple pleasures, one jar at a time.
FAQs
How long do refrigerator pickles last?
They typically stay fresh and crisp for up to 2 weeks when stored in the fridge in a sealed jar.
Can I use regular cucumbers instead of Kirby cucumbers?
You can, but Kirby cucumbers hold their crunch better. Regular slicing cucumbers may become softer faster.
Do I need to boil the brine for refrigerator pickles?
Nope! This recipe uses a cold brine, so no boiling is necessary—making it quick and easy.
Can I make these pickles spicy?
Absolutely! Add extra red pepper flakes or sliced jalapeños to the jar for a spicy kick.
Why are my pickles sometimes mushy?
Common reasons include not removing blossom ends from cucumbers, insufficient salt, or cucumbers not being fully submerged in the brine.
Pin This Recipe!
Easy Crispy Dill Refrigerator Pickles Recipe Ready in 24 Hours

A quick and easy refrigerator pickle recipe that delivers fresh, crispy, and tangy dill pickles ready in just 24 hours without the need for canning or boiling.
- Prep Time: 15 minutes
- Cook Time: 0 minutes
- Total Time: 24 hours
- Yield: 4 servings 1x
- Category: Side Dish
- Cuisine: American
Ingredients
- 4 medium Kirby or Persian cucumbers, sliced into spears or rounds
- 1 large bunch fresh dill (about 1/2 cup loosely packed), plus extra sprigs for garnish
- 3–4 garlic cloves, smashed
- 1 1/2 cups white vinegar (distilled white vinegar recommended)
- 1 1/2 cups water (filtered or tap)
- 2 tablespoons kosher salt
- 1 tablespoon granulated sugar
- 1 teaspoon whole black peppercorns
- 1/2 teaspoon red pepper flakes (optional)
Instructions
- Wash the cucumbers thoroughly. Cut off the blossom ends to prevent mushiness. Slice into spears about 3-4 inches long or rounds about 1/4 inch thick according to preference. (About 10 minutes)
- In a mixing bowl, combine 1 1/2 cups white vinegar, 1 1/2 cups water, 2 tablespoons kosher salt, and 1 tablespoon sugar. Stir until salt and sugar dissolve completely. (5 minutes)
- Place smashed garlic cloves, dill bunch, black peppercorns, and red pepper flakes (if using) into the bottom of a clean quart-sized glass jar.
- Tightly pack the cucumber slices on top, leaving about 1/2 inch of space at the top. (10 minutes)
- Slowly pour the brine over the cucumbers, ensuring they are fully submerged. Tap the jar lightly to release any air bubbles. Seal the jar with a lid. (5 minutes)
- Place the jar in the refrigerator for at least 24 hours before tasting. The pickles will keep for up to 2 weeks refrigerated but are best within the first week for maximum crispness.
Notes
For extra crispness, soak cucumber spears in ice water for 30 minutes before packing. Keep cucumbers fully submerged in brine to avoid soft spots. Use fresh dill for best flavor. Store pickles in the coldest part of the fridge. Pickles are best eaten within the first week for maximum crunch. Variations include adding jalapeños for spice or omitting garlic for a milder flavor.
Nutrition
- Serving Size: About 1/2 cup pickle
- Calories: 15
- Sugar: 2
- Sodium: 900
- Carbohydrates: 3
- Fiber: 0.5
Keywords: refrigerator pickles, dill pickles, quick pickles, easy pickles, crispy pickles, no canning pickles, homemade pickles