
Let me tell you, the moment you pull these Ultimate Chewy Touchdown Cookie Bars with Gooey Marshmallow Topping out of the oven, the sweet, buttery aroma hits you like a winning touchdown in the final seconds of the game. Honestly, it’s the kind of scent that makes you pause, take a deep breath, and smile because you know you’re about to enjoy something truly special. The first time I baked these cookie bars was on a chilly Sunday afternoon, just in time for the big game. I was instantly hooked—not just by the chewy, chocolate-studded base, but by that irresistible, melty marshmallow layer crowning the top.
When I was knee-high to a grasshopper, my grandma used to make similar treats, but those were never quite as chewy or as decadently topped. Years ago, I set out to recreate that nostalgic magic with a twist, and what I ended up with feels like a warm hug wrapped in a cookie bar. My family couldn’t stop sneaking them off the cooling rack (and I can’t really blame them). It’s dangerously easy to make, and the gooey marshmallow topping adds that perfect bit of sticky sweetness that’s just hard to resist.
You know what? These bars are perfect for game day parties, sweet treats for your kids, or just a way to brighten up your Pinterest cookie board. I’ve tested this recipe more times than I can count (in the name of research, of course), and it’s become a staple for family gatherings and gifting. If you’re looking for a cookie bar recipe that’s chewy, gooey, and downright addictive, you’re going to want to bookmark this one.
Why You’ll Love This Recipe
Honestly, this Ultimate Chewy Touchdown Cookie Bars recipe is one of those rare finds that combines ease, flavor, and crowd-pleasing appeal all in one pan. Here’s why I think you’ll fall head over heels for it:
- Quick & Easy: Comes together in under 45 minutes, perfect for busy weeknights or last-minute game day cravings.
- Simple Ingredients: No fancy grocery trips needed; you likely already have everything in your kitchen pantry.
- Perfect for Game Day: Great for tailgates, potlucks, or cozying up on the couch with friends and family.
- Crowd-Pleaser: Always gets rave reviews from kids and adults alike—trust me, the gooey marshmallow topping is a total showstopper.
- Unbelievably Delicious: The chewy texture and rich chocolate chips combined with the sticky marshmallow topping make this comfort food with a playful twist.
What makes this recipe stand out? Well, the secret lies in the perfectly balanced chewiness of the cookie base—thanks to a blend of brown sugar and just the right amount of butter—and the marshmallow topping that softens up to a luscious, gooey blanket as it bakes. This isn’t your average cookie bar; it’s a well-tested family favorite that’s as much fun to make as it is to eat. Every bite feels like that little moment after a touchdown where you close your eyes and savor the win.
What Ingredients You Will Need
This recipe uses simple, wholesome ingredients to deliver bold flavor and a satisfying chewy texture without any fuss. Most of these are pantry staples, and if you don’t have a few, there are easy swaps to keep things rolling.
- For the Cookie Base:
- 1 cup (226g) unsalted butter, softened (adds richness and chewiness)
- 1 cup (220g) packed light brown sugar (for that deep molasses flavor)
- 1/2 cup (100g) granulated sugar (balances sweetness)
- 2 large eggs, room temperature (helps bind everything together)
- 2 teaspoons pure vanilla extract (trust me, don’t skip this!)
- 2 1/4 cups (280g) all-purpose flour (you can swap for almond flour for gluten-free)
- 1 teaspoon baking soda (for lift and texture)
- 1/2 teaspoon salt (brings out all the flavors)
- 2 cups (340g) semi-sweet chocolate chips (I recommend Ghirardelli for the best melt)
- For the Marshmallow Topping:
- 3 cups (about 180g) mini marshmallows (regular size works too, but minis spread more evenly)
Optional Add-ins: You can toss in 1 cup chopped toasted pecans or walnuts for a little crunch — my family loves the texture contrast.
If you want to keep it dairy-free, swapping the butter for a plant-based alternative works nicely, and using dairy-free chocolate chips keeps the dessert allergy-friendly.
Equipment Needed
- 9×13 inch (23×33 cm) baking pan – a standard size that bakes the cookie bars evenly. If you don’t have one, you can use a similar-sized glass or metal pan; just watch baking time.
- Mixing bowls – one large for the batter and one small for dry ingredients.
- Electric mixer or sturdy whisk – an electric hand mixer makes creaming butter and sugar a breeze, but a whisk and some elbow grease work just fine.
- Rubber spatula – for folding in the chocolate chips without deflating the batter.
- Measuring cups and spoons – accuracy matters when it comes to baking chewy cookie bars.
- Cooling rack – to let your bars cool down properly after baking.
Tip: If you’re watching your budget, a simple metal baking pan from your local store will do just fine. I’ve tested this recipe in both glass and metal pans, and results are just as good. Just remember glass pans sometimes need a couple extra minutes in the oven.
Preparation Method

- Preheat your oven to 350°F (175°C). Grease your 9×13 inch baking pan or line it with parchment paper for easy removal. This step takes about 10 minutes and sets the stage for perfectly baked bars.
- Cream the butter and sugars. In a large mixing bowl, beat 1 cup softened unsalted butter with 1 cup light brown sugar and 1/2 cup granulated sugar until light and fluffy. This usually takes 3-4 minutes with an electric mixer. If you skip this, your cookie bars might turn out dense and less chewy.
- Add the eggs and vanilla. Crack in 2 large eggs, one at a time, beating well after each addition. Stir in 2 teaspoons of pure vanilla extract. The batter should be smooth and glossy here.
- Combine the dry ingredients. In a separate bowl, whisk together 2 1/4 cups all-purpose flour, 1 teaspoon baking soda, and 1/2 teaspoon salt. This helps distribute the leavening agents evenly.
- Mix dry ingredients into wet. Gradually add the flour mixture to the butter mixture, mixing on low speed just until incorporated. Overmixing can make the bars tough, so stop as soon as no flour streaks remain.
- Fold in the chocolate chips. Using a rubber spatula, gently fold in 2 cups semi-sweet chocolate chips until evenly distributed.
- Spread batter into prepared pan. Use your spatula to smooth the batter evenly across the bottom. This ensures uniform baking and chewiness.
- Bake for 20-25 minutes. Keep an eye on the edges; they should be golden brown but the center still slightly soft. Insert a toothpick for a quick check — it should come out with a few moist crumbs, not wet batter.
- Add the marshmallow topping. Remove the pan from the oven and immediately sprinkle 3 cups mini marshmallows evenly over the top. Return to the oven and bake for an additional 5-7 minutes, or until the marshmallows are puffed and golden.
- Cool completely on a wire rack. This step is key to letting the marshmallow topping set and the bars firm up for clean slicing. It usually takes about 30-45 minutes.
- Slice and serve. Use a sharp knife to cut into squares or rectangles. You’ll want to serve these slightly warm for gooey goodness or at room temperature for easier handling.
Cooking Tips & Techniques
Making these cookie bars just right is all about timing and a few little tricks I’ve learned along the way. First, when creaming butter and sugar, don’t rush it—this traps air and creates that chewy texture we’re after. Also, watch your baking time closely; overbaking is the enemy of chewiness. You want the edges to be golden but the center still soft.
Adding the marshmallow topping near the end of baking is a game-changer. If you add them too early, they melt into the batter and lose that signature gooey top. Too late, and they don’t get that beautiful golden puff. I’ve learned from many batches that 5-7 minutes after sprinkling marshmallows is just right.
When folding in the chocolate chips, use a gentle hand to keep the batter light. Overmixing here can lead to tough bars, and nobody wants that. Lastly, cooling the bars completely before slicing helps prevent marshmallow sticking to your knife and keeps your pieces neat.
Variations & Adaptations
Feel free to make these cookie bars your own with some fun tweaks!
- Nutty Touchdown: Add 1 cup chopped toasted pecans or walnuts to the batter for a satisfying crunch that pairs beautifully with the marshmallow topping.
- Peanut Butter Swirl: Drop dollops of peanut butter on top of the batter before baking and swirl with a knife for a rich, nutty twist.
- Gluten-Free Option: Swap the all-purpose flour for a gluten-free flour blend. I recommend one with xanthan gum included for best texture.
- Seasonal Flavors: Mix in dried cranberries or chopped dried apricots with the chocolate chips for a festive, fruity surprise.
- Dairy-Free Version: Use plant-based butter and dairy-free chocolate chips to keep these bars allergy-friendly without sacrificing flavor.
I once tried adding a sprinkle of sea salt over the marshmallow topping before the final bake, and honestly, it knocked the flavor out of the park—salty-sweet perfection!
Serving & Storage Suggestions
These cookie bars are best served slightly warm, right after they’ve cooled enough to handle but while the marshmallow topping is still soft and gooey. Pair them with a cold glass of milk, hot coffee, or even a creamy vanilla ice cream scoop for game day decadence.
For storage, keep them in an airtight container at room temperature for up to 3 days. If you want to keep them longer, they freeze beautifully—wrap individual bars in plastic wrap and place them in a freezer bag for up to 3 months. To reheat, pop them in the microwave for 10-15 seconds to bring back that marshmallow gooeyness.
Fun fact: these bars actually taste better a day after baking, once the flavors meld and the marshmallow topping sets into a chewy, sticky crown. So if you’re prepping ahead, you’re in luck!
Nutritional Information & Benefits
These Ultimate Chewy Touchdown Cookie Bars pack a sweet punch, with an estimated 280-320 calories per serving depending on portion size. The cookie base offers some energy from the butter and sugars, while the chocolate chips add a touch of antioxidant-rich cocoa.
Using real butter and whole eggs provides quality fats and protein, making these bars more satisfying than your average cookie. If you add nuts, you’re sneaking in some heart-healthy fats and fiber too.
Keep in mind these bars contain gluten, dairy, and eggs, so they’re not suitable for all allergies unless adapted. They’re a fun treat, best enjoyed in moderation as part of a balanced diet.
Conclusion
In the end, these Ultimate Chewy Touchdown Cookie Bars with Gooey Marshmallow Topping are a winning recipe you’ll come back to again and again. They’re easy to make, loaded with nostalgic flavors, and bring that perfect chewy, gooey combo that’s hard to beat. Customize them to fit your taste buds or dietary needs, and you’ll have a sweet treat that’s always a crowd favorite.
I love this recipe because it reminds me of cozy family game days and the simple joy of sharing something homemade. Give it a try, and I promise you’ll understand why it’s become a staple in my kitchen. If you make these bars, please drop a comment below and share your favorite tweaks or how they turned out. I’d love to hear from you!
Happy baking, and may your game day be as sweet as these cookie bars!
FAQs
Can I make these cookie bars ahead of time?
Absolutely! You can bake them a day in advance and store them in an airtight container. They actually taste better after the flavors settle overnight.
What if I don’t have mini marshmallows?
No worries! Regular-sized marshmallows work fine; just keep an eye on baking time as they might take a little longer to melt and brown.
How do I prevent the marshmallow topping from sticking to the knife when cutting?
Let the bars cool completely before slicing. You can also lightly grease your knife or warm it under hot water and dry before cutting.
Can I use chocolate chunks instead of chips?
Yes, chocolate chunks work well and create pockets of melty chocolate throughout the bars. Just chop them to about chip size for even distribution.
Is there a vegan version of this recipe?
To make it vegan, substitute the butter with plant-based margarine, eggs with flax eggs, and use vegan marshmallows and chocolate chips. Baking times may vary slightly, so keep an eye on the bars.
Pin This Recipe!
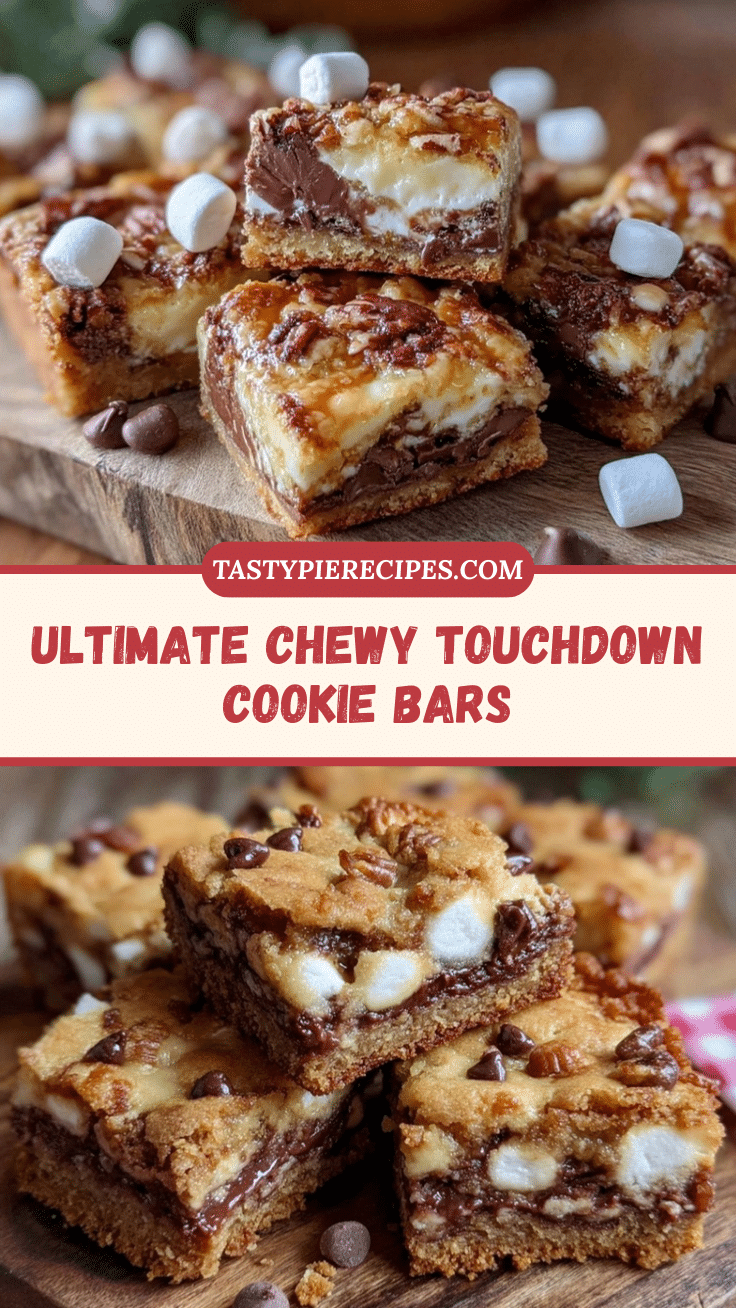
Ultimate Chewy Touchdown Cookie Bars Recipe with Gooey Marshmallow Topping

These chewy cookie bars topped with gooey marshmallows are perfect for game day, combining a rich chocolate-studded base with a sticky, sweet marshmallow layer.
- Prep Time: 15 minutes
- Cook Time: 30 minutes
- Total Time: 45 minutes
- Yield: 24 bars 1x
- Category: Dessert
- Cuisine: American
Ingredients
- 1 cup (226g) unsalted butter, softened
- 1 cup (220g) packed light brown sugar
- 1/2 cup (100g) granulated sugar
- 2 large eggs, room temperature
- 2 teaspoons pure vanilla extract
- 2 1/4 cups (280g) all-purpose flour
- 1 teaspoon baking soda
- 1/2 teaspoon salt
- 2 cups (340g) semi-sweet chocolate chips
- 3 cups (about 180g) mini marshmallows
Instructions
- Preheat your oven to 350°F (175°C). Grease a 9×13 inch baking pan or line it with parchment paper.
- In a large mixing bowl, cream together 1 cup softened unsalted butter, 1 cup light brown sugar, and 1/2 cup granulated sugar until light and fluffy, about 3-4 minutes.
- Add 2 large eggs one at a time, beating well after each addition. Stir in 2 teaspoons pure vanilla extract.
- In a separate bowl, whisk together 2 1/4 cups all-purpose flour, 1 teaspoon baking soda, and 1/2 teaspoon salt.
- Gradually add the dry ingredients to the wet ingredients, mixing on low speed just until incorporated.
- Fold in 2 cups semi-sweet chocolate chips gently with a rubber spatula.
- Spread the batter evenly into the prepared baking pan.
- Bake for 20-25 minutes until edges are golden and center is slightly soft. Test with a toothpick; it should come out with moist crumbs.
- Remove from oven and immediately sprinkle 3 cups mini marshmallows evenly over the top.
- Return to oven and bake for an additional 5-7 minutes until marshmallows are puffed and golden.
- Cool completely on a wire rack for 30-45 minutes to set the marshmallow topping.
- Slice into squares or rectangles and serve slightly warm or at room temperature.
Notes
Do not overmix the batter to keep bars chewy. Add marshmallows near the end of baking to keep them gooey and golden. Cool bars completely before slicing to prevent marshmallow sticking. Optional add-ins include 1 cup chopped toasted pecans or walnuts. For dairy-free, use plant-based butter and dairy-free chocolate chips. For gluten-free, substitute all-purpose flour with gluten-free flour blend.
Nutrition
- Serving Size: 1 bar (assuming 24 b
- Calories: 300
- Sugar: 28
- Sodium: 150
- Fat: 15
- Saturated Fat: 9
- Carbohydrates: 40
- Fiber: 2
- Protein: 4
Keywords: cookie bars, chewy cookie bars, marshmallow topping, game day dessert, chocolate chip cookie bars, easy cookie bars, chewy cookies


