The second that gooey marshmallow scent hits the air, I’m instantly taken back to summer nights by the campfire—sticky fingers, melted chocolate, and laughter echoing in the background. Let’s face it, there’s just something magical about s’mores. But what if you could get all that nostalgia and chocolatey decadence in a single, glorious pie? That’s exactly what this irresistible 30-minute s’mores pie delivers. Honestly, this recipe was born out of pure necessity. One rainy Friday, my kids were craving s’mores, but the weather had other plans. Enter my trusty pie dish, a bag of marshmallows, and a little kitchen magic. Now, it’s my go-to shortcut dessert for parties, movie nights, or whenever a craving strikes.
What I love most about this s’mores pie recipe is how it brings people together. It’s a guaranteed crowd-pleaser—kids, teens, and adults all dig in with equal enthusiasm. If you’re looking for an easy dessert that tastes like you spent hours on it (spoiler: it takes less than 30 minutes!), you’re in the right spot. Over the years, I’ve tweaked and tested this recipe more times than I can count, making sure every bite is perfectly gooey, chocolatey, and crunchy. Whether you’re a seasoned baker or a total newbie, you’ll find this recipe foolproof and seriously satisfying.
Not only does this s’mores pie check all the flavor boxes, but it’s also made with simple pantry staples and zero fancy equipment. Plus, the shortcut method means you get to indulge in those classic campfire flavors—no tent required. Trust me, this easy s’mores pie recipe is about to become your new secret weapon for last-minute desserts and sweet family memories.
Why You’ll Love This Recipe
- Quick & Easy: Ready in under 30 minutes from start to finish. Perfect for busy weeknights, spontaneous get-togethers, or when that sweet tooth just won’t quit.
- Simple Ingredients: No need for a shopping spree. Everything you need for this s’mores pie recipe is probably already in your pantry—graham crackers, chocolate, and marshmallows.
- Perfect for Any Occasion: This pie shines at potlucks, birthday parties, holiday gatherings, or even as a cozy dessert after a casual family dinner.
- Crowd-Pleaser: It’s practically impossible to resist. I’ve served this to picky eaters, chocolate fanatics, and even my grandma—everyone asks for seconds.
- Unbelievably Delicious: The combination of gooey toasted marshmallows, silky chocolate, and a crunchy graham crust is pure comfort food bliss.
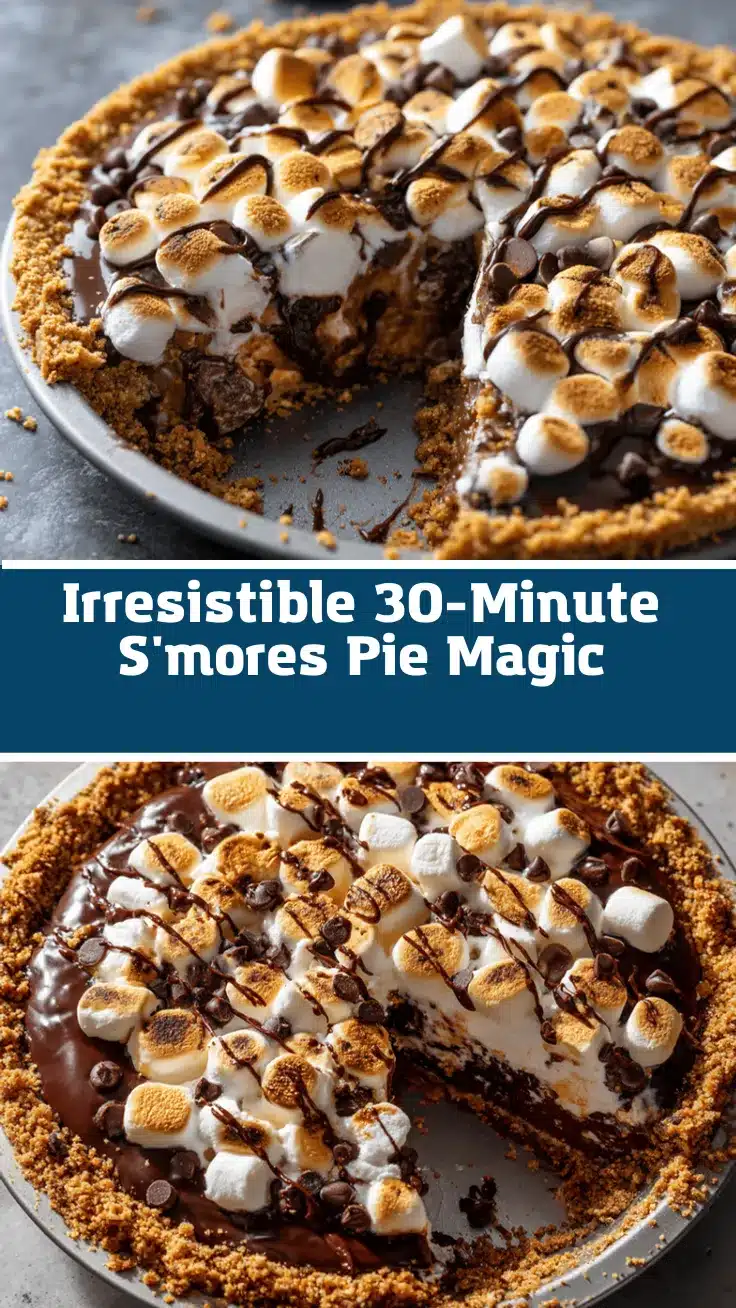
What really sets this s’mores pie apart is the shortcut technique—no endless mixing or complicated steps. Instead, you get all the flavor of classic s’mores in a format you can slice and share. I’ve found that blending semi-sweet and milk chocolate gives the richest, most balanced chocolate layer. Plus, giving the marshmallows a quick toast under the broiler delivers that campfire vibe (without the bugs or smoke). This is not just another s’mores dessert. It’s the one you’ll crave, make on repeat, and brag about to your friends. Honestly, the first time I brought this to a block party, not a single crumb was left.
Beyond the taste, there’s something joyful about serving a pie that sparks memories and conversation. It’s comfort food with a playful twist—easy enough for weeknight baking, special enough for celebrations. If you dream of making dessert a little more fun (and a lot more delicious), this easy s’mores pie recipe is your ticket.
What Ingredients You Will Need
This s’mores pie recipe uses simple, everyday ingredients that come together for an over-the-top dessert—no complicated shopping list here. Each ingredient plays a key role in achieving that signature s’mores flavor and texture. Here’s what you’ll need:
- For the Graham Cracker Crust:
- 1 1/2 cups (150g) graham cracker crumbs (about 10 full crackers; honey or cinnamon flavor both work)
- 1/3 cup (75g) unsalted butter, melted (adds richness and helps the crust hold together)
- 1/4 cup (50g) granulated sugar (boosts sweetness and caramelizes the crust)
- Pinch of salt (balances the sweetness)
- For the Chocolate Layer:
- 1 cup (180g) semi-sweet chocolate chips (I like Ghirardelli for the best melt)
- 1 cup (180g) milk chocolate chips (for that classic s’mores flavor—Hershey’s is a winner)
- 1/2 cup (120ml) heavy cream (creates a silky, truffle-like chocolate filling)
- 1/2 teaspoon vanilla extract (optional, but adds a lovely warmth)
- For the Marshmallow Topping:
- 1 bag (about 10 oz/280g) large marshmallows (you’ll use about 25-30 for a 9-inch pie)
- Optional: mini marshmallows for extra coverage or fun decorating
Ingredient Tips: If you’re gluten-free, swap in gluten-free graham crackers—Schar and Pamela’s brands bake up nicely. For a dairy-free version, use coconut cream and vegan chocolate chips. I sometimes toss in a handful of chopped dark chocolate for a deeper cocoa hit. If you’re short on time, a store-bought graham cracker crust totally works (been there, done that on a Monday night!).
The beauty of this recipe is its flexibility. You can use any chocolate you love (even white chocolate, if you’re feeling wild) and mix up the crust with chocolate wafer cookies or even pretzels for a salty twist. Honestly, as long as you have graham crackers, chocolate, and marshmallows, you’re golden.
Equipment Needed
- 9-inch Pie Dish: Glass or ceramic both work. I’ve used disposable aluminum pans for easy cleanup at parties (no judgment!).
- Mixing Bowls: At least two—one for mixing the crust, one for melting chocolate.
- Measuring Cups & Spoons: For accuracy, especially with the crust.
- Microwave-safe Bowl or Double Boiler: For melting chocolate and cream together. If you don’t have a double boiler, a heatproof bowl set over a pot of simmering water does the trick.
- Spatula or Spoon: For mixing and spreading.
- Baking Sheet: Optional, but useful to catch any marshmallow overflow in the oven.
- Oven Mitts: Trust me, the pie plate gets hot.
If you don’t have a pie dish, an 8×8-inch square pan or even a small cast iron skillet works (the crust might be a little thicker—yum!). For the chocolate, I’ve melted everything in the microwave in 20-second bursts, stirring in between, and it works just fine. If you’re using nonstick pans, avoid metal utensils to keep them scratch-free. And for budget-friendly options, the dollar store pie tins hold up great for potlucks or gifting.
Preparation Method
- Preheat and Prep: Set your oven to 350°F (175°C). Place a rack in the center. Lightly grease your pie dish (especially if it’s not nonstick) to help with easy removal.
- Make the Graham Cracker Crust: In a medium mixing bowl, combine 1 1/2 cups (150g) graham cracker crumbs, 1/3 cup (75g) melted butter, 1/4 cup (50g) sugar, and a pinch of salt. Stir until the texture resembles wet sand. Press the mixture evenly into the bottom and up the sides of your pie dish. Use the flat bottom of a measuring cup to compact it well (this helps prevent crumbling).
- Bake the Crust: Bake for 8-10 minutes, until lightly golden and set. The kitchen should start to smell delightfully buttery at this point. Remove and let cool slightly while you prep the chocolate.
- Make the Chocolate Filling: In a microwave-safe bowl, add 1 cup (180g) semi-sweet chocolate chips, 1 cup (180g) milk chocolate chips, and 1/2 cup (120ml) heavy cream. Microwave in 20-second intervals, stirring after each, until smooth and glossy (about 1-1.5 minutes total). Stir in 1/2 teaspoon vanilla extract if using. If using a double boiler, melt over simmering water, stirring until smooth.
- Pour and Level: Pour the chocolate mixture into the cooled graham crust. Use a spatula to smooth the top. Let it sit for 5-10 minutes so it can firm up just a bit (placing it in the fridge for a few minutes helps if you’re in a rush!).
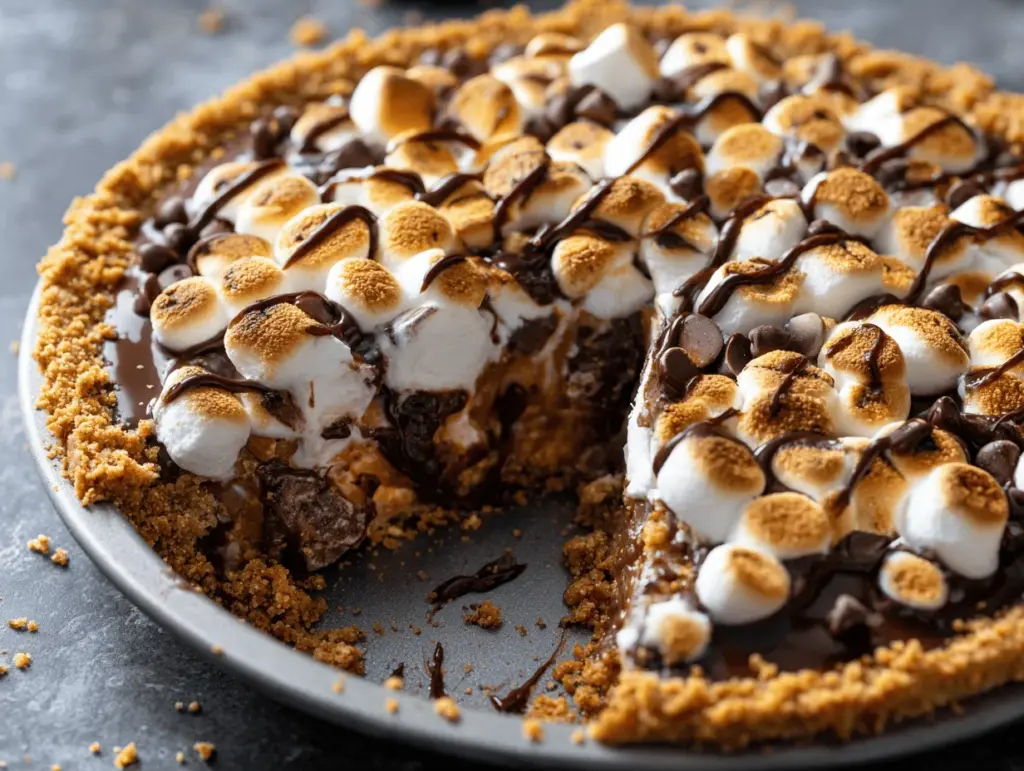
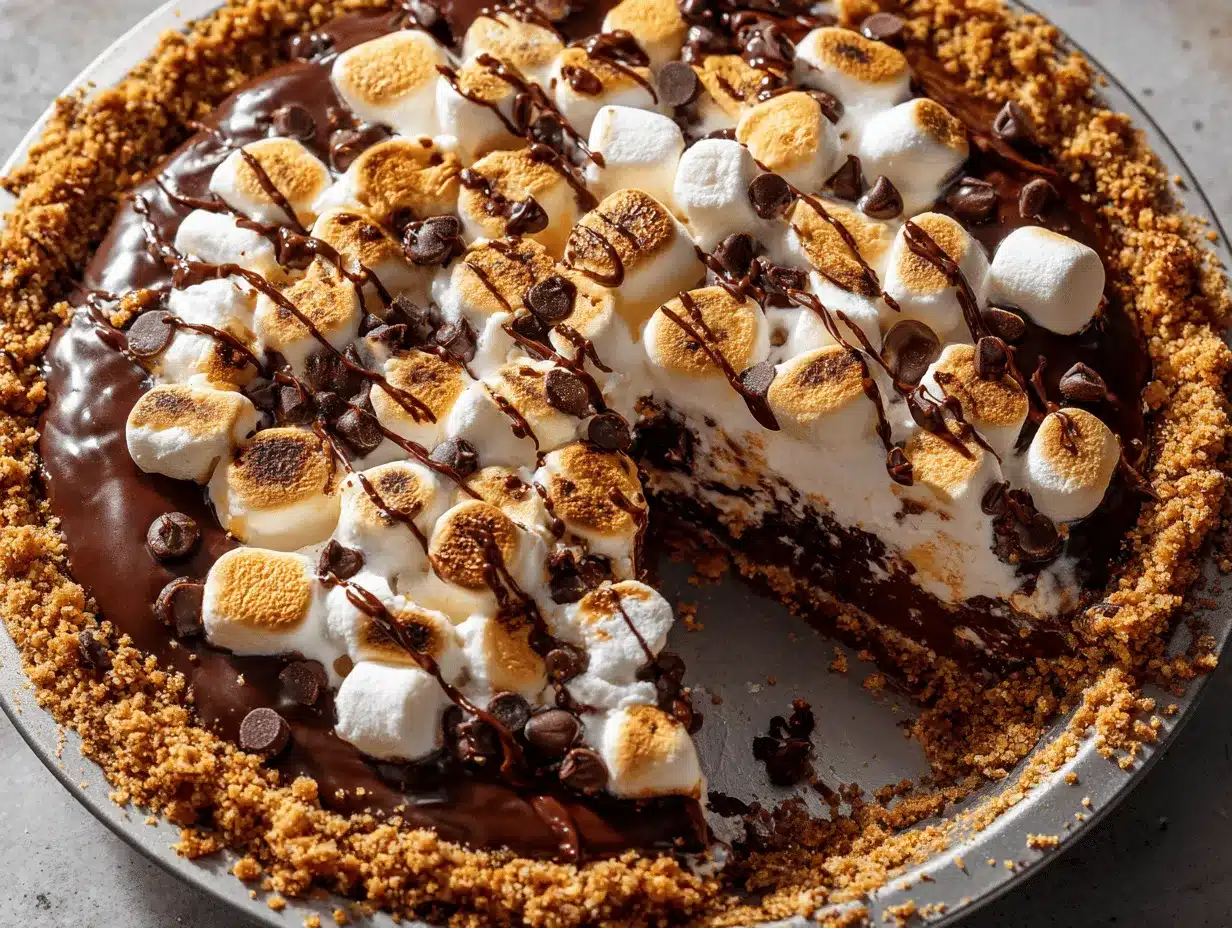
- Add the Marshmallows: Arrange large marshmallows on top of the chocolate in a single, snug layer. For extra coverage, fill gaps with mini marshmallows. The more marshmallows, the gooier the top will be.
- Toast the Marshmallows: Place the pie back in the oven and bake for 8-10 minutes, or until marshmallows are puffed and golden brown. For a more toasted look, broil for 1-2 minutes—watch closely, as they go from golden to burnt in seconds! (I’ve learned this the hard way—never walk away from the broiler.)
- Cool and Serve: Let the pie cool for at least 10 minutes before slicing. The filling will thicken as it cools, making for cleaner slices. If you prefer super gooey, serve while still warm with a big spoon. (Honestly, I’ve served it both ways and never had leftovers either time.)
Troubleshooting: If your crust is crumbling, it likely needs more butter or tighter packing. Chocolate not melting? Add a splash more cream and heat gently. Marshmallows too dark? Next time, lower the oven rack a notch. The pie is pretty forgiving—if it’s messy, just call it “rustic” and dig in!
Cooking Tips & Techniques
After baking this s’mores pie more times than I can count, I’ve picked up a few tricks that make all the difference. First off, tightly packing the graham crust with the bottom of a measuring cup keeps it from falling apart. Don’t skip chilling the crust for a few minutes before adding the chocolate—it helps everything stay neat.
When melting chocolate and cream, patience is key. Stir often and use low heat (either in the microwave or double boiler). If the chocolate seizes, don’t panic—just add a splash more cream and gently whisk until smooth. For the marshmallows, broiling gives that classic campfire look, but keep the oven door cracked and never take your eyes off them. I’ve turned my marshmallows into charcoal more than once by getting distracted!
Multitasking is your friend here. While the crust bakes, melt the chocolate and prep the marshmallows. If you’re serving a crowd, use mini marshmallows for easier slicing. And for the neatest slices, let the pie cool completely before cutting with a serrated knife coated in nonstick spray. If you’re impatient (I get it), embrace the goo and serve warm—just have napkins handy!
Consistency is all about ingredient ratios. Measure carefully, and if in doubt, a little extra butter in the crust won’t hurt. This pie is all about fun, so don’t stress if it doesn’t look perfect. The messier it is, the more it feels like campfire s’mores—trust me on that one.
Variations & Adaptations
One of the best things about this s’mores pie recipe is how easy it is to tweak for different flavors, diets, or even seasons. Here’s how you can make it your own:
- Gluten-Free S’mores Pie: Swap regular graham crackers for gluten-free ones (Schar is my favorite brand). The rest of the recipe stays exactly the same.
- Peanut Butter S’mores Pie: Add 1/2 cup creamy peanut butter to the melted chocolate filling. It’s rich, nutty, and so good—I first tried this for a friend’s birthday, and it’s been requested ever since.
- Holiday Twist: Use peppermint chocolate chips in place of some regular chips and sprinkle crushed candy canes over the marshmallows before toasting. It’s festive and totally addicting at Christmastime!
If you’re dairy-free, substitute coconut cream for the heavy cream and use dairy-free chocolate and butter. For a less sweet pie, try dark chocolate chips instead of milk chocolate. You can also add a pinch of cinnamon or espresso powder to the chocolate for a grown-up twist. I’ve even swapped in chocolate wafer cookies for the crust once when I ran out of grahams—no complaints!
Want to cook it differently? Try making “mini” s’mores pies in muffin tins for individual servings—they’re adorable for parties and bake up even faster. No matter how you adapt it, this pie is always a hit.
Serving & Storage Suggestions
This s’mores pie is best served slightly warm, when the marshmallows are gooey and the chocolate is just set. If you want those perfect, Instagram-worthy slices, let the pie cool completely, then cut with a sharp, greased knife. I like to serve each slice with a scoop of vanilla ice cream or a drizzle of chocolate sauce for extra decadence. Coffee or hot chocolate are classic drink pairings, especially on chilly nights.
If you have leftovers (rare, but it happens!), cover the pie loosely with foil and store in the fridge for up to 3 days. The crust will soften a bit, but the flavors meld and it’s still delicious. To reheat, pop a slice in the microwave for 10-15 seconds or warm the whole pie in a low oven (300°F/150°C) for 5-7 minutes—just enough to soften the marshmallows again.
Planning ahead? You can assemble the crust and chocolate layer a day in advance, then add and toast the marshmallows right before serving. Honestly, the pie gets more irresistible as the chocolate sets and the flavors mingle—if you can wait that long!
Nutritional Information & Benefits
Each slice of this s’mores pie (assuming 10 slices per pie) is around 340 calories, with about 5g of protein, 33g carbs, and 19g fat. The graham crackers and chocolate provide some fiber and antioxidants, while marshmallows keep it fun. If you use dark chocolate, you get a little extra iron and less sugar. This recipe can be gluten-free or dairy-free with simple swaps—perfect for allergies or special diets.
Potential allergens include gluten, dairy, and soy (if using certain chocolates). As a dessert, it’s definitely a treat, but I like knowing exactly what’s in it—no weird preservatives or artificial flavors. For me, part of wellness is making room for joy, and this pie delivers plenty of that!
Conclusion
This irresistible 30-minute s’mores pie recipe is proof that you don’t need a campfire (or hours in the kitchen) to enjoy classic s’mores magic. It’s easy, fast, and always brings smiles—whether for a weeknight treat or a special gathering. I love how it sparks memories, starts conversations, and brings everyone back for seconds (and thirds).
Don’t be afraid to make this recipe your own. Add peanut butter, swap the chocolate, try a new crust—whatever suits your mood. The best part is sharing it with the people you love, no matter the occasion.
If you try this s’mores pie, let me know in the comments how it turned out—and if you gave it your own twist! Pin it, share it, or send it to a friend who needs a little dessert inspiration. Here’s to delicious shortcuts and sweet moments—happy baking!
Frequently Asked Questions
How do I keep the marshmallows from burning on top of my s’mores pie?
Keep a close eye when broiling—marshmallows can go from golden to burnt in seconds. Stay by the oven and rotate the pie for even browning if needed.
Can I make this s’mores pie in advance?
Yes! Prepare the crust and chocolate layer up to a day ahead. Add and toast the marshmallows just before serving for the best gooey texture.
What’s the best way to cut neat slices of s’mores pie?
Let the pie cool completely, then use a serrated knife coated with nonstick spray. Wipe the knife clean between slices for sharp edges.
Can I use mini marshmallows instead of large ones?
Absolutely. Mini marshmallows work great and make for easier slicing. You can even mix both sizes for a fun texture on top.
Is there a way to make this pie gluten-free or dairy-free?
Yes! Use gluten-free graham crackers for the crust and dairy-free chocolate plus coconut cream in the filling. Swap butter for a vegan alternative if needed.
Pin This Recipe!
Smores Pie Recipe Easy 30-Minute Dessert Everyone Loves
This irresistible s’mores pie brings all the gooey, chocolatey nostalgia of campfire s’mores into a quick, crowd-pleasing dessert you can make in under 30 minutes. With a buttery graham cracker crust, silky chocolate filling, and toasted marshmallow topping, it’s the ultimate shortcut treat for any occasion.
- Prep Time: 10 minutes
- Cook Time: 18-20 minutes
- Total Time: 28-30 minutes
- Yield: 10 servings 1x
- Category: Dessert
- Cuisine: American
Ingredients
- 1 1/2 cups (150g) graham cracker crumbs (about 10 full crackers; honey or cinnamon flavor)
- 1/3 cup (75g) unsalted butter, melted
- 1/4 cup (50g) granulated sugar
- Pinch of salt
- 1 cup (180g) semi-sweet chocolate chips
- 1 cup (180g) milk chocolate chips
- 1/2 cup (120ml) heavy cream
- 1/2 teaspoon vanilla extract (optional)
- 1 bag (about 10 oz/280g) large marshmallows (about 25–30 for a 9-inch pie)
- Optional: mini marshmallows for extra coverage or decorating
Instructions
- Preheat oven to 350°F (175°C). Lightly grease a 9-inch pie dish.
- In a medium mixing bowl, combine graham cracker crumbs, melted butter, sugar, and a pinch of salt. Stir until the mixture resembles wet sand.
- Press the mixture evenly into the bottom and up the sides of the pie dish. Compact well using the bottom of a measuring cup.
- Bake the crust for 8-10 minutes, until lightly golden and set. Remove and let cool slightly.
- In a microwave-safe bowl, combine semi-sweet chocolate chips, milk chocolate chips, and heavy cream. Microwave in 20-second intervals, stirring after each, until smooth and glossy (about 1-1.5 minutes total). Stir in vanilla extract if using.
- Pour the chocolate mixture into the cooled graham crust and smooth the top. Let sit for 5-10 minutes to firm up (refrigerate briefly if needed).
- Arrange large marshmallows on top of the chocolate in a single, snug layer. Fill gaps with mini marshmallows if desired.
- Return the pie to the oven and bake for 8-10 minutes, or until marshmallows are puffed and golden brown. For a more toasted look, broil for 1-2 minutes, watching closely.
- Let the pie cool for at least 10 minutes before slicing. For cleaner slices, cool completely before cutting with a greased serrated knife.
Notes
For gluten-free, use gluten-free graham crackers. For dairy-free, substitute coconut cream and vegan chocolate/butter. Chill the crust before adding chocolate for neater slices. Watch marshmallows closely under the broiler to prevent burning. Store leftovers in the fridge for up to 3 days; reheat gently to soften marshmallows.
Nutrition
- Serving Size: 1 slice (1/10 of pie)
- Calories: 340
- Sugar: 22
- Sodium: 160
- Fat: 19
- Saturated Fat: 11
- Carbohydrates: 33
- Fiber: 2
- Protein: 5
Keywords: smores pie, easy dessert, chocolate pie, marshmallow pie, graham cracker crust, quick dessert, summer dessert, campfire dessert, kid friendly, party dessert