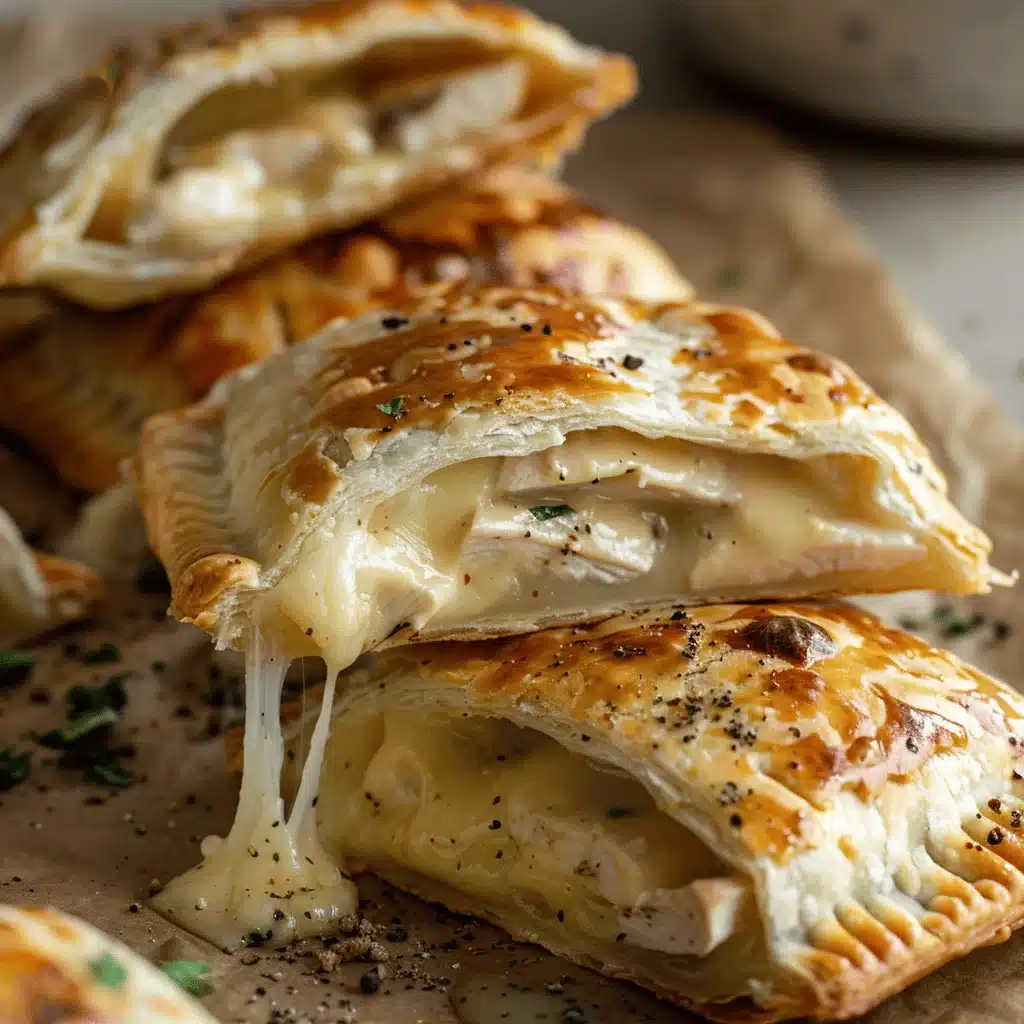
Let me tell you, the first time I bit into a melty garlic chicken & cheese hand pie, I nearly forgot about dinner altogether. The buttery pastry flaked in my fingers, oozing with gooey cheese and savory chicken, all wrapped up with a punch of garlic that made my kitchen smell absolutely amazing. If you’ve ever craved a snack so comforting it feels like a warm hug (especially on those rainy afternoons or busy weeknights), these hand pies are about to become your new favorite.
I started making garlic chicken & cheese hand pies when I was looking for something quick that wouldn’t skimp on flavor. You know the drill—everyone’s hungry, but you want something homemade, not just another frozen pizza. These hand pies are the answer! They’re super portable, easy to reheat, and honestly, they disappear faster than you’d expect. I’ve tweaked this recipe after countless batches (some vanished before they even cooled), and now I’ve got it down to a science.
This recipe is perfect for families with kids who turn up their noses at “boring” chicken, or for anyone chasing that ultimate comfort snack. Whether you need a hearty lunchbox treat, a quick dinner, or a crowd-pleasing party bite, garlic chicken & cheese hand pies are up to the task. And let’s face it—sometimes you just need something melty and cheesy to lift your spirits. After testing and sharing with friends (and even my pickiest cousin), I can honestly say: these hand pies are worth every minute in the kitchen.
Why You’ll Love This Recipe
- Quick & Easy: Ready in about 35 minutes, including prep—just what you need on busy days.
- Simple Ingredients: Most of these are fridge and pantry staples. No wild goose chases at the store!
- Perfect for Any Occasion: Think game days, kids’ lunches, cozy movie nights, or a brunch spread.
- Crowd-Pleaser: Trust me, nobody stops at just one. Kids, teens, adults—they all ask for seconds.
- Unbelievably Delicious: The combo of melty cheese, juicy chicken, and fragrant garlic tucked inside flaky pastry is pure comfort.
What sets these garlic chicken & cheese hand pies apart? I blend minced garlic right into the filling and brush the pastry with garlic butter before baking. That means every bite bursts with flavor and aroma. Plus, the cheese melts into the chicken, making the filling creamy and rich.
I’ve tried lots of hand pie recipes, but this one is my go-to because of the technique—pressing the edges with a fork helps seal in all the goodness so nothing leaks out in the oven. And you don’t need fancy pastry skills! Even if you’ve never made a hand pie, you’ll nail it on your first try.
My favorite thing: these hand pies aren’t just tasty, they’re comforting. There’s something magical about handheld food that’s warm, cheesy, and just a little garlicky. It’s the kind of snack that makes you sigh with happiness. And if you want to impress guests without stress, these little pies will wow everyone—no chef hat required.
What Ingredients You Will Need
This recipe uses simple, wholesome ingredients to deliver bold flavor and a satisfying texture—no fancy stuff, just classic comfort. Here’s what you’ll need for irresistible garlic chicken & cheese hand pies:
- For the Filling:
- Cooked chicken breast, shredded (2 cups/320g) – I like using rotisserie chicken for convenience.
- Garlic cloves, minced (3 large) – fresh garlic gives the best flavor punch.
- Cream cheese, softened (3 oz/85g) – makes the filling creamy and rich.
- Shredded mozzarella cheese (1 cup/100g) – melts beautifully. You can sub cheddar for extra tang.
- Shredded parmesan cheese (1/4 cup/25g) – adds depth. Use freshly grated if possible.
- Fresh parsley, chopped (2 tbsp/8g) – for color and a hint of freshness.
- Salt (1/2 tsp/3g) and black pepper (1/4 tsp/1g) – adjust to taste.
- Optional: Red pepper flakes (1/4 tsp/1g) – for a little kick.
- For the Pastry:
- Refrigerated pie crusts (2 rounds, about 14 oz/400g total) – shortcut alert! You can use homemade, but store-bought works great.
- All-purpose flour, for dusting (2 tbsp/15g).
- For the Garlic Butter:
- Unsalted butter, melted (2 tbsp/28g).
- Garlic powder (1/2 tsp/2g) – for extra garlicky crust.
- Fresh parsley, chopped (1 tsp/4g).
- For Egg Wash:
- Large egg (1), beaten – gives the pies a golden finish.
- Milk (1 tbsp/15ml) – blends with the egg for shine.
If you’re gluten-free, swap the pie crust for a gluten-free pastry (I like Bob’s Red Mill). For dairy-free, use vegan cheese and dairy-free cream cheese. You can even use leftover turkey or ham instead of chicken—this recipe is super flexible.
When I’m out of fresh parsley, I toss in a pinch of dried Italian herbs. And honestly, if you want to add veggies (like spinach or mushrooms), go for it! Just make sure to sauté and drain them first so the pies don’t get soggy.
Equipment Needed
- Large mixing bowl – for combining the filling. I use my trusty stainless steel bowl; it’s easy to clean.
- Cutting board and sharp knife – for chopping garlic and parsley.
- Measuring cups and spoons – don’t eyeball the garlic unless you love surprises.
- Rolling pin – optional, but helps even out store-bought crusts.
- Pastry brush – for spreading garlic butter and egg wash. (A clean silicone brush works well, and it’s dishwasher-safe!)
- Baking sheet – lined with parchment paper for easy clean-up.
- Fork – to crimp the edges and seal in all that cheesy goodness.
- Small bowl – for mixing the egg wash and garlic butter.
If you don’t have a rolling pin, a clean glass bottle works in a pinch (been there, done that). And if you’re short on baking sheets, just bake in batches. I’ve used basic non-stick trays and even old-school aluminum pans—both work fine as long as you use parchment. Just don’t skip the crimping step; a fork is key for sealing those pies so the filling stays put.
Preparation Method

- Preheat and Prep: Preheat your oven to 400°F (200°C). Line a baking sheet with parchment paper. This prevents sticking and makes cleanup a breeze.
- Make the Filling: In a large bowl, combine 2 cups (320g) shredded cooked chicken, 3 minced garlic cloves, 3 oz (85g) cream cheese, 1 cup (100g) shredded mozzarella, 1/4 cup (25g) parmesan, 2 tbsp (8g) parsley, 1/2 tsp (3g) salt, 1/4 tsp (1g) pepper, and a pinch of red pepper flakes if you like a kick. Mix until creamy and well blended. If the mixture seems dry, add 1-2 tbsp (15-30ml) milk.
- Roll Out the Pastry: On a lightly floured surface, roll out each pie crust to about 1/8-inch (3mm) thick. If using store-bought, sometimes it’s a little thick—rolling helps! Cut out circles using a 4-inch (10cm) cutter or rim of a glass. You’ll get about 10-12 rounds.
- Fill the Hand Pies: Spoon 1-2 tbsp (15-30g) filling into the center of each pastry circle. Be careful not to overfill (I learned this after my first batch leaked everywhere!).
- Seal and Crimp: Fold the pastry over the filling to form a half-moon. Press edges together, then crimp with a fork. This step is important—if you skip it, the cheese might ooze out during baking.
- Add Egg Wash: In a small bowl, whisk together 1 beaten egg with 1 tbsp (15ml) milk. Brush over the top of each hand pie for a golden, glossy finish.
- Prepare Garlic Butter: Mix 2 tbsp (28g) melted butter, 1/2 tsp (2g) garlic powder, and 1 tsp (4g) parsley. Brush lightly over each hand pie (this is where the magic happens!).
- Bake: Arrange the hand pies on your prepared baking sheet. Bake for 18-20 minutes, or until golden brown and bubbling. Rotate halfway if your oven cooks unevenly.
- Cool Slightly: Let the pies cool on the pan for 5 minutes before serving—trust me, they’re lava-hot inside!
Notes: If you notice the edges splitting, press again with the fork. For extra crispiness, bake an additional 2-3 minutes. If the cheese leaks, don’t worry—the crispy bits are delicious! I sometimes sprinkle a little extra parmesan on top before baking for a cheesy crust.
Cooking Tips & Techniques
- Seal Well: Pressing the edges with a fork really matters. If you skip it, the filling could escape. I learned this the hard way on my first try—cheese everywhere, but still tasty!
- Don’t Overfill: It’s tempting to pack in more filling, but go easy. Too much will cause the pies to burst open. A heaped tablespoon is usually perfect.
- Egg Wash for Shine: Mixing egg with milk gives the pies a glossy finish. If you only use egg, it can be a little streaky.
- Use Cold Pastry: If the dough is too warm, the pies won’t hold their shape. Chill the rounds for 10 minutes before filling if your kitchen is warm.
- Multitasking: While the pies bake, whip up a simple salad or prep a dipping sauce. I often use the bake time to tidy the kitchen—it’s a win-win!
- Check for Doneness: Look for deep golden color and bubbling cheese at the edges. If the pastry is pale, give it a few more minutes.
Common mistakes include overfilling, not sealing the edges, or using warm pastry. If a pie does burst, don’t stress—the crispy cheese bits on the pan are a secret treat. For even baking, don’t overcrowd the sheet. Space the pies out so the air circulates (I learned this after a few soggy bottoms!).
Consistency is key: weigh your ingredients for best results. And if you want a little extra flavor, sprinkle garlic salt over the pies before baking. Trust me, it’s a game-changer!
Variations & Adaptations
- Gluten-Free: Use gluten-free pie crusts. Bob’s Red Mill or Schär work well. The filling stays the same—just watch baking times (gluten-free dough can brown faster).
- Vegetarian: Swap chicken for sautéed mushrooms and spinach. Make sure to drain veggies well to avoid soggy pies.
- Spicy Kick: Add jalapeños or a sprinkle of cayenne to the filling. I sometimes toss in pepper jack cheese for a little heat.
- Dairy-Free: Use vegan cream cheese and cheese alternatives. Earth Balance makes a great dairy-free butter for the garlic topping.
- Seasonal Twist: In fall, add diced roasted pumpkin and sage. In summer, try chopped sun-dried tomatoes and basil for a Mediterranean vibe.
I’ve also tried mini versions for parties—use a smaller cutter and reduce baking time to 12-15 minutes. If you’re cooking for kids, leave out the red pepper flakes and use mild cheese. For adults, a sprinkle of smoked paprika adds depth. Feel free to mix and match fillings based on what’s in your fridge—these hand pies are all about comfort and creativity!
Serving & Storage Suggestions
Serve garlic chicken & cheese hand pies warm for the ultimate melty experience. I love arranging them on a wooden board with a bowl of marinara or ranch for dipping—makes them look extra inviting! These pies pair well with a crisp salad or a bowl of tomato soup if you want something heartier.
For storage, let the hand pies cool completely, then store in an airtight container in the fridge for up to 3 days. They freeze beautifully—wrap individually in foil, then pop in a freezer bag for up to 2 months. To reheat, bake at 350°F (175°C) for 10-12 minutes, or microwave for 30-40 seconds (though the oven keeps the pastry crispier).
Honestly, the flavors get even better after a day. The garlic infuses the filling, and the pastry stays flaky. If you want to serve for a party, make ahead and reheat—nobody will guess they weren’t baked fresh!
Nutritional Information & Benefits
Each garlic chicken & cheese hand pie contains about 220 kcal, 12g protein, 14g fat, and 14g carbs (estimate, varies by brand and size). They’re a good source of protein thanks to chicken and cheese, and the garlic offers immune-boosting properties.
If you use whole wheat pastry, you’ll add fiber (great for digestion). You can make these lower-carb by using almond flour crust. They’re also easy to adjust for gluten-free and dairy-free diets—just swap the pastry and cheese. If you’re watching sodium, use low-salt cheeses and check the labels.
I like them as a post-workout snack—protein from chicken and cheese helps muscle recovery, and the carbs give quick energy. Just keep in mind: there’s dairy and wheat unless you adapt. If you have allergies, check all cheese and pastry labels for hidden ingredients.
Conclusion
Garlic chicken & cheese hand pies are the kind of comfort snack that makes every moment a little brighter. They’re easy to make, packed with flavor, and totally customizable. Whether you’re feeding a hungry family or just need a pick-me-up after work, these hand pies deliver every time.
I love this recipe because it’s flexible—switch up fillings, try new cheeses, or go gluten-free. It’s forgiving, too; even if a pie bursts, it still tastes amazing. If you’re new to hand pies, don’t stress. You’ll get better with each batch, and the results are always delicious.
Give these garlic chicken & cheese hand pies a try, and let me know how you customize them! Share your tweaks in the comments—did you add herbs, try a vegetarian filling, or discover a new dipping sauce? I can’t wait to hear about your kitchen adventures. Here’s to melty, cheesy comfort in every bite!
FAQs
Can I make garlic chicken & cheese hand pies ahead of time?
Yes! Assemble and refrigerate up to 24 hours before baking. Or freeze unbaked pies for up to 2 months—bake straight from frozen, just add 5 minutes.
What’s the best cheese for these hand pies?
Mozzarella melts best, but cheddar, gouda, or pepper jack all work. Mix and match for your favorite combo!
Can I use leftover cooked chicken?
Absolutely. Rotisserie chicken, grilled breast, or even leftover turkey work perfectly. Just shred or chop finely.
How do I keep the pastry from getting soggy?
Drain any wet ingredients well, and don’t overfill the pies. Baking on parchment helps keep bottoms crisp.
Are garlic chicken & cheese hand pies kid-friendly?
Yes! Most kids love the cheesy filling. Skip the spicy stuff for picky eaters and serve with their favorite dipping sauce.
PrintGarlic Chicken & Cheese Hand Pies

These melty, cheesy hand pies feature savory garlic chicken and gooey cheese wrapped in buttery pastry. Perfect as a comforting snack, lunchbox treat, or party bite, they’re quick to make and guaranteed to please both kids and adults.
- Prep Time: 15 minutes
- Cook Time: 20 minutes
- Total Time: 35 minutes
- Yield: 10-12 hand pies 1x
- Category: Snack
- Cuisine: American
Ingredients
- 2 cups cooked chicken breast, shredded
- 3 large garlic cloves, minced
- 3 oz cream cheese, softened
- 1 cup shredded mozzarella cheese
- 1/4 cup shredded parmesan cheese
- 2 tbsp fresh parsley, chopped
- 1/2 tsp salt
- 1/4 tsp black pepper
- 1/4 tsp red pepper flakes (optional)
- 2 refrigerated pie crusts (about 14 oz total)
- 2 tbsp all-purpose flour, for dusting
- 2 tbsp unsalted butter, melted
- 1/2 tsp garlic powder
- 1 tsp fresh parsley, chopped
- 1 large egg, beaten
- 1 tbsp milk
Instructions
- Preheat oven to 400°F (200°C). Line a baking sheet with parchment paper.
- In a large bowl, combine shredded chicken, minced garlic, cream cheese, mozzarella, parmesan, parsley, salt, pepper, and red pepper flakes (if using). Mix until creamy and well blended. If mixture is dry, add 1-2 tbsp milk.
- On a lightly floured surface, roll out each pie crust to about 1/8-inch thick. Cut out circles using a 4-inch cutter or glass rim (about 10-12 rounds).
- Spoon 1-2 tbsp filling into the center of each pastry circle. Do not overfill.
- Fold pastry over filling to form a half-moon. Press edges together and crimp with a fork to seal.
- In a small bowl, whisk together beaten egg and milk. Brush over the tops of the hand pies.
- Mix melted butter, garlic powder, and parsley. Brush lightly over each hand pie.
- Arrange hand pies on the prepared baking sheet. Bake for 18-20 minutes, or until golden brown and bubbling. Rotate halfway if needed.
- Let pies cool on the pan for 5 minutes before serving.
Notes
Seal edges well with a fork to prevent leaks. Do not overfill pies. For extra crispiness, bake an additional 2-3 minutes. Sprinkle extra parmesan on top before baking for a cheesy crust. Use cold pastry for best results. Variations include gluten-free, vegetarian, or dairy-free adaptations.
Nutrition
- Serving Size: 1 hand pie
- Calories: 220
- Sugar: 2
- Sodium: 350
- Fat: 14
- Saturated Fat: 7
- Carbohydrates: 14
- Fiber: 1
- Protein: 12
Keywords: garlic chicken hand pies, cheese hand pies, comfort snack, easy chicken recipe, party appetizer, kid-friendly, portable lunch, savory pastry