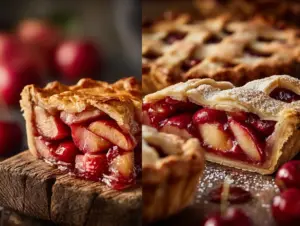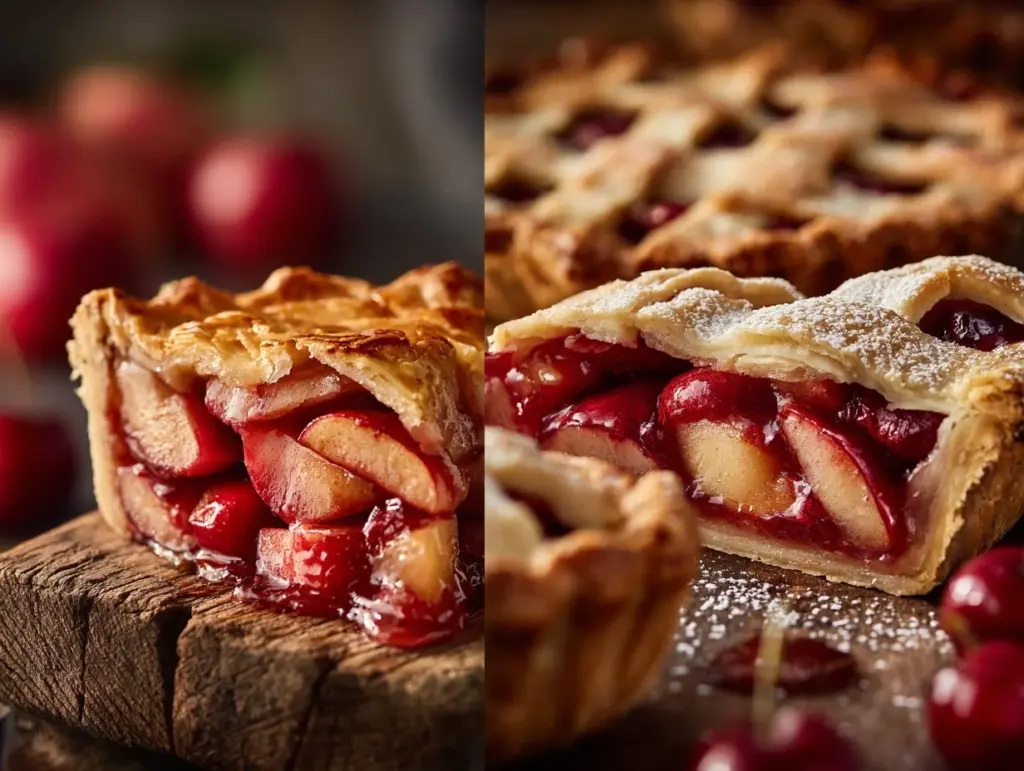
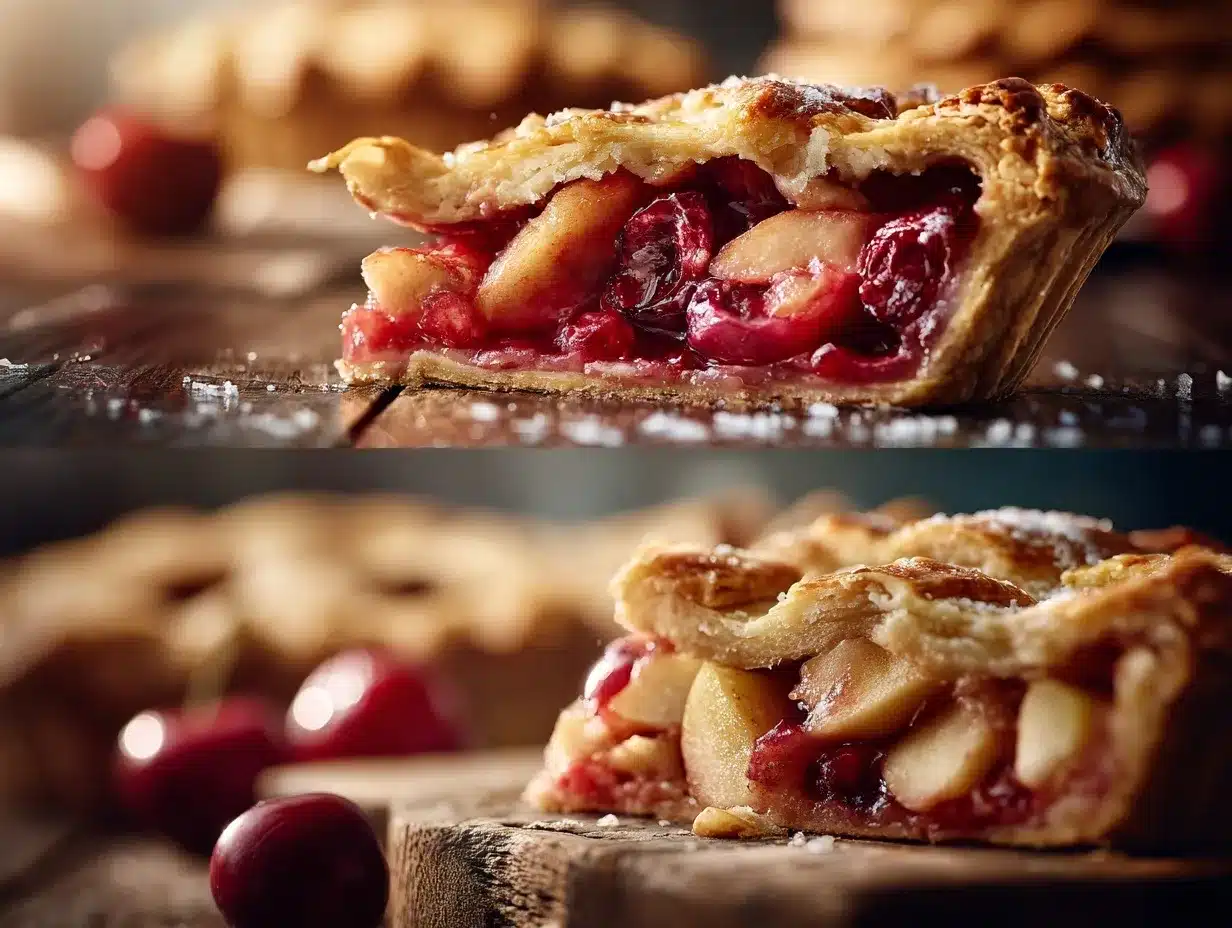
The first time I pulled my cherry apple pie out of the oven, the kitchen filled with this wild, sweet-tart aroma that made everyone wander in, noses first. Imagine the juiciest cherries and crisp apples bubbling together under a golden, flaky crust — it’s the kind of homemade dessert you dream about all day. You know, I grew up on classic apple pie, but one summer, I tossed in some leftover cherries from the farmer’s market. Let’s just say, that simple swap turned my usual pie into a cherry apple pie recipe that’s now a family legend.
What I love about this cherry apple pie combo is how it balances everything perfectly. The apples bring that familiar comfort, while cherries add a pop of color and tang that keeps you coming back for “just one more” slice. It’s also ridiculously easy — no fancy pie-making skills needed. If you’re a pie newbie, trust me, this recipe is totally forgiving, and you’ll feel like a pro when you pull it out of the oven, all bubbly and golden.
This cherry apple pie recipe is my go-to for potlucks, holidays, or when I want to treat myself on a lazy Sunday. After baking it more times than I can count (with plenty of tweaks over the years), I promise it’s foolproof and downright delicious. Whether you’re a diehard cherry fan, an apple pie traditionalist, or just hunting for the ultimate homemade dessert, you’re going to fall in love with this easy cherry apple pie combo. Grab your favorite pie dish and let’s make something unforgettable — because homemade pie just hits different, doesn’t it?
Why You’ll Love This Cherry Apple Pie Recipe
- Quick & Easy: This cherry apple pie comes together in under 30 minutes of prep — perfect for impromptu gatherings or when you want dessert without the wait.
- Simple Ingredients: No weird extras. Just apples, cherries, and a handful of pantry staples you probably already have.
- Perfect for Any Occasion: Works for cozy family dinners, summer BBQs, Thanksgiving, or as a show-stopping holiday dessert.
- Crowd-Pleaser: This combo always gets rave reviews — even from folks who say they don’t like fruit pie (true story from my own family!).
- Unbelievable Flavor: Tart cherries mingle with sweet-tart apples, all wrapped in a flaky, buttery crust. Every bite is bright, juicy, and comforting at the same time.
What sets this cherry apple pie recipe apart? After years of pie experiments (some amazing, some a little… soupy), I figured out a few secrets: toss the fruit with a touch of cornstarch for that perfect, jammy filling, and dot with butter right before baking. The result is glossy fruit, not a soggy crust. I also like to use a mix of sweet and tart apples with fresh or frozen cherries for a layer of flavors you just don’t get in a single-fruit pie.
This isn’t just another “fruit pie.” It’s that rare dessert that makes everyone at the table pause for a second, fork in mid-air, just to savor what’s happening. It’s cozy and nostalgic, but with a twist. The best part? No pie-making stress — just honest-to-goodness deliciousness that’ll have you looking for any excuse to make it again.
What Ingredients You Will Need
This cherry apple pie recipe keeps things straightforward, yet every ingredient works together for a knockout dessert. You won’t need to hunt down anything fancy, and most substitutions work just fine. Here’s what you’ll need:
- For the Filling:
- 3 cups fresh or frozen cherries, pitted (preferably tart cherries; frozen work great in winter)
- 3 medium apples (about 1.5 lbs/700g), peeled, cored, and sliced (I love using a mix of Granny Smith for tartness and Honeycrisp for sweetness)
- 3/4 cup (150g) granulated sugar (adjust up or down for sweetness preference or depending on your fruit)
- 2 tbsp cornstarch (for a thick, jammy filling that won’t run everywhere)
- 1 tbsp lemon juice (brightens the fruit flavor and keeps apples from browning)
- 1 tsp ground cinnamon (classic apple pie spice, but feel free to add a pinch of nutmeg or cardamom for extra warmth)
- 1/4 tsp salt (balances sweetness and brings out fruit flavors)
- 2 tbsp unsalted butter, diced (for dotting over the filling before adding the top crust)
- For the Pie Crust:
- 2 store-bought pie crusts (one for the bottom, one for the top; I’m all for shortcuts when life gets busy)
- Or use homemade: 2 1/2 cups (310g) all-purpose flour, 1 cup (225g) unsalted butter (cold, cubed), 1 tsp salt, 1 tbsp sugar, 6-8 tbsp (90-120ml) ice water (see prep notes for homemade option)
- For the Egg Wash:
- 1 egg, beaten with 1 tbsp milk or water (for a golden, shiny crust)
- Optional Topping:
- 1-2 tbsp coarse sugar (like turbinado or demerara, for a sparkly finish)
Ingredient Tips: If cherries aren’t in season, frozen work just as well — just thaw and drain first. No cornstarch? Substitute with 3 tbsp flour. For a gluten-free version, swap the crust for a gluten-free pie shell and use gluten-free flour in homemade dough. Vegan? Use a dairy-free crust and skip the egg wash (brush with plant milk instead). See variations below for more ideas!
Equipment Needed
- 9-inch (23cm) pie dish: Glass, ceramic, or metal — I usually grab my trusty Pyrex, but any pie pan will do.
- Mixing bowls: One large for the fruit filling, one small for egg wash.
- Peeler and apple corer: Makes prepping apples quick. A sharp paring knife works if you don’t have a corer.
- Rolling pin: Only needed if using homemade pie dough. In a pinch, a wine bottle works (been there!).
- Baking sheet: Set under the pie as it bakes to catch any juicy drips — saves your oven from a sticky mess.
- Parchment paper: Optional, but handy for lining the baking sheet.
- Pastry brush: For brushing egg wash onto the crust. If you don’t have one, just use the back of a spoon.
- Sharp knife or kitchen shears: For venting the top crust (and for those cute little leaf cutouts, if you’re feeling fancy).
Honestly, you don’t need a lot of specialty gear. My first cherry apple pie was made with a thrift store pie pan and a rolling pin I borrowed from my neighbor! If you’re using metal, just watch the bake time — sometimes pies brown a little faster in metal pans. Wash everything in warm, soapy water right after use, especially if you’re working with sticky fruit filling.
Preparation Method
- Prep the fruit: Peel, core, and slice 3 apples into thin wedges (about 1/4 inch/0.5cm thick). If using fresh cherries, pit them. For frozen cherries, thaw and drain well. (This helps avoid a watery filling.) This takes about 10-15 minutes.
- Mix the filling: In a large bowl, combine apples, cherries, 3/4 cup (150g) sugar, 2 tbsp cornstarch, 1 tbsp lemon juice, 1 tsp cinnamon, and 1/4 tsp salt. Toss gently until the fruit is evenly coated. Let it sit for 5 minutes — you’ll see a little juice form, and that’s perfect.
- Prepare the crust: If using store-bought pie dough, let it soften for 5 minutes before unrolling. For homemade, mix 2 1/2 cups (310g) flour, 1 tsp salt, and 1 tbsp sugar. Cut in 1 cup (225g) cold butter until crumbly. Add 6-8 tbsp (90-120ml) ice water, one spoon at a time, until it comes together. Chill for 30 minutes, then roll out on a lightly floured surface.
- Assemble the pie: Preheat oven to 400°F (200°C). Fit one crust into your pie dish, pressing gently into the corners. Pour in the cherry apple filling (juices and all). Dot with 2 tbsp diced butter. (Don’t skip this — it makes the filling rich and glossy!)
- Add the top crust: Lay the second crust over the filling. Trim excess dough, leaving a 1/2-inch (1cm) overhang. Fold under and crimp the edges (use a fork or your fingers). Cut 4-6 small slits in the top for steam to escape. For a lattice, slice dough into strips and weave over the filling.
- Egg wash and sugar: Beat 1 egg with 1 tbsp milk or water. Brush all over the crust (for that bakery shine). Sprinkle with 1-2 tbsp coarse sugar if you like extra crunch.
- Bake: Place pie on a parchment-lined baking sheet. Bake at 400°F (200°C) for 20 minutes, then reduce heat to 350°F (175°C) and bake another 35-40 minutes, until the crust is deep golden and filling is bubbling. (If the edges brown too fast, cover them loosely with foil.)
- Cool: Let the pie cool on a rack for at least 2 hours. It sets up as it cools — cutting too soon means runny filling. I know, it’s hard to wait!
Troubleshooting: If your filling bubbles over, it’s normal (just means it’s juicy and good). Runny pies usually need longer cooling. If your crust is pale, give it a few extra minutes in the oven. Want extra shine? Brush once more with egg wash in the last 10 minutes.
Personal tip: I always use a baking sheet under my pies. Learned that one the hard way — cleaning burnt sugar from the bottom of an oven is no fun!
Cooking Tips & Techniques
- Don’t skip the cornstarch: Without it, your cherry apple pie filling can get soupy (been there, not fun at a potluck!). It helps thicken all those lovely juices.
- Keep your butter and dough cold: Cold fat makes for the flakiest crust. If your dough gets soft, pop it in the fridge for 10 minutes before rolling.
- Let the fruit sit with sugar and lemon juice: This step releases some juices and gives you a more flavorful, jammy filling.
- Vent the top crust well: Those slits are more than decoration — they let steam escape so your pie doesn’t get soggy.
- Lattice or solid top? Both work! Lattice lets more steam escape, so your filling thickens faster. Solid tops need more vents.
- Protect the edges: I use strips of foil or a silicone pie shield for the first 20-30 minutes, then remove so the whole crust browns evenly.
- Cool completely: This is the hardest part. If you slice too soon, the filling will spill everywhere. Give it at least 2 hours — just enough time for the scent to drive everyone wild!
My first cherry apple pie had a soggy bottom (yikes). Ever since, I always preheat my oven fully and start at a higher temp — it helps the crust set before the filling releases all those juices. And don’t worry if your lattice isn’t perfect — rustic pies are always the prettiest, if you ask me!
Variations & Adaptations
- Gluten-Free: Use a gluten-free pie crust (store-bought or homemade with almond or oat flour) and check that your cornstarch is certified gluten-free.
- Vegan: Choose a vegan pie dough (lots of great brands out there, or use coconut oil instead of butter in homemade) and skip the egg wash — a brush of almond milk works well.
- Seasonal Fruit Swaps: In summer, swap half the cherries for blueberries or blackberries. In fall, add a handful of cranberries for a tangy kick. Got peaches? Mix in a cup with the apples for a fun twist.
- Flavor Boosts: Add a splash of vanilla extract or almond extract to the fruit filling. A tablespoon of bourbon or spiced rum takes it to another level (for adults, of course!).
- Nutty Crunch: Stir in a half cup of chopped pecans or walnuts to the filling, or sprinkle them on top before baking.
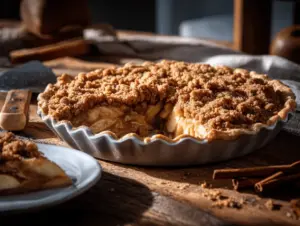
I’ve played with adding a crumble topping (oats, brown sugar, butter) for a cross between pie and crisp — so good! If you have allergy concerns, skip the nuts and check all labels for hidden gluten or dairy. The best part? This cherry apple pie recipe is flexible, so don’t be afraid to make it your own.
Serving & Storage Suggestions
This cherry apple pie is best served slightly warm or at room temperature. A scoop of vanilla ice cream or a dollop of whipped cream takes it to a whole new level — honestly, it’s a must if you ask me. For a fancier presentation, sprinkle with extra coarse sugar or drizzle with caramel sauce.
If you’re serving a crowd, cut into 8 generous slices. Pair with a cup of hot coffee, black tea, or, for a special treat, a glass of chilled dessert wine. It makes a show-stopping centerpiece for any dessert table or picnic spread.
To store, cover leftovers tightly with foil or plastic wrap and keep in the fridge for up to 4 days. For longer storage, wrap slices individually and freeze for up to 2 months. Reheat in a 300°F (150°C) oven for 10-15 minutes to crisp the crust and warm the filling — the flavors get even deeper after a day or two, which makes this pie a great make-ahead option.
Nutritional Information & Benefits
One slice of cherry apple pie (1/8 of the pie) contains roughly 320 calories, 5g protein, 11g fat, 55g carbs, and 3g fiber. Apples and cherries both pack a punch of antioxidants and vitamin C, and using fresh fruit means you get less added sugar than most bakery pies. If you want to lighten things up, use less sugar or opt for a whole-wheat or nut-based crust.
This recipe is vegetarian and can be easily adapted for gluten-free and vegan diets (see above). It contains wheat (in the crust) and eggs (in the wash), so keep that in mind for allergies. Personally, I love that every bite delivers real fruit and a touch of nostalgia — it’s dessert, but with some wholesome goodness, too.
Conclusion
So, why is this cherry apple pie recipe worth making again and again? It’s everything you want in a homemade dessert — easy, reliable, bursting with flavor, and always a hit. You can tweak it, make it suit your tastes or your pantry, and it never disappoints. For me, it’s the pie I crave on cozy nights and the one everyone requests at family gatherings.
If you try it, don’t be afraid to play with the ingredients or add your own twist. Trust me — homemade pie is about comfort and joy, not perfection. I hope this recipe brings a little extra happiness to your table, just like it does to mine. If you give it a whirl, let me know how it turns out in the comments, share your photos, or tell me about your favorite add-ins!
Here’s to more homemade desserts, full kitchens, and good memories — happy baking!
Frequently Asked Questions
Can I use canned cherry pie filling instead of fresh or frozen cherries?
You can, but I recommend using fresh or frozen cherries for the best flavor and texture. If you use canned filling, reduce the added sugar and cornstarch since it’s already sweetened and thickened.
What are the best apples for cherry apple pie?
I love a mix of Granny Smith (for tartness) and Honeycrisp or Fuji (for sweetness). You can use whatever apples you have on hand, but firmer, tart apples hold up best during baking.
How do I keep my pie crust from getting soggy?
Start baking at a higher temperature (400°F/200°C) to help set the crust, and use cornstarch or flour to thicken the filling. Don’t skip venting the top crust, and always cool the pie completely before slicing.
Can I make this cherry apple pie ahead of time?
Absolutely! Bake it a day ahead and keep it covered at room temperature or in the fridge. The flavors develop and the filling sets up even better overnight.
How do I freeze cherry apple pie?
Let the baked pie cool completely, then wrap slices or the whole pie tightly in foil and freeze for up to 2 months. Thaw overnight in the fridge and reheat in the oven before serving for best results.
PrintCherry Apple Pie

This easy homemade cherry apple pie combines juicy cherries and crisp apples under a golden, flaky crust for a sweet-tart dessert that’s perfect for any occasion. With simple ingredients and foolproof instructions, it’s a crowd-pleasing treat you’ll want to make again and again.
- Prep Time: 25 minutes
- Cook Time: 55-60 minutes
- Total Time: 1 hour 25 minutes
- Yield: 8 servings 1x
- Category: Dessert
- Cuisine: American
Ingredients
- 3 cups fresh or frozen cherries, pitted (preferably tart cherries; thaw and drain if frozen)
- 3 medium apples (about 1.5 lbs), peeled, cored, and sliced (mix of Granny Smith and Honeycrisp recommended)
- 3/4 cup granulated sugar
- 2 tbsp cornstarch
- 1 tbsp lemon juice
- 1 tsp ground cinnamon
- 1/4 tsp salt
- 2 tbsp unsalted butter, diced
- 2 store-bought pie crusts (or homemade: 2 1/2 cups all-purpose flour, 1 cup unsalted butter cold and cubed, 1 tsp salt, 1 tbsp sugar, 6–8 tbsp ice water)
- 1 egg, beaten with 1 tbsp milk or water (for egg wash)
- 1–2 tbsp coarse sugar (optional, for topping)
Instructions
- Peel, core, and slice the apples into thin wedges (about 1/4 inch thick). Pit fresh cherries or thaw and drain frozen cherries.
- In a large bowl, combine apples, cherries, sugar, cornstarch, lemon juice, cinnamon, and salt. Toss gently until evenly coated. Let sit for 5 minutes.
- If using store-bought pie dough, let it soften for 5 minutes before unrolling. For homemade crust, mix flour, salt, and sugar. Cut in cold butter until crumbly, then add ice water one tablespoon at a time until dough comes together. Chill for 30 minutes, then roll out.
- Preheat oven to 400°F (200°C). Fit one crust into a 9-inch pie dish, pressing gently into corners.
- Pour the cherry apple filling (with juices) into the crust. Dot with diced butter.
- Lay the second crust over the filling. Trim excess dough, leaving a 1/2-inch overhang. Fold under and crimp edges. Cut 4-6 small slits in the top for steam, or create a lattice if desired.
- Brush the top crust with egg wash and sprinkle with coarse sugar if using.
- Place pie on a parchment-lined baking sheet. Bake at 400°F for 20 minutes, then reduce heat to 350°F (175°C) and bake another 35-40 minutes, until crust is golden and filling is bubbling. Cover edges with foil if browning too quickly.
- Cool pie on a rack for at least 2 hours before slicing to allow filling to set.
Notes
For best results, use a mix of tart and sweet apples. If using frozen cherries, thaw and drain well to avoid a watery filling. Protect pie edges with foil if browning too quickly. Let the pie cool completely before slicing for a set filling. For gluten-free or vegan adaptations, use appropriate crusts and skip the egg wash.
Nutrition
- Serving Size: 1 slice (1/8 of pie)
- Calories: 320
- Sugar: 28
- Sodium: 260
- Fat: 11
- Saturated Fat: 7
- Carbohydrates: 55
- Fiber: 3
- Protein: 5
Keywords: cherry apple pie, fruit pie, easy pie recipe, homemade dessert, summer pie, holiday dessert, apple cherry pie, potluck dessert