You know that magical moment when the first sip of an iced mocha hits your lips—cool, creamy, and just the right amount of chocolatey coffee goodness? That’s exactly what inspired this iced mocha coffee cream pie recipe. It’s a dessert that somehow manages to be both refreshing and deeply comforting, like a café treat in pie form. I first made this on a sweltering summer afternoon when my oven was basically off-limits, and honestly, I’ve never looked back. It’s become my go-to when friends pop over or when I just want to wow my family without breaking a sweat. The layered flavors of espresso, chocolate, and whipped cream are a total crowd-pleaser, and the fact that it’s a no-bake dessert? Absolute game changer.
I can’t tell you how many times I’ve tweaked and tested this iced mocha coffee cream pie recipe to get it just right—balancing the coffee so it’s bold but not bitter, making sure the crust is sturdy but still melts in your mouth, and whipping the filling until it’s light as air. This is the kind of dessert you’ll crave on those hot days when coffee ice cream just won’t cut it, or when you want something show-stopping for a dinner party but can’t deal with the oven. If you love iced mochas, chocolate, or coffee desserts in general, this pie will absolutely hit the spot. It’s perfect for busy families, summer gatherings, or honestly, anyone who’s ever wished their coffee break lasted just a little bit longer. Let’s get into all the reasons you’ll fall in love with this iced mocha coffee cream pie!
Why You’ll Love This Iced Mocha Coffee Cream Pie Recipe
- No-Bake Wonder: No oven, no problem—this pie comes together in your fridge, making it the ultimate summer dessert.
- Quick & Effortless: You can whip up the filling in under 20 minutes, then just let it chill. Perfect for last-minute cravings or surprise guests.
- Coffeehouse Flavor at Home: The combination of espresso and chocolate feels like your favorite iced mocha, only richer and creamier.
- Simple Ingredients: Most of what you need is probably already in your pantry or fridge—nothing fancy, just straightforward goodness.
- Perfect for Any Occasion: Potlucks, BBQs, brunches, or after-dinner treats—it shines everywhere. I’ve brought this to picnics and it’s always the first dessert gone.
- Crowd-Pleaser: Even the “I don’t like coffee” people in my life ask for seconds. The flavors are balanced and mellow, not too strong.
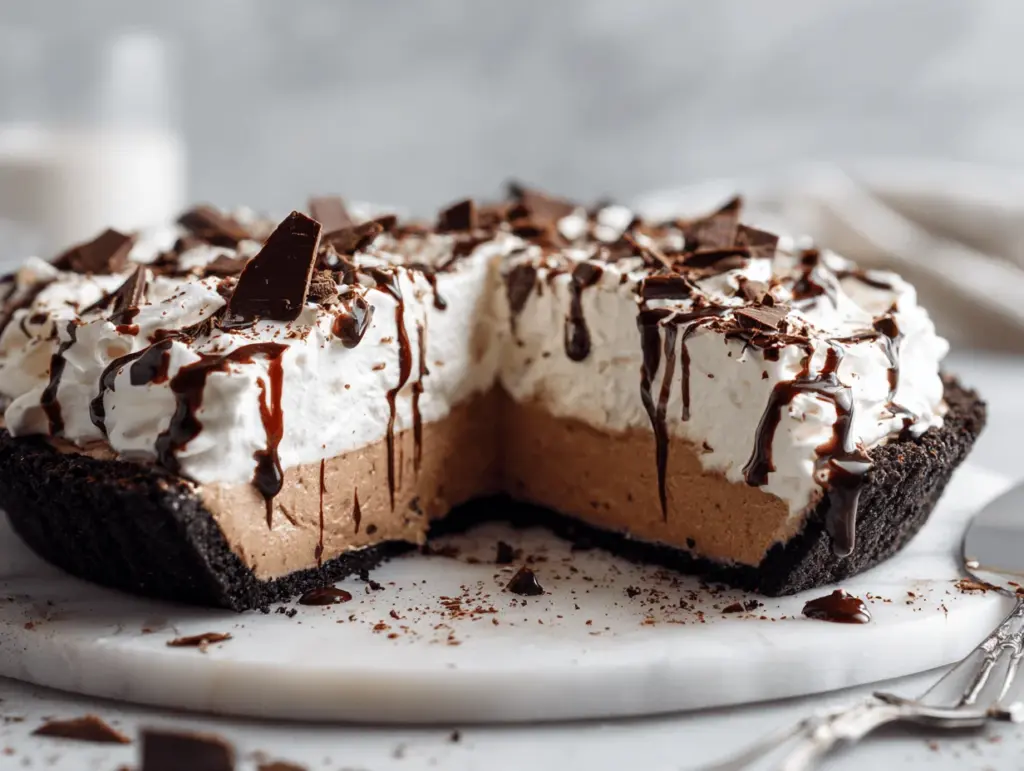
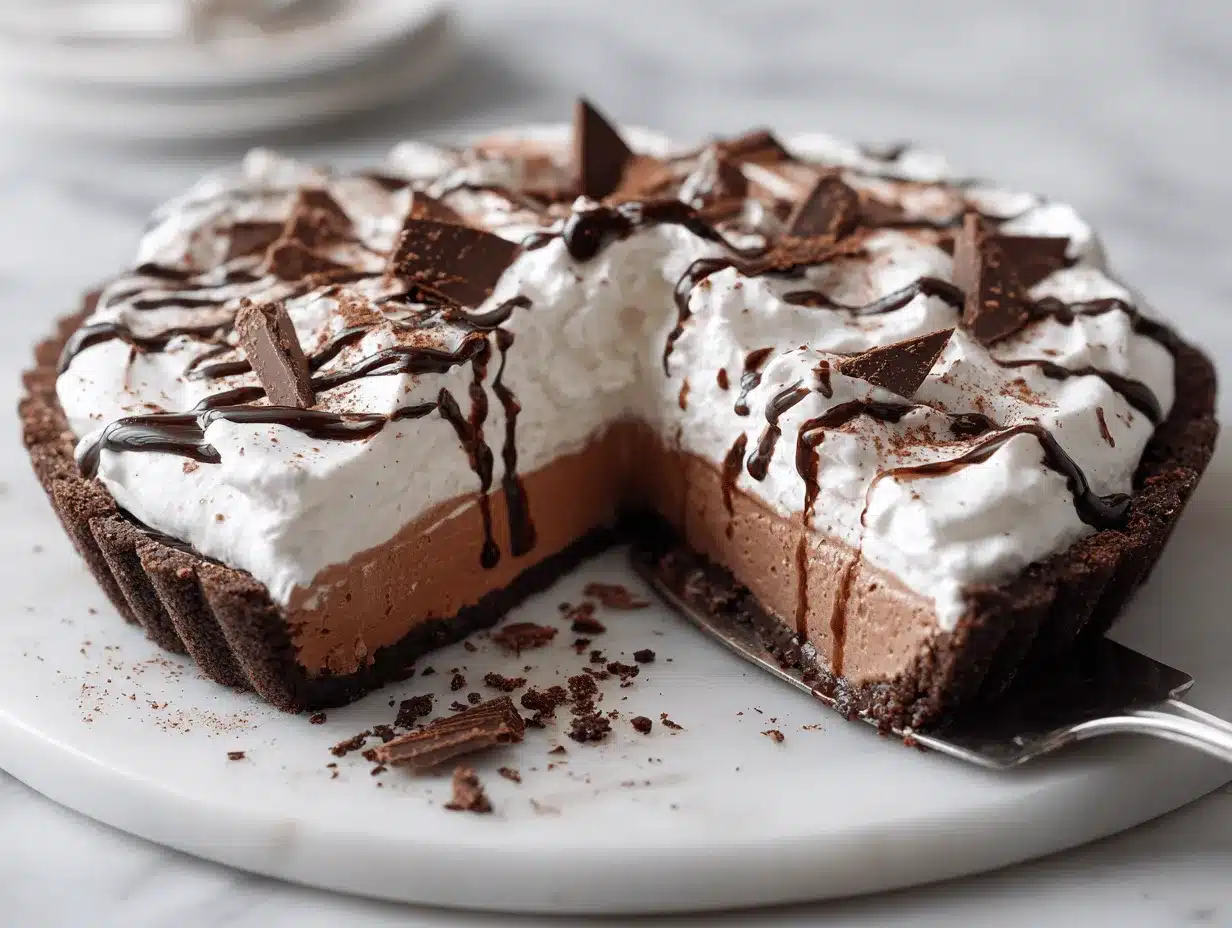
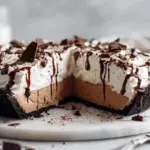
- Visually Stunning: With a drizzle of fudge sauce and a sprinkle of chocolate shavings, it looks as good as it tastes. Perfect for Pinterest, if you ask me!
What really sets this iced mocha coffee cream pie recipe apart is the texture—silky, airy, and just the right amount of rich. I blend the espresso powder directly into the whipped cream filling, so you get that coffee flavor in every bite. The chocolate cookie crust adds a perfect crunch, and a whipped cream topping lightens everything up. It’s honestly the kind of dessert that makes you pause after one bite, close your eyes, and just savor it. I’ve made a lot of no-bake pies, but this is the one my family requests again and again, and I think you’ll see why after just one slice.
What Ingredients You Will Need
This iced mocha coffee cream pie recipe is built on simple, accessible ingredients that come together for a surprisingly decadent treat. Here’s what you’ll need to get that perfect mix of creamy, chocolatey, and coffee-infused deliciousness:
-
For the Crust:
- Chocolate wafer cookies or chocolate graham crackers, finely crushed (about 2 cups / 200g) – I love using Nabisco Famous Wafers or Oreo thins, but honestly, any chocolate cookie works.
- Unsalted butter, melted (6 tablespoons / 85g) – This binds the crust and adds that buttery, melt-in-your-mouth feel.
- Pinch of salt – Just a tiny bit to balance the sweetness.
-
For the Mocha Cream Filling:
- Cream cheese, softened (8 ounces / 225g) – Full-fat gives the richest texture, but you can use light for a slightly healthier version.
- Powdered sugar (1 cup / 120g) – This blends smoothly into the filling. Sift it if it’s lumpy!
- Espresso powder or instant coffee granules (2 tablespoons / 10g) – I use Medaglia D’Oro because it’s strong but not bitter. Dissolve in 2 tablespoons (30ml) hot water for best flavor.
- Pure vanilla extract (1 teaspoon / 5ml) – Adds depth and rounds out the flavor.
- Heavy whipping cream (1 1/2 cups / 360ml), cold – Whips up light and fluffy for that mousse-like filling.
- Semi-sweet chocolate chips, melted and cooled (1/2 cup / 85g) – Ghirardelli or Nestlé chips both work great here.
-
For the Topping:
- Whipped cream (1 cup / 240ml), freshly whipped or store-bought – I use homemade for the best texture, but Reddi-Wip will do in a pinch.
- Chocolate shavings or curls (about 2 tablespoons / 10g) – Use a vegetable peeler on a chocolate bar for easy curls.
- Chocolate sauce or fudge drizzle (optional) – Totally optional, but it makes the pie look extra special.
Ingredient Tips & Substitutions:
- No espresso powder? Use strong instant coffee instead—just make sure it dissolves fully for a smooth filling.
- For a gluten-free version, swap in gluten-free chocolate cookies for the crust.
- If you want a dairy-free option, use vegan cream cheese and coconut cream (chilled and whipped) in place of dairy, and a plant-based butter for the crust.
- You can add a splash of coffee liqueur (like Kahlua) to the filling for an adult twist—just 1-2 tablespoons is enough.
- Swap semi-sweet chocolate chips for dark or milk chocolate, depending on your preference. I’ve even used mini chocolate chips for fun texture.
Equipment Needed
- 9-inch (23cm) pie plate or springform pan: Standard pie dish works, but a springform pan makes for easier slicing and dramatic presentation. I use a glass pie dish for pretty layering.
- Mixing bowls: You’ll want at least two—one for the crust and one for the filling. Stainless steel or glass is my go-to.
- Electric hand mixer or stand mixer: Whipping cream by hand is doable, but an electric mixer saves time and gives the fluffiest texture.
- Rubber spatula: Perfect for folding and scraping every last bit out of the bowl.
- Measuring cups and spoons: For accuracy! Baking (even no-bake) is a bit of a science.
- Microwave-safe bowl: For melting chocolate chips. If you don’t have a microwave, a double boiler works too.
- Plastic wrap or aluminum foil: For covering the pie as it chills.
If you’re short on equipment, you can crush cookies in a zip-top bag with a rolling pin (great stress relief, honestly). No electric mixer? A sturdy whisk and some elbow grease will do—just be patient with the whipping cream. I’ve used disposable pie pans for bringing this to potlucks, and they hold up fine. A springform pan makes for a showy reveal, but isn’t required. Just avoid flimsy pans that might buckle under the weight of the filling.
How to Make Iced Mocha Coffee Cream Pie
-
Prepare the Crust (10 minutes):
In a medium bowl, combine 2 cups (200g) finely crushed chocolate wafer cookies with 6 tablespoons (85g) melted butter and a pinch of salt. Stir until the mixture resembles wet sand. Press firmly and evenly into the bottom and up the sides of a 9-inch (23cm) pie plate or springform pan. Use the flat bottom of a measuring cup for a smooth, compact crust.
Tip: If the crust feels too dry, add an extra tablespoon of melted butter. If it’s too wet, sprinkle in another spoonful of cookie crumbs.
Chill in the freezer for at least 15 minutes while you make the filling. -
Melt the Chocolate (5 minutes):
Place 1/2 cup (85g) semi-sweet chocolate chips in a microwave-safe bowl. Microwave in 20-second bursts, stirring each time, until melted and smooth. Set aside to cool to room temperature. (If you add it hot, it might seize up the filling.) -
Bloom the Espresso (2 minutes):
Dissolve 2 tablespoons (10g) espresso powder or instant coffee in 2 tablespoons (30ml) hot water. Let it cool slightly. This brings out the bold coffee flavor without bitterness. -
Make the Mocha Cream Filling (10 minutes):
In a large mixing bowl, beat 8 ounces (225g) softened cream cheese with 1 cup (120g) powdered sugar and 1 teaspoon (5ml) vanilla extract until smooth and creamy, about 2 minutes. Scrape down the sides as needed. Add the cooled espresso mixture and melted chocolate, beating until fully combined and fluffy.
Warning: Make sure the chocolate is cool, or it could harden when it hits the cold cream cheese. -
Whip the Cream (5 minutes):
In a separate bowl, whip 1 1/2 cups (360ml) cold heavy cream to stiff peaks. This means when you lift the beaters, the cream stands up firmly. If it looks grainy, you’ve gone too far—add a bit more cream and gently fold it in. -
Fold and Fill (5 minutes):
Gently fold the whipped cream into the mocha cream cheese mixture in three additions. Use a spatula and light hand—overmixing will deflate the filling. The mixture should be light, fluffy, and uniform in color. -
Assemble the Pie (2 minutes):
Spoon the filling into the chilled crust, smoothing the top with an offset spatula or the back of a spoon. Give the pan a gentle tap on the counter to settle the filling. -
Chill (at least 4 hours, preferably overnight):
Cover the pie with plastic wrap or foil and refrigerate for at least 4 hours (overnight is even better!). This allows the filling to set and flavors to blend.
Troubleshooting: If the filling doesn’t seem firm after chilling, pop it into the freezer for 30 minutes before serving. -
Top and Serve:
Just before serving, top with 1 cup (240ml) whipped cream, chocolate shavings, and a drizzle of chocolate sauce if desired. Use a hot, dry knife for clean slices—just run it under hot water and wipe between cuts.
Pro tip: I like to add a sprinkle of instant coffee powder on top for a little extra coffee kick.
Cooking Tips & Techniques
- Don’t Rely on “Room Temperature” Cream Cheese: If you forget to soften it, microwave in 10-second bursts—just don’t let it melt! Lumps in the filling are a bummer.
- Blooming Espresso Powder: Always dissolve espresso powder in a bit of hot water rather than tossing it in dry. This keeps the filling silky instead of grainy.
- Cool the Chocolate: Adding hot chocolate to cream cheese can cause it to seize or separate. Let it cool until just warm to the touch (but still pourable).
- Whip the Cream Cold: Cold cream whips higher and faster. I even chill my mixing bowl and beaters for a few minutes before starting.
- Folding, Not Mixing: When adding whipped cream to the mocha mixture, gently fold it in. This keeps the filling light and airy—if you stir aggressively, you’ll lose volume.
- Troubleshooting “Soupy” Filling: If your filling seems too loose, it could be from overmixing or using low-fat cream cheese. Chill longer, or freeze for 20-30 minutes before slicing.
- Make Ahead: This pie is even better the next day. The flavors meld, and the texture firms up. Just hold off on adding whipped cream and toppings until right before serving.
- Personal Flubs: Once, I forgot to chill the crust and the filling seeped through—lesson learned! Always give that crust a chance to set before pouring in the filling.
Timing-wise, I love multitasking: while the crust chills, I prep the filling and toppings. If you’re new to no-bake pies, don’t stress—this iced mocha coffee cream pie recipe is forgiving! Just follow the steps, and you’ll have dessert bragging rights in no time.
Variations & Adaptations
- Gluten-Free Version: Use certified gluten-free chocolate cookies for the crust and double-check all other ingredients for hidden gluten. The rest of the recipe is naturally gluten-free!
- Dairy-Free or Vegan: Swap cream cheese for a vegan alternative (like Kite Hill or Tofutti), and use coconut cream (thick part only) in place of whipped cream. Use vegan butter for the crust. The result is still rich and creamy, just with a hint of coconut.
- Mocha Peanut Butter Pie: Add 1/4 cup (65g) creamy peanut butter to the filling for a nutty twist. If you’re a fan of peanut butter cups and mochas, this is a total flavor bomb!
- Seasonal Berry Mocha Pie: In summer, top the pie with fresh raspberries, strawberries, or blueberries before serving. The tartness is a perfect match with the mocha filling.
- Alcohol-Infused: For adults, add a splash of coffee liqueur (Kahlua or Baileys) to the filling. Just don’t go overboard, or the filling might not set as firmly.
- Nut Allergy Adaptation: If someone is allergic to nuts, be sure to use nut-free cookies in the crust and check all chocolate products for cross-contamination.
One of my favorite personal tweaks? Swapping half the chocolate chips for dark chocolate and sprinkling a little flaky sea salt on top. The salty-sweet combo is ridiculously addictive. Don’t be afraid to make this iced mocha coffee cream pie recipe your own—every family has their favorite twist!
Serving & Storage Suggestions
This iced mocha coffee cream pie is best served cold—straight from the fridge is ideal. I love topping it right before serving so the whipped cream stays fresh and fluffy. For a little drama, drizzle chocolate sauce in a zigzag, then sprinkle with chocolate curls (they look gorgeous in photos for Pinterest, too).
Pair with a cup of hot espresso, iced coffee, or even a glass of cold milk for a dessert that feels like a café treat. It’s also fantastic alongside fresh berries or a scoop of vanilla ice cream if you’re feeling extra indulgent.
Store leftovers covered in the fridge for up to 4 days. The crust stays crisp, and the filling holds its shape beautifully. For longer storage, freeze the pie (without whipped cream topping) for up to 1 month. Thaw overnight in the fridge before serving, then add toppings. To re-slice neatly, run a sharp knife under hot water and wipe dry between cuts. Flavor-wise, this pie gets even better after a day or two as the coffee and chocolate mingle. If you’re prepping for a party, it’s a dream make-ahead dessert!
Nutritional Information & Benefits
Each slice of this iced mocha coffee cream pie (based on 12 servings) has about 350 calories, 5g protein, 28g carbohydrates, and 24g fat. Not exactly diet food, but totally worth it for a special treat!
The real perks? Coffee provides a subtle energy boost (hello, caffeine!), while dark chocolate chips offer antioxidants. You can lighten things up by using light cream cheese or swapping in coconut cream for a dairy-free spin. It’s naturally egg-free and can be made gluten-free with a simple crust swap.
Allergens to watch: dairy, gluten (unless using gluten-free cookies), and possibly soy (check your chocolate chips). As someone focused on balanced eating, I love that you can customize this pie to fit different needs. It’s decadent, yes, but also flexible enough to make a little lighter or allergy-friendly if needed.
Conclusion
This iced mocha coffee cream pie recipe is a total winner—cool, creamy, and bursting with coffeehouse flavor, all without turning on the oven. Whether you’re a diehard coffee fan or just looking for the ultimate easy no-bake dessert, this pie checks every box: fast, fuss-free, and always impressive.
Don’t be afraid to tweak it—add your favorite toppings, make it gluten-free, or try a splash of liqueur for a grown-up twist. I keep coming back to this recipe because it’s just so reliable and endlessly adaptable. Plus, the look on people’s faces when they try it? Priceless.
If you make this iced mocha coffee cream pie, I’d love to hear what you think! Drop a comment, share a photo, or let me know how you made it your own. Here’s to more sweet moments and chilled-out desserts—you’ve got this!
Frequently Asked Questions
How strong is the coffee flavor in this iced mocha coffee cream pie?
It’s present but not overpowering. The espresso gives a gentle coffee kick, balanced by chocolate and cream. You can add more or less espresso powder to suit your taste.
Can I make this pie ahead of time?
Absolutely! This pie actually gets better after chilling overnight, so it’s perfect for preparing a day in advance. Just add the whipped cream topping right before serving.
What’s the best way to slice the pie neatly?
Use a sharp knife dipped in hot water and wiped dry between each slice. This helps cut cleanly through the creamy filling and cookie crust.
Is there a kid-friendly version of this iced mocha coffee cream pie?
Yes! Use decaf espresso powder or instant coffee, or reduce the amount for a milder flavor. Kids love the chocolatey filling and crunchy crust.
Can I freeze leftovers?
Yes, you can freeze the pie (without whipped cream topping) for up to a month. Thaw in the fridge overnight before serving, then add fresh whipped cream and toppings.
Pin This Recipe!

Iced Mocha Coffee Cream Pie
This easy no-bake iced mocha coffee cream pie combines a chocolate cookie crust, a silky espresso-infused cream cheese filling, and a fluffy whipped cream topping. It’s a refreshing, crowd-pleasing dessert that delivers all the flavors of your favorite iced mocha in a cool, creamy pie—perfect for summer or any time you want a fuss-free treat.
- Prep Time: 20 minutes
- Cook Time: 0 minutes
- Total Time: 4 hours 20 minutes
- Yield: 12 servings 1x
- Category: Dessert
- Cuisine: American
Ingredients
- 2 cups (about 200g) chocolate wafer cookies or chocolate graham crackers, finely crushed
- 6 tablespoons (85g) unsalted butter, melted
- Pinch of salt
- 8 ounces (225g) cream cheese, softened
- 1 cup (120g) powdered sugar
- 2 tablespoons (10g) espresso powder or instant coffee granules, dissolved in 2 tablespoons (30ml) hot water
- 1 teaspoon (5ml) pure vanilla extract
- 1 1/2 cups (360ml) heavy whipping cream, cold
- 1/2 cup (85g) semi-sweet chocolate chips, melted and cooled
- 1 cup (240ml) whipped cream, freshly whipped or store-bought
- 2 tablespoons (10g) chocolate shavings or curls
- Chocolate sauce or fudge drizzle (optional)
Instructions
- Prepare the crust: In a medium bowl, combine crushed chocolate cookies, melted butter, and a pinch of salt. Stir until the mixture resembles wet sand. Press firmly and evenly into the bottom and up the sides of a 9-inch pie plate or springform pan. Chill in the freezer for at least 15 minutes.
- Melt the chocolate: Place chocolate chips in a microwave-safe bowl. Microwave in 20-second bursts, stirring each time, until melted and smooth. Set aside to cool to room temperature.
- Bloom the espresso: Dissolve espresso powder or instant coffee in hot water. Let cool slightly.
- Make the mocha cream filling: In a large mixing bowl, beat softened cream cheese with powdered sugar and vanilla extract until smooth and creamy, about 2 minutes. Add the cooled espresso mixture and melted chocolate, beating until fully combined and fluffy.
- Whip the cream: In a separate bowl, whip cold heavy cream to stiff peaks.
- Fold and fill: Gently fold the whipped cream into the mocha cream cheese mixture in three additions until light, fluffy, and uniform in color.
- Assemble the pie: Spoon the filling into the chilled crust, smoothing the top. Tap the pan gently to settle the filling.
- Chill: Cover the pie and refrigerate for at least 4 hours, preferably overnight, to set.
- Top and serve: Just before serving, top with whipped cream, chocolate shavings, and a drizzle of chocolate sauce if desired. Slice with a hot, dry knife for clean cuts.
Notes
For a gluten-free version, use gluten-free chocolate cookies. For a dairy-free or vegan pie, substitute vegan cream cheese, coconut cream, and plant-based butter. Chill the crust thoroughly before adding the filling. The pie is best made ahead and topped just before serving. For clean slices, use a hot, dry knife. You can add a splash of coffee liqueur for an adult twist.
Nutrition
- Serving Size: 1 slice (1/12 of pie)
- Calories: 350
- Sugar: 18
- Sodium: 180
- Fat: 24
- Saturated Fat: 15
- Carbohydrates: 28
- Fiber: 2
- Protein: 5
Keywords: iced mocha pie, coffee cream pie, no-bake dessert, chocolate coffee pie, summer dessert, espresso pie, easy pie recipe, mocha dessert, cream cheese pie, chocolate cookie crust