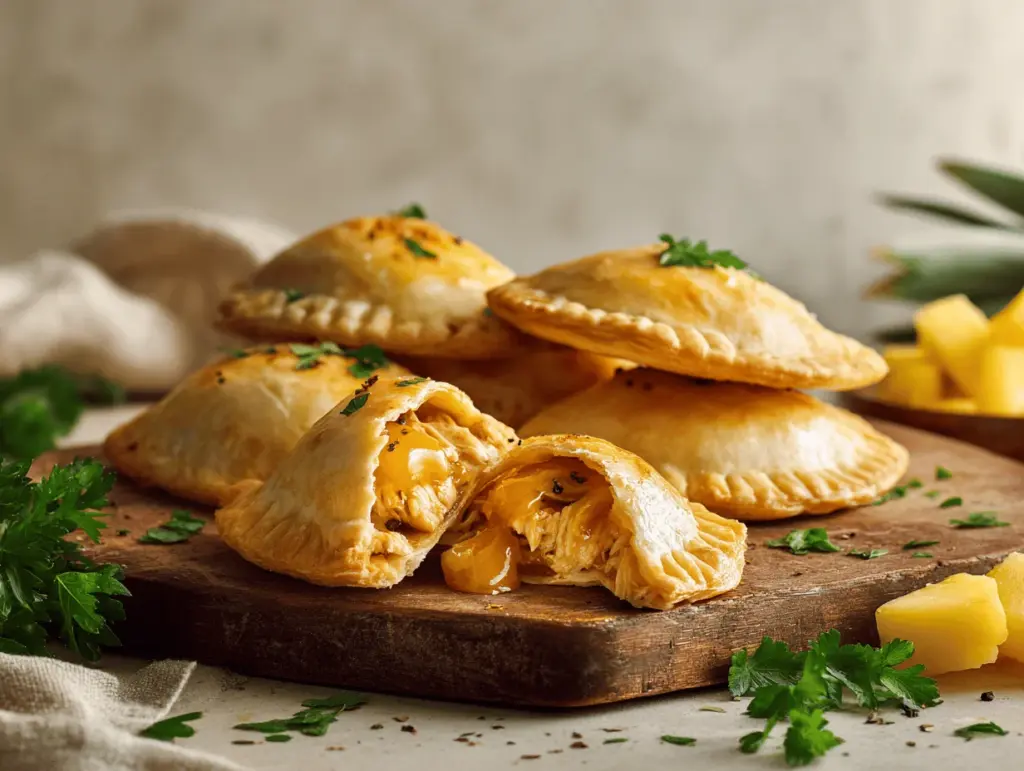
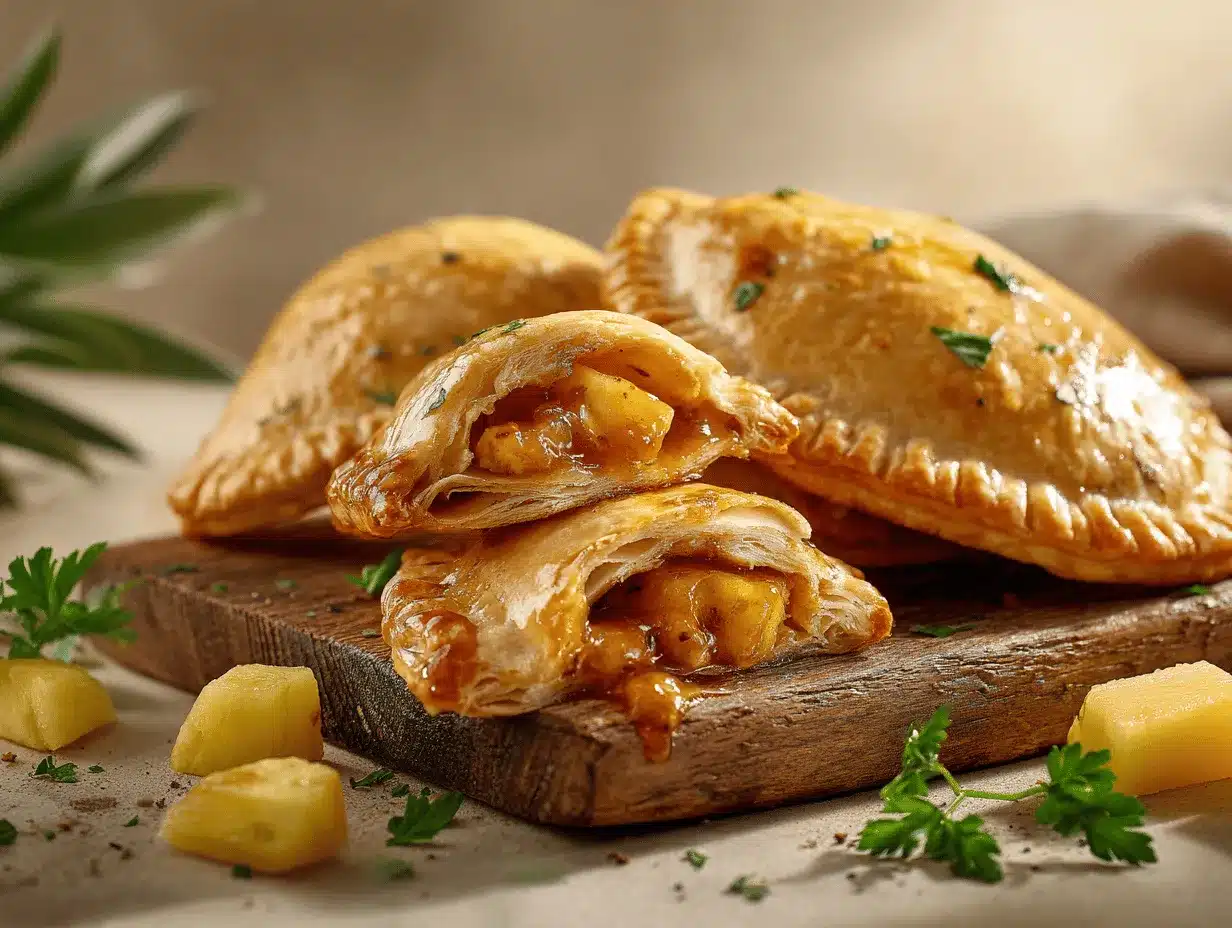
The first time I made sweet Hawaiian chicken hand pies, the kitchen was bursting with the scent of golden pastry and sweet pineapple. Honestly, I couldn’t wait for them to cool before sneaking a bite. The flaky crust gave way to a juicy filling that tasted like sunshine and comfort at the same time. If you’re on the hunt for a party snack that’s as easy to grab as it is to love, you’re in for a treat. These hand pies bring together tender chicken, tangy pineapple, and a hint of savory cheese, all tucked into a buttery pastry shell.
I stumbled across the idea for these sweet Hawaiian chicken hand pies during a summer potluck. Someone brought a tray of savory-sweet chicken sliders, and I thought—why not wrap all those flavors into a portable pie? That’s exactly what I did, with a few tweaks for extra flavor and convenience. These hand pies have become my go-to recipe for family gatherings, lunchbox surprises, and even weeknight dinners. They’re a hit with kids, adults, and even my pickiest friend who usually skips anything with pineapple.
Whether you’re prepping snacks for a game day, a picnic, or just a cozy movie night, these hand pies will fit right in. They freeze well, reheat beautifully, and—bonus—don’t make a mess. And hey, if you’re like me and appreciate a recipe that’s as fun to make as it is to eat, you’ll love assembling these. Grab your apron and let’s get baking—these sweet Hawaiian chicken hand pies are about to become your new obsession!
Why You’ll Love This Recipe
- Quick & Easy: Ready in under an hour, these hand pies are perfect for last-minute entertaining or weeknight cravings. No proofing dough or fancy techniques needed!
- Simple Ingredients: Everything you need is likely already in your pantry or fridge. From cooked chicken to canned pineapple, it’s all about convenience and flavor.
- Perfect for Every Occasion: These sweet Hawaiian chicken hand pies are a crowd-pleaser at potlucks, picnics, birthday parties, and even holiday brunches.
- Crowd-Pleaser: Kids love the sweet-and-savory combo, while adults can’t resist the flaky pastry and gooey cheese. Trust me, they disappear fast!
- Unbelievably Delicious: The balance of sweet pineapple, savory chicken, and melty cheese wrapped in a buttery crust is pure comfort food magic.
What sets this recipe apart is the little things: I blend the pineapple and chicken filling with a splash of Hawaiian BBQ sauce for that signature island flavor. The cheese melts into everything, holding it together with just the right stretch. I’ve tested these sweet Hawaiian chicken hand pies at everything from backyard BBQs to quiet weekends at home, and they’ve never disappointed. The filling stays juicy, the crust bakes up golden every time, and the flavor is downright addictive. It’s not just another hand pie—it’s the hand pie I turn to when I want something special without any fuss.
In my kitchen, these hand pies are a celebration of comfort and ease. They’re the kind of snack that makes you close your eyes and smile after the first bite. They’re easy enough for a weeknight, but impressive enough to share with friends. And let’s face it—there’s something so satisfying about holding your meal in your hand, no utensils required!
What Ingredients You Will Need
This recipe uses simple, wholesome ingredients to deliver bold flavor and satisfying texture without the fuss. I love that most of these are pantry or fridge staples, which means I can whip up a batch of sweet Hawaiian chicken hand pies whenever the craving strikes. Here’s what you’ll need:
- For the Filling:
- 2 cups cooked chicken breast, shredded (rotisserie chicken works great for speed)
- 1 cup pineapple chunks, drained and chopped (fresh or canned—just pat dry for best texture)
- 1/2 cup red bell pepper, finely diced (adds color and crunch)
- 1/4 cup green onions, thinly sliced (for a mild onion bite)
- 1/2 cup shredded mozzarella or Monterey Jack cheese (for melty goodness)
- 1/4 cup Hawaiian BBQ sauce (I swear by King’s Hawaiian brand, but any sweet BBQ sauce works)
- 1 tablespoon soy sauce (for savory depth)
- 1/2 teaspoon garlic powder
- Salt and pepper, to taste
- For the Pastry:
- 2 sheets refrigerated pie crust (about 14 oz/400g total; thaw if frozen)
- 1 large egg, beaten (for egg wash—gives that gorgeous shine)
Ingredient Tips: If you want a gluten-free version, swap in your favorite GF pie crust. For dairy-free, use a vegan cheese you love (I’ve tried Daiya and it works well). Chicken thighs add more flavor if you prefer them over breast. In summer, swap the pineapple with diced mango for a fun twist. I always keep a can of pineapple in the pantry—just in case the mood strikes for these hand pies!
Substitutions: No Hawaiian BBQ sauce? Mix 2 tablespoons regular BBQ sauce with 1 tablespoon honey and a dash of pineapple juice. No mozzarella? Any mild, melty cheese will do. Don’t be afraid to improvise—this filling is super forgiving.
Equipment Needed
- Baking sheet – A standard half-sheet (18×13 inches/46x33cm) is perfect for fitting a dozen hand pies.
- Rolling pin – For rolling out the pie crust to the right thickness. If you don’t have one, a clean wine bottle works in a pinch (been there!).
- Mixing bowls – At least one medium bowl for the filling. Glass or stainless steel is easiest to clean.
- Pastry brush – For brushing on the egg wash. You can use your fingers or a spoon if you don’t have one.
- Knife or pizza cutter – To cut the pastry into circles or rectangles. I find a pizza cutter works fastest.
- Fork – For sealing the edges of the pies.
- Parchment paper – Keeps your baking sheet clean and helps prevent sticking.
- Cooling rack – Optional, but helps pies stay crisp as they cool.
I’ve made these with store-brand baking sheets and fancy nonstick ones—the results are the same. If you want an easy cleanup, line your pan with parchment. Pastry brushes are cheap, but in a pinch, even a paper towel dabbed in egg wash does the job. Just don’t forget to wash your rolling pin right away—the dough can get sticky if left too long!
Preparation Method
-
Preheat and Prep:
Preheat your oven to 400°F (200°C). Line a baking sheet with parchment paper for easy cleanup. -
Make the Filling:
In a medium bowl, combine 2 cups (about 300g) shredded cooked chicken, 1 cup (150g) pineapple chunks, 1/2 cup (70g) diced red bell pepper, 1/4 cup (15g) sliced green onions, and 1/2 cup (60g) shredded cheese. Add 1/4 cup (60ml) Hawaiian BBQ sauce, 1 tablespoon (15ml) soy sauce, 1/2 teaspoon garlic powder, and a pinch of salt and pepper. Mix until everything is evenly coated. The filling should be moist but not runny—if it’s watery, drain off a bit of juice. -
Roll Out the Pastry:
On a lightly floured surface, unroll your refrigerated pie crusts. With a rolling pin, gently roll each to about 1/8-inch (3mm) thick. If the dough cracks, let it warm slightly before rolling further. -
Cut the Dough:
Use a 4-5 inch (10-12cm) round cookie cutter or a glass to cut circles from the dough. Re-roll scraps once if needed. You should get 10-12 rounds total. For rectangles, cut 3×5 inch (8x13cm) pieces. -
Fill the Pies:
Place 2-3 tablespoons (about 30-45g) of filling in the center of each round. Don’t overfill—otherwise, sealing gets tricky. If using rectangles, fold them over into pockets. -
Seal the Edges:
Fold the dough over to create a half-moon. Press edges firmly, then seal with a fork. If the dough sticks, dip your fork in flour or water. Make 2-3 small slits on top with a knife for steam to escape. -
Egg Wash:
Beat 1 egg with 1 tablespoon water. Brush the tops of the pies with the egg wash for a glossy, golden finish. -
Bake:
Arrange pies on the prepared baking sheet, about 1 inch (2.5cm) apart. Bake for 18-22 minutes, or until golden brown and crisp. Rotate the pan halfway through for even browning. -
Cool and Serve:
Let the pies cool on the baking sheet for 5 minutes, then transfer to a wire rack. Serve warm or at room temperature. The filling will be hot—don’t burn your tongue!
Troubleshooting Tips: If your dough gets too sticky, chill it for 5 minutes. If the pies open during baking, press the edges again with a fork before baking. Sometimes filling leaks out—honestly, those caramelized bits are my favorite!
Cooking Tips & Techniques
- Don’t Overfill: As tempting as it is to pack in extra filling, too much will burst the pies during baking. Stick to 2-3 tablespoons per hand pie.
- Seal Edges Well: Press with a fork all around the edge—twice if you’re worried about leaks. Wet the edge with a little water if the dough feels dry.
- Chill the Assembled Pies: If your kitchen is warm, pop the filled pies in the fridge for 10 minutes before baking. This helps the crust stay flaky.
- Use Fresh or Canned Pineapple: Both work, but drain canned pineapple and pat dry. Extra moisture will sog out your pastry.
- Oven Hot Spot? Rotate your pan halfway through baking so all pies brown evenly. I learned this the hard way when my first batch came out pale on one side and too dark on the other.
I’ve made these sweet Hawaiian chicken hand pies more times than I can count. Once, I forgot the egg wash, and while they still tasted great, I missed that shiny, bakery-worthy finish. If you’re multitasking (which I always am), set a timer for 18 minutes, then peek every 2 minutes after. Pastry can go from golden to overdone quickly!
Finally, don’t skip the cooling step. The filling will be steaming hot, and a quick rest helps everything set. And if you want to get fancy, sprinkle a little sesame seed on top right before baking for extra crunch.
Variations & Adaptations
- Gluten-Free: Swap in a gluten-free pie crust or use gluten-free biscuit dough. I’ve tried both and they bake up nicely—just handle gently, as GF doughs can be fragile.
- Vegan Option: Replace chicken with shredded jackfruit or chickpeas, use vegan cheese, and choose an egg-free pastry. The sweet-and-savory combo still shines!
- Spicy Hawaiian: Add 1-2 tablespoons diced jalapeño or a pinch of red pepper flakes to the filling for a little kick. My husband loves this spicy twist.
- Breakfast Version: Swap chicken for scrambled eggs and cooked bacon. It’s a portable breakfast you’ll crave.
- Air Fryer Method: Brush pies with egg wash and air-fry at 375°F (190°C) for 10-12 minutes. They get extra crisp this way—just don’t crowd the basket!
For nut allergies, double-check your BBQ sauce and pie crust ingredients. I once made these with mango instead of pineapple when I ran out—surprisingly, it worked! Don’t be afraid to riff on the filling based on what you have at home. These hand pies are endlessly adaptable.
Serving & Storage Suggestions
Serve these sweet Hawaiian chicken hand pies warm or at room temperature, piled high on a platter for parties or tucked into lunchboxes. They pair perfectly with a crisp green salad, kettle chips, or a tangy pineapple slaw. For something special, offer a side of extra BBQ sauce or honey mustard for dipping.
To store, let the pies cool completely, then transfer to an airtight container. They keep well in the fridge for up to 3 days and reheat best in a 350°F (175°C) oven for about 10 minutes (they’ll crisp up again). For freezing, wrap individually in foil and freeze up to 2 months. Reheat from frozen at 350°F (175°C) for 20-25 minutes. The flavors deepen after a day, making leftovers even more delicious—if you have any left, that is!
Nutritional Information & Benefits
Each sweet Hawaiian chicken hand pie (based on a batch of 12) offers roughly 210 calories, 10g protein, 24g carbs, and 8g fat. The chicken adds lean protein, while pineapple delivers vitamin C and natural sweetness. Using reduced-fat cheese and whole wheat pastry can lower saturated fat and add fiber. These pies are nut-free (depending on your crust and sauce), and can be made gluten-free or dairy-free with simple swaps. From a wellness perspective, I love that they’re portion-controlled—easy to share, but also not too heavy for a snack. As always, check labels if allergies are a concern and adjust for your dietary needs.
Conclusion
These sweet Hawaiian chicken hand pies are the recipe I reach for when I want something easy, delicious, and totally shareable. Whether you’re serving a crowd or just craving a cozy snack, they bring sunny flavors and a touch of nostalgia to any table. The flaky crust, juicy filling, and hint of sweetness make every bite a little celebration.
Don’t be afraid to put your own spin on this recipe—try a new cheese, swap in your favorite BBQ sauce, or add a sprinkle of fresh herbs. I love these hand pies because they remind me that food doesn’t have to be complicated to be memorable. If you give them a try, let me know how they turn out—drop a comment, share a photo, or tell me your favorite variation. Happy baking, and here’s to making any occasion a little more delicious!
FAQs
Can I make these sweet Hawaiian chicken hand pies ahead of time?
Absolutely! Prepare and assemble the hand pies, then refrigerate them, covered, for up to 24 hours before baking. Or freeze unbaked pies for up to 2 months—just bake straight from frozen, adding about 5 minutes to the bake time.
What’s the best way to reheat leftover hand pies?
For the crispiest results, reheat in a 350°F (175°C) oven for 10-12 minutes. The microwave works in a pinch, but the crust won’t be as flaky.
Can I use puff pastry instead of pie crust?
Yes! Puff pastry gives an extra-light, buttery texture. Just keep an eye on the baking time—puff pastry cooks a bit faster, usually done in 15-18 minutes.
What other fillings work well in this recipe?
You can try cooked ham and pineapple, pulled pork with BBQ sauce, or even a vegetarian mix with black beans, corn, and diced sweet potato. The hand pie method is super flexible.
How do I prevent my hand pies from leaking?
Make sure not to overfill and seal the edges tightly with a fork. If your filling looks juicy, drain off extra liquid before assembling. Chilling the assembled pies before baking helps too!
Pin This Recipe!

Sweet Hawaiian Chicken Hand Pies

These easy homemade hand pies feature tender chicken, sweet pineapple, and melty cheese wrapped in a flaky, golden pastry. Perfect for parties, snacks, or lunchboxes, they’re a crowd-pleaser that’s quick to make and fun to eat.
- Prep Time: 20 minutes
- Cook Time: 20 minutes
- Total Time: 40 minutes
- Yield: 10-12 hand pies 1x
- Category: Snack
- Cuisine: Hawaiian-American
Ingredients
- 2 cups cooked chicken breast, shredded (rotisserie chicken works great)
- 1 cup pineapple chunks, drained and chopped (fresh or canned, patted dry)
- 1/2 cup red bell pepper, finely diced
- 1/4 cup green onions, thinly sliced
- 1/2 cup shredded mozzarella or Monterey Jack cheese
- 1/4 cup Hawaiian BBQ sauce
- 1 tablespoon soy sauce
- 1/2 teaspoon garlic powder
- Salt and pepper, to taste
- 2 sheets refrigerated pie crust (about 14 oz total; thaw if frozen)
- 1 large egg, beaten (for egg wash)
Instructions
- Preheat your oven to 400°F (200°C). Line a baking sheet with parchment paper.
- In a medium bowl, combine shredded chicken, pineapple chunks, diced red bell pepper, sliced green onions, shredded cheese, Hawaiian BBQ sauce, soy sauce, garlic powder, and salt and pepper. Mix until evenly coated. If the filling is watery, drain off excess juice.
- On a lightly floured surface, unroll the refrigerated pie crusts. Gently roll each to about 1/8-inch thick.
- Use a 4-5 inch round cookie cutter or glass to cut circles from the dough. Re-roll scraps once if needed to get 10-12 rounds.
- Place 2-3 tablespoons of filling in the center of each round. Don’t overfill.
- Fold the dough over to create a half-moon. Press edges firmly, then seal with a fork. Make 2-3 small slits on top for steam to escape.
- Beat the egg with 1 tablespoon water. Brush the tops of the pies with the egg wash.
- Arrange pies on the prepared baking sheet, about 1 inch apart. Bake for 18-22 minutes, or until golden brown and crisp. Rotate the pan halfway through baking.
- Let the pies cool on the baking sheet for 5 minutes, then transfer to a wire rack. Serve warm or at room temperature.
Notes
Don’t overfill the pies to prevent bursting. Seal edges well with a fork, and chill assembled pies for 10 minutes before baking if your kitchen is warm. Both fresh and canned pineapple work—just drain and pat dry. For a gluten-free version, use GF pie crust. For dairy-free, use vegan cheese. These pies freeze well and reheat best in the oven.
Nutrition
- Serving Size: 1 hand pie
- Calories: 210
- Sugar: 5
- Sodium: 390
- Fat: 8
- Saturated Fat: 3
- Carbohydrates: 24
- Fiber: 1
- Protein: 10
Keywords: Hawaiian chicken hand pies, party snack, easy hand pies, pineapple chicken pastry, savory hand pies, picnic food, lunchbox recipe, make-ahead snack